Scala dei Giganti
View looking up at staircase and palace facade, facing northeast from north end of courtyard
Arco Foscari
View looking up at triumphal arch, facing northwest from north end of courtyard
Cortile del Palazzo Ducale
View of courtyard, facing west from east-side second-story loggia
Cortile del Palazzo Ducale
View of courtyard, facing west from east-side second-story loggia of palace
Scala d'Oro
View looking up stairs, facing east
Scala d'Oro
Detail view of ceiling moldings and grotesques
Scala d'Oro
Detail view of ceiling moldings and grotesques
Scala d'Oro
Detail view of vaulting and coffers above stairs
Scala d'Oro
View looking down staircase, facing west towards courtyard
Scala d'Oro
View looking up staircase, facing west
Atrio Quadrato
View of ceiling
Atrio Quadrato
View of ceiling
Sala dell'Anticollegio
View of fireplace, facing west
Sala dell'Anticollegio
View of fireplace, facing west
Sebastiano Venier giving thanks to the Redeemer after the Battle of Lepanto
View of wall and ceiling paintings, facing north from center of room
Sala del Collegio
View of ceiling from center of room
Sala del Collegio
View of painting on south wall
Doge Nicolò da Ponte Invokes the Protection of the Virgin
View of paintings on eastern wall, facing east from south end of room
Sebastiano Venier giving thanks to the Redeemer after the Battle of Lepanto
View of wall and ceiling paintings, facing northeast from center of room
Sala del Collegio
View of fireplace on western wall
Dead Christ Adored by Doges Pietro Lando and Marcantonio Trevisan
View of tribune and paintings on north wall, facing north
Sala del Senato
View of ceiling, facing north from center of room
Sala del Senato
View of ceiling, facing north from center of room
Triumph of Venice
View of central ceiling panel
Triumph of Venice
View of central ceiling panel
Doge Pietro Loredan Praying to the Virgin
View of painting and zodiac clock near southern end of west wall, facing west
Dead Christ Adored by Doges Pietro Lando and Marcantonio Trevisan
View of seating area, facing north from center of room
Sala del Senato
View of paintings on ceiling and north wall, facing north from center of room
Sala del Senato
View of paintings on ceiling and north wall, facing north from south side of room
Doges Lorenzo and Girolamo Priuli Praying in Front of the Redeemer
View of painting on south wall, facing south from center of room
Adoration of the Magi
View of painting above tribune along west wall, facing west
Pope Alexander III Recieiving Doge Ziani
View of painting on north wall, facing north
Pope Alexander III Recieiving Doge Ziani
View of painting on north wall, facing north
Copy of Jupiter Hurling Thunderbolts at the Vices
View of central ceiling panel
Pope Clement VII and the Emperor Charles V
View of painting on south wall, facing south
Sala della Bussola
View of central ceiling panel
Sala della Bussola
View of painting on western wall
Palazzo Ducale
View of sculpture and weapons
Palazzo Ducale
View of room containing weapons
Palazzo Ducale
View of painting showing the genealogy of Filippo Foscarini
Doge Marcantio Memmo Before the Virgin
View of painting on western wall of corridor
Sala della Quarantia Civil Vecchia
View of the Quarantia Civil Vecchia, facing west
Paradise
Detail of remains of Guariento fresco, facing south
Paradise
View of remains of Guariento fresco, facing southeast
Il Paradiso
View of tribune and painting on east wall
Il Paradiso
View of tribune and painting on east wall
Sala del Maggior Consiglio
View of central ceiling panel
Sala del Maggior Consiglio
View of west side of hall from center
Sala del Maggior Consiglio
View of west side of hall from center
Sala del Maggior Consiglio
View of east side of hall from center
Sala del Maggior Consiglio
View of west side of hall
Battle of Salvore
View of paintings on western wall
Sala del Maggior Consiglio
View of hall from west end, facing east
Sala dello Scrutinio
View of the room, facing north
Sala dello Scrutinio
Looking up at Vicentino's Battle of Lepanto painting on eastern wall
Sala dello Scrutinio
View of Palma il Giovane's Last Judgement on southern wall
Sala del Maggior Consiglio
Looking up at south side of hall
Il Paradiso
View of hall from west end, facing southeast
Palazzo Ducale
View of prison
Palazzo Ducale
View of north side of bridge and east side of palace, facing west from Prigione Nuove
Palazzo Ducale
View of paintings on eastern part of south wall, facing south
Palazzo Ducale
View of paintings on western wall
Palazzo Ducale
View of central painting on south wall
Palazzo Ducale
View of eastern wall and entrance to Ponte dei Sospiri
Cortile del Palazzo Ducale
View of southwest corner of the courtyard
Cortile del Palazzo Ducale
View of southwest corner of the courtyard
Mars
View of east facade of Foscari porch, facing west from the top right of the Giants' staircase
Scala dei Giganti
View of east facade of Foscari porch, facing west from the top of the Giants' staircase
Colonna di San Tòdaro
View of the statue, facing northwest from the portico of the Senatori courtyard
Arco Foscari
View of upper facade of Foscari porch, facing southwest from Senatori courtyard
Piazza San Marco
Looking down the Alitalia mosaic advertisement
Piazza San Marco
View of the piazza, from the southwest corner
Piazza San Marco
View of the Campanile, part of the facade of the Basilica, part of the facade of the Palazzo Ducale, from the southwest corner
Piazzetta San Marco
View of the Piazzetta, facing southeast
Piazzetta San Marco
View of the Piazzetta, facing southeast
Piazza San Marco
View of the Piazza San Marco, facing west
Colonna di San Marco
Looking up at the Colonna del Leone di San Marco, from the Piazzetta facing southeast
Colonna di San Marco
Looking up at the Colonna del Leone di San Marco, from the Piazzetta facing southeast
Colonna di San Tòdaro
Looking up at the Colonna di San Todaro, from the Piazzetta facing southeast
Colonna di San Tòdaro
Looking up at the Colonna di San Todaro, from the Piazzetta facing southeast
Ponte dell'Accademia
View of the bridge from the Canal, facing southeast
Ponte dell'Accademia
View of the bridge from the Canal, facing southeast
Ponte dell'Accademia
View of the bridge from the Canal, facing southeast
Ponte dell'Accademia
View of the bridge from the Canal, facing southeast
Ponte dell'Accademia
View of the bridge from the Canal, facing southeast
Ponte di Rialto
View of the bridge from the Canal, facing northeast
Ponte di Rialto
View of the bridge from the Canal, facing northeast
Ponte di Rialto
View of the left side of the bridge from the Canal, facing northeast
Ponte di Rialto
View of the left side of the bridge from the Canal, facing northeast
Ponte di Rialto
View of the bridge from the Canal, facing north
Ponte di Rialto
View of the bridge from the Canal, facing north
Ponte di Rialto
View of the bridge steps, facing southeast
Ponte di Rialto
View of the bridge steps, facing southeast
Chiesa di San Felice, Venezia
View of side altar to the right of the apse, facing north from the left transept
Chiesa di San Felice, Venezia
View of the apse, facing north from the left transept
Chiesa di San Felice, Venezia
View of lateral entrance to the left of the apse, facing northwest from the left transept
Chiesa di San Felice, Venezia
View of crossing, facing northwest towards the main altar from the left aisle
Chiesa di San Felice, Venezia
View of crossing, facing west towards the main altar from the right aisle
Chiesa di San Felice, Venezia
View of lateral entrance to the right of the apse, facing west from the right aisle
Chiesa di San Felice, Venezia
View of entrance in the left transept, facing southwest from the right aisle
Chiesa di San Felice, Venezia
View of main entrance, facing southeast from the right aisle
Chiesa di San Felice, Venezia
View of right aisle, facing southeast from the right transept
Chiesa di San Felice, Venezia
View of nave and main entrance, facing south from the right aisle
Chiesa di San Felice, Venezia
View of nave and main entrance, facing south from the right aisle
Chiesa di San Felice, Venezia
View of crossing and apse from the nave, facing northwest
Chiesa di San Felice, Venezia
View of apse from the crossing, facing northwest
Chiesa di San Felice, Venezia
View of apse and main altar, facing northwest
Chiesa di San Felice, Venezia
View of apse and main altar, facing northwest
Chiesa di San Felice, Venezia
View of side altar to the right of the apse from the opposite side, facing northeast
Chiesa di San Felice, Venezia
View of organ in the right transept from the left side of the altar, facing northeast
Chiesa di San Felice, Venezia
View of left aisle, facing southeast from the left transept
Chiesa di San Felice, Venezia
View of the nave from the crossing, facing southeast
Chiesa di San Felice, Venezia
View of the organ in the right transept from the crossing, facing northeast
Chiesa di San Felice, Venezia
View of apse from the crossing, facing northwest
Chiesa di San Felice, Venezia
View of altar in the right aisle next to the transept, facing northeast
Chiesa di San Felice, Venezia
View of left aisle from the right one, facing southwest
Chiesa di San Felice, Venezia
Looking up towards the dome, the left transept and the apse, facing southwest
Chiesa di San Felice, Venezia
View of the interior from the left transept and the apse, facing southwest
Chiesa di San Felice, Venezia
View of the main facade, facing southwest
Chiesa di San Felice, Venezia
View of the main facade, facing southwest
Chiesa di San Felice, Venezia
View of the main facade, facing southwest
Chiesa di San Felice, Venezia
View of the main facade and the canal, facing southwest
Chiesa di San Felice, Venezia
View of the main facade and the canal, facing southwest
Chiesa di San Felice, Venezia
View of the main facade and the canal, facing southwest
Chiesa di San Felice, Venezia
View of the main facade and the canal, facing southwest
View of the canal in front of San Felice main facade, facing northeast
Chiesa di San Felice, Venezia
View of the main facade and the canal, facing south
Chiesa di San Felice, Venezia
View of the lateral facade, facing north
Chiesa di San Felice, Venezia
View of the lateral facade, facing north
Chiesa di San Felice, Venezia
View of the lateral facade, facing northeast
Chiesa di San Felice, Venezia
View of the lateral facade, facing northeast
Chiesa di San Felice, Venezia
View of the lateral facade, facing northeast
Chiesa di San Felice, Venezia
View of the lateral facade, facing east
Chiesa di San Felice, Venezia
View of the lateral facade, facing east
Chiesa di San Giacomo di Rialto
View towards the church and the palace from the bridge steps, facing north
Chiesa di San Giacomo di Rialto
View of the campo and the church, facing south
Chiesa di San Giacomo di Rialto
View of the campo and the church, facing south
Campo San Giacomo di Rialto
View of the campo with the Fabbriche Vecchie and the church, facing east
Fabbriche Vecchie
View of the Fabbriche Vecchie, facing north
Chiesa di San Giacomo di Rialto
View of the church and the bridge, facing southeast
Campo San Giacomo di Rialto
View of north corner of Fabbriche Vecchie from the campo
Fabbriche Vecchie
View of the street between Fabbriche Vecchie and the buildings behind the church, facing the Camerlenghi palace from northeast
Campo San Giacomo di Rialto
View of the western corner of the campo
Campo San Giacomo di Rialto
View of the church facade, from the northern corner of the campo
Chiesa di San Giacomo di Rialto
View of the church facade, facing southeast from the opposite side of the campo
Chiesa di San Giovanni Crisostomo
View of church facade, from north
Chiesa di San Giovanni Crisostomo
View of church and bell tower, from north
Chiesa di San Giovanni Crisostomo
View of church and bell tower, from north
Chiesa di San Giovanni Crisostomo
View of church and bell tower, from north
Marble Septum
View of marble gate and bell tower, facing west
Marble Septum
View of marble gate and bell tower, facing southwest
Marble Septum
View of marble gate, facing southwest
Marble Septum
View of marble gate, facing west
Marble Septum
View of marble gate, facing west
Scuola Grande di San Giovanni Evangelista
View of the southwest corner of marble septum with bell tower behind
Marble Septum
View of southwest corner of marble gate with bell tower
Chiesa di San Giovanni Evangelista
View of northern facade of the church with base of bell tower, from northeast
Chiesa di San Giovanni Evangelista
View of northern facade of the church and bell tower, from northeast
Chiesa di San Giovanni Evangelista
Looking up towards the northern facade of the church and bell tower, from northeast
Chiesa di San Giovanni Evangelista
Looking up northern facade of the church and bell tower, from northeast
Scuola Grande di San Giovanni Evangelista
View of sculptural relief, facing northwest
Scuola Grande di San Giovanni Evangelista
View of sculptural relief, facing northwest
Chiesa di San Lio
View of the church facade, facing south
Chiesa di San Lio
View of the church facade, facing south
Chiesa di San Lio
View of the church facade, facing northeast
Chiesa di San Lio
View of the southwest corner of the church facade
Chiesa di San Lio
View of the church facade, facing northeast
Chiesa di San Lio
View of the church portal, facing east
Chiesa di San Lio
View of the church facade, facing south
Scuola Grande di San Rocco
View of street to the left of the Scuola, facing southwest from campo San Rocco, with San Pantalon bell tower in the background
Scuola Grande di San Rocco
View of street to the left of the Scuola, facing southwest from campo San Rocco, with San Pantalon bell tower in the background
Scuola Grande di San Rocco
View of the Scuola facade, facing west from campo San Rocco
Chiesa di San Rocco, Venezia
View of the church facade, facing northwest from campo San Rocco
Chiesa di San Rocco, Venezia
View of the church facade, facing northwest from campo San Rocco
Scuola Grande di San Rocco
Looking up the Scuola and church facades, facing west from campo San Rocco
Scuola Grande di San Rocco
Looking up the Scuola and church facades, facing west from campo San Rocco
Scuola Grande di San Rocco
View of the Scuola and church facades, facing west from campo San Rocco
Scuola Grande di San Rocco
View of the Scuola and church facades, facing west from campo San Rocco
Scuola Grande di San Rocco
View of the Scuola and church facades, facing west from campo San Rocco
Scuola Grande di San Rocco
View of the Scuola and church facades, facing west from campo San Rocco
Chiesa di San Samuele
View of the church facade and bell tower, facing east from San Samuele campo
Chiesa di San Samuele
View of the church facade and bell tower, facing east from San Samuele campo
Chiesa di San Samuele
View of the church facade and bell tower, facing east from San Samuele campo
Chiesa di San Samuele
View of the church facade and bell tower, facing east from San Samuele campo
Chiesa di San Samuele
View of the church facade and bell tower, facing east from San Samuele campo
Chiesa di San Simeone Profeta
View of church facade, facing east
Chiesa di San Simeone Profeta
View of church facade, facing east
Chiesa di San Simeone Profeta
View of church facade, facing east
Chiesa di San Simeone Profeta
View of church facade, facing northeast from Campo Santo
Chiesa di San Simeone Profeta
View of church portal, facing northeast from Campo Santo
Chiesa di San Simeone Profeta
View of part of the northwestern facade of the church behind a porch, from Campo San Simon Grando
Chiesa di San Simeone Profeta
View of part of the northwestern facade of the church behind a porch, from Campo San Simon Grando
Chiesa di San Simeone Profeta
View of bell tower, facing south from Campo San Simon Grande
Chiesa di San Simeone Profeta
View of bell tower, facing south from Campo San Simon Grande
Chiesa di San Simeone Profeta
View of rear facade, facing south
Chiesa di San Simeone Profeta
View of rear facade, facing south
Chiesa di San Simeone Profeta
View of rear facade, facing southeast
Chiesa di San Simeone Profeta
View of rear facade with lateral entrance, facing west
Chiesa di Santa Fosca, Torcello
View of church facade, facing southeast
Chiesa di Santa Fosca, Torcello
View of the church, from north
 Scala dei GigantiView looking up at staircase and palace facade, facing northeast from north end of courtyard
 Arco FoscariView looking up at triumphal arch, facing northwest from north end of courtyard
 Cortile del Palazzo DucaleView of courtyard, facing west from east-side second-story loggia
 Cortile del Palazzo DucaleView of courtyard, facing west from east-side second-story loggia of palace
 Scala d'OroView looking up stairs, facing east
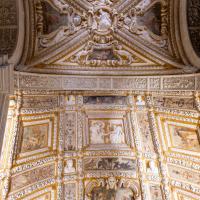 Scala d'OroDetail view of ceiling moldings and grotesques
 Scala d'OroDetail view of ceiling moldings and grotesques
 Scala d'OroDetail view of vaulting and coffers above stairs
 Scala d'OroView looking down staircase, facing west towards courtyard
 Scala d'OroView looking up staircase, facing west
 Atrio QuadratoView of ceiling
 Atrio QuadratoView of ceiling
 Sala dell'AnticollegioView of fireplace, facing west
 Sala dell'AnticollegioView of fireplace, facing west
 Sebastiano Venier giving thanks to the Redeemer after the Battle of LepantoView of wall and ceiling paintings, facing north from center of room
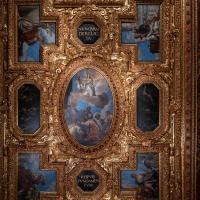 Sala del CollegioView of ceiling from center of room
 Sala del CollegioView of painting on south wall
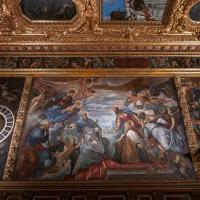 Doge Nicolò da Ponte Invokes the Protection of the VirginView of paintings on eastern wall, facing east from south end of room
 Sebastiano Venier giving thanks to the Redeemer after the Battle of LepantoView of wall and ceiling paintings, facing northeast from center of room
 Sala del CollegioView of fireplace on western wall
 Dead Christ Adored by Doges Pietro Lando and Marcantonio TrevisanView of tribune and paintings on north wall, facing north
 Sala del SenatoView of ceiling, facing north from center of room
 Sala del SenatoView of ceiling, facing north from center of room
 Triumph of VeniceView of central ceiling panel
 Triumph of VeniceView of central ceiling panel
 Doge Pietro Loredan Praying to the VirginView of painting and zodiac clock near southern end of west wall, facing west
 Dead Christ Adored by Doges Pietro Lando and Marcantonio TrevisanView of seating area, facing north from center of room
 Sala del SenatoView of paintings on ceiling and north wall, facing north from center of room
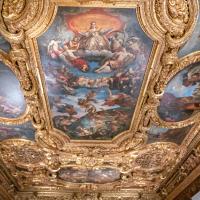 Sala del SenatoView of paintings on ceiling and north wall, facing north from south side of room
 Doges Lorenzo and Girolamo Priuli Praying in Front of the RedeemerView of painting on south wall, facing south from center of room
 Adoration of the MagiView of painting above tribune along west wall, facing west
 Pope Alexander III Recieiving Doge ZianiView of painting on north wall, facing north
 Pope Alexander III Recieiving Doge ZianiView of painting on north wall, facing north
 Copy of Jupiter Hurling Thunderbolts at the VicesView of central ceiling panel
 Pope Clement VII and the Emperor Charles VView of painting on south wall, facing south
 Sala della BussolaView of central ceiling panel
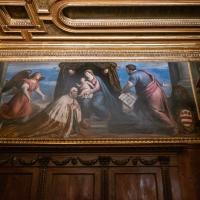 Sala della BussolaView of painting on western wall
 Palazzo DucaleView of sculpture and weapons
 Palazzo DucaleView of room containing weapons
 Palazzo DucaleView of painting showing the genealogy of Filippo Foscarini
 Doge Marcantio Memmo Before the VirginView of painting on western wall of corridor
 Sala della Quarantia Civil VecchiaView of the Quarantia Civil Vecchia, facing west
 ParadiseDetail of remains of Guariento fresco, facing south
 ParadiseView of remains of Guariento fresco, facing southeast
 Il ParadisoView of tribune and painting on east wall
 Il ParadisoView of tribune and painting on east wall
 Sala del Maggior ConsiglioView of central ceiling panel
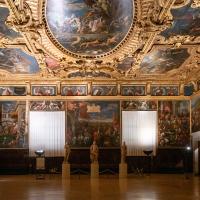 Sala del Maggior ConsiglioView of west side of hall from center
 Sala del Maggior ConsiglioView of west side of hall from center
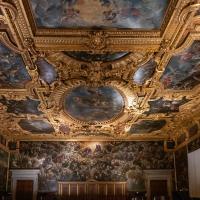 Sala del Maggior ConsiglioView of east side of hall from center
 Sala del Maggior ConsiglioView of west side of hall
 Battle of SalvoreView of paintings on western wall
 Sala del Maggior ConsiglioView of hall from west end, facing east
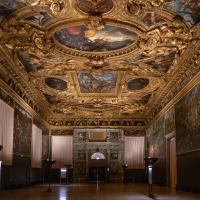 Sala dello ScrutinioView of the room, facing north
 Sala dello ScrutinioLooking up at Vicentino's Battle of Lepanto painting on eastern wall
 Sala dello ScrutinioView of Palma il Giovane's Last Judgement on southern wall
 Sala del Maggior ConsiglioLooking up at south side of hall
 Il ParadisoView of hall from west end, facing southeast
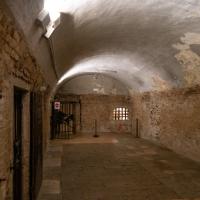 Palazzo DucaleView of prison
 Palazzo DucaleView of north side of bridge and east side of palace, facing west from Prigione Nuove
 Palazzo DucaleView of paintings on eastern part of south wall, facing south
 Palazzo DucaleView of paintings on western wall
 Palazzo DucaleView of central painting on south wall
 Palazzo DucaleView of eastern wall and entrance to Ponte dei Sospiri
 Cortile del Palazzo DucaleView of southwest corner of the courtyard
 Cortile del Palazzo DucaleView of southwest corner of the courtyard
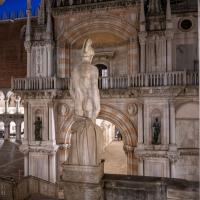 MarsView of east facade of Foscari porch, facing west from the top right of the Giants' staircase
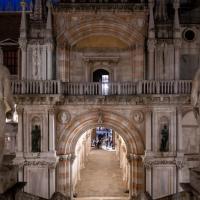 Scala dei GigantiView of east facade of Foscari porch, facing west from the top of the Giants' staircase
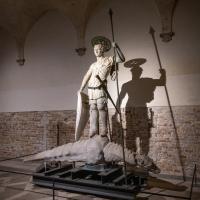 Colonna di San TòdaroView of the statue, facing northwest from the portico of the Senatori courtyard
 Arco FoscariView of upper facade of Foscari porch, facing southwest from Senatori courtyard
 Piazza San MarcoLooking down the Alitalia mosaic advertisement
 Piazza San MarcoView of the piazza, from the southwest corner
 Piazza San MarcoView of the Campanile, part of the facade of the Basilica, part of the facade of the Palazzo Ducale, from the southwest corner
 Piazzetta San MarcoView of the Piazzetta, facing southeast
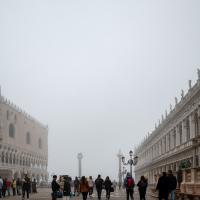 Piazzetta San MarcoView of the Piazzetta, facing southeast
 Piazza San MarcoView of the Piazza San Marco, facing west
 Colonna di San MarcoLooking up at the Colonna del Leone di San Marco, from the Piazzetta facing southeast
 Colonna di San MarcoLooking up at the Colonna del Leone di San Marco, from the Piazzetta facing southeast
 Colonna di San TòdaroLooking up at the Colonna di San Todaro, from the Piazzetta facing southeast
 Colonna di San TòdaroLooking up at the Colonna di San Todaro, from the Piazzetta facing southeast
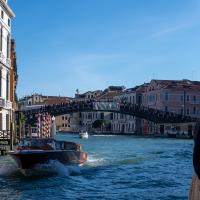 Ponte dell'AccademiaView of the bridge from the Canal, facing southeast
 Ponte dell'AccademiaView of the bridge from the Canal, facing southeast
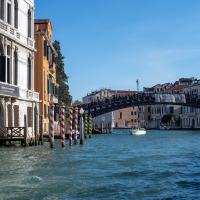 Ponte dell'AccademiaView of the bridge from the Canal, facing southeast
 Ponte dell'AccademiaView of the bridge from the Canal, facing southeast
 Ponte dell'AccademiaView of the bridge from the Canal, facing southeast
 Ponte di RialtoView of the bridge from the Canal, facing northeast
 Ponte di RialtoView of the bridge from the Canal, facing northeast
 Ponte di RialtoView of the left side of the bridge from the Canal, facing northeast
 Ponte di RialtoView of the left side of the bridge from the Canal, facing northeast
 Ponte di RialtoView of the bridge from the Canal, facing north
 Ponte di RialtoView of the bridge from the Canal, facing north
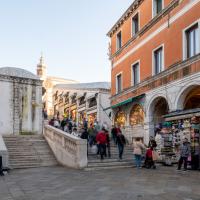 Ponte di RialtoView of the bridge steps, facing southeast
 Ponte di RialtoView of the bridge steps, facing southeast
 Chiesa di San Felice, VeneziaView of side altar to the right of the apse, facing north from the left transept
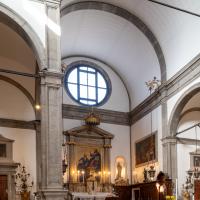 Chiesa di San Felice, VeneziaView of the apse, facing north from the left transept
 Chiesa di San Felice, VeneziaView of lateral entrance to the left of the apse, facing northwest from the left transept
 Chiesa di San Felice, VeneziaView of crossing, facing northwest towards the main altar from the left aisle
 Chiesa di San Felice, VeneziaView of crossing, facing west towards the main altar from the right aisle
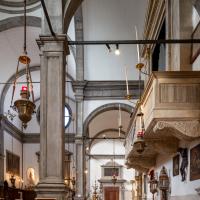 Chiesa di San Felice, VeneziaView of lateral entrance to the right of the apse, facing west from the right aisle
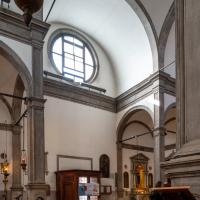 Chiesa di San Felice, VeneziaView of entrance in the left transept, facing southwest from the right aisle
 Chiesa di San Felice, VeneziaView of main entrance, facing southeast from the right aisle
 Chiesa di San Felice, VeneziaView of right aisle, facing southeast from the right transept
 Chiesa di San Felice, VeneziaView of nave and main entrance, facing south from the right aisle
 Chiesa di San Felice, VeneziaView of nave and main entrance, facing south from the right aisle
 Chiesa di San Felice, VeneziaView of crossing and apse from the nave, facing northwest
 Chiesa di San Felice, VeneziaView of apse from the crossing, facing northwest
 Chiesa di San Felice, VeneziaView of apse and main altar, facing northwest
 Chiesa di San Felice, VeneziaView of apse and main altar, facing northwest
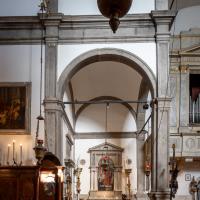 Chiesa di San Felice, VeneziaView of side altar to the right of the apse from the opposite side, facing northeast
 Chiesa di San Felice, VeneziaView of organ in the right transept from the left side of the altar, facing northeast
 Chiesa di San Felice, VeneziaView of left aisle, facing southeast from the left transept
 Chiesa di San Felice, VeneziaView of the nave from the crossing, facing southeast
 Chiesa di San Felice, VeneziaView of the organ in the right transept from the crossing, facing northeast
 Chiesa di San Felice, VeneziaView of apse from the crossing, facing northwest
 Chiesa di San Felice, VeneziaView of altar in the right aisle next to the transept, facing northeast
 Chiesa di San Felice, VeneziaView of left aisle from the right one, facing southwest
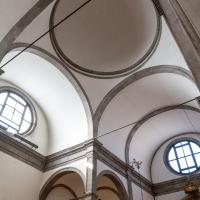 Chiesa di San Felice, VeneziaLooking up towards the dome, the left transept and the apse, facing southwest
 Chiesa di San Felice, VeneziaView of the interior from the left transept and the apse, facing southwest
 Chiesa di San Felice, VeneziaView of the main facade, facing southwest
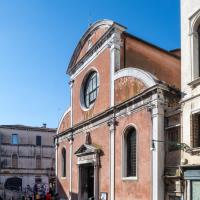 Chiesa di San Felice, VeneziaView of the main facade, facing southwest
 Chiesa di San Felice, VeneziaView of the main facade, facing southwest
 Chiesa di San Felice, VeneziaView of the main facade and the canal, facing southwest
 Chiesa di San Felice, VeneziaView of the main facade and the canal, facing southwest
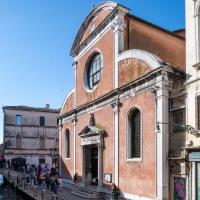 Chiesa di San Felice, VeneziaView of the main facade and the canal, facing southwest
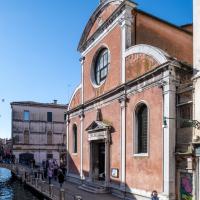 Chiesa di San Felice, VeneziaView of the main facade and the canal, facing southwest
 View of the canal in front of San Felice main facade, facing northeast
 Chiesa di San Felice, VeneziaView of the main facade and the canal, facing south
 Chiesa di San Felice, VeneziaView of the lateral facade, facing north
 Chiesa di San Felice, VeneziaView of the lateral facade, facing north
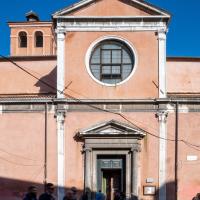 Chiesa di San Felice, VeneziaView of the lateral facade, facing northeast
 Chiesa di San Felice, VeneziaView of the lateral facade, facing northeast
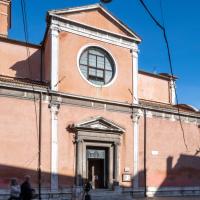 Chiesa di San Felice, VeneziaView of the lateral facade, facing northeast
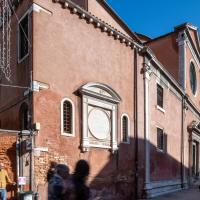 Chiesa di San Felice, VeneziaView of the lateral facade, facing east
 Chiesa di San Felice, VeneziaView of the lateral facade, facing east
 Chiesa di San Giacomo di RialtoView towards the church and the palace from the bridge steps, facing north
 Chiesa di San Giacomo di RialtoView of the campo and the church, facing south
 Chiesa di San Giacomo di RialtoView of the campo and the church, facing south
 Campo San Giacomo di RialtoView of the campo with the Fabbriche Vecchie and the church, facing east
 Fabbriche VecchieView of the Fabbriche Vecchie, facing north
 Chiesa di San Giacomo di RialtoView of the church and the bridge, facing southeast
 Campo San Giacomo di RialtoView of north corner of Fabbriche Vecchie from the campo
 Fabbriche VecchieView of the street between Fabbriche Vecchie and the buildings behind the church, facing the Camerlenghi palace from northeast
 Campo San Giacomo di RialtoView of the western corner of the campo
 Campo San Giacomo di RialtoView of the church facade, from the northern corner of the campo
 Chiesa di San Giacomo di RialtoView of the church facade, facing southeast from the opposite side of the campo
 Chiesa di San Giovanni CrisostomoView of church facade, from north
 Chiesa di San Giovanni CrisostomoView of church and bell tower, from north
 Chiesa di San Giovanni CrisostomoView of church and bell tower, from north
 Chiesa di San Giovanni CrisostomoView of church and bell tower, from north
 Marble SeptumView of marble gate and bell tower, facing west
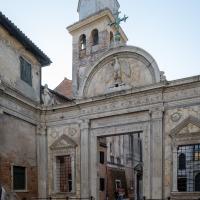 Marble SeptumView of marble gate and bell tower, facing southwest
 Marble SeptumView of marble gate, facing southwest
 Marble SeptumView of marble gate, facing west
 Marble SeptumView of marble gate, facing west
 Scuola Grande di San Giovanni EvangelistaView of the southwest corner of marble septum with bell tower behind
 Marble SeptumView of southwest corner of marble gate with bell tower
 Chiesa di San Giovanni EvangelistaView of northern facade of the church with base of bell tower, from northeast
 Chiesa di San Giovanni EvangelistaView of northern facade of the church and bell tower, from northeast
 Chiesa di San Giovanni EvangelistaLooking up towards the northern facade of the church and bell tower, from northeast
 Chiesa di San Giovanni EvangelistaLooking up northern facade of the church and bell tower, from northeast
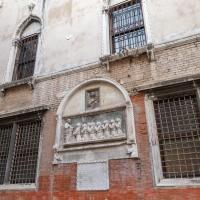 Scuola Grande di San Giovanni EvangelistaView of sculptural relief, facing northwest
 Scuola Grande di San Giovanni EvangelistaView of sculptural relief, facing northwest
 Chiesa di San LioView of the church facade, facing south
 Chiesa di San LioView of the church facade, facing south
 Chiesa di San LioView of the church facade, facing northeast
 Chiesa di San LioView of the southwest corner of the church facade
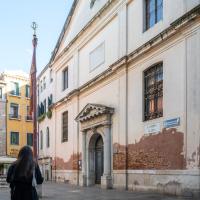 Chiesa di San LioView of the church facade, facing northeast
 Chiesa di San LioView of the church portal, facing east
 Chiesa di San LioView of the church facade, facing south
 Scuola Grande di San RoccoView of street to the left of the Scuola, facing southwest from campo San Rocco, with San Pantalon bell tower in the background
 Scuola Grande di San RoccoView of street to the left of the Scuola, facing southwest from campo San Rocco, with San Pantalon bell tower in the background
 Scuola Grande di San RoccoView of the Scuola facade, facing west from campo San Rocco
 Chiesa di San Rocco, VeneziaView of the church facade, facing northwest from campo San Rocco
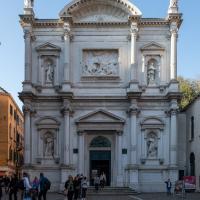 Chiesa di San Rocco, VeneziaView of the church facade, facing northwest from campo San Rocco
 Scuola Grande di San RoccoLooking up the Scuola and church facades, facing west from campo San Rocco
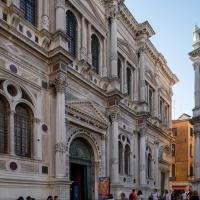 Scuola Grande di San RoccoLooking up the Scuola and church facades, facing west from campo San Rocco
 Scuola Grande di San RoccoView of the Scuola and church facades, facing west from campo San Rocco
 Scuola Grande di San RoccoView of the Scuola and church facades, facing west from campo San Rocco
 Scuola Grande di San RoccoView of the Scuola and church facades, facing west from campo San Rocco
 Scuola Grande di San RoccoView of the Scuola and church facades, facing west from campo San Rocco
 Chiesa di San SamueleView of the church facade and bell tower, facing east from San Samuele campo
 Chiesa di San SamueleView of the church facade and bell tower, facing east from San Samuele campo
 Chiesa di San SamueleView of the church facade and bell tower, facing east from San Samuele campo
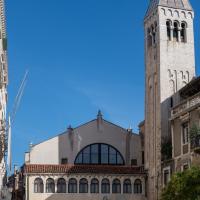 Chiesa di San SamueleView of the church facade and bell tower, facing east from San Samuele campo
 Chiesa di San SamueleView of the church facade and bell tower, facing east from San Samuele campo
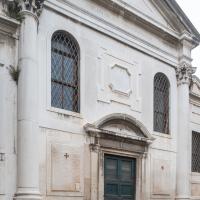 Chiesa di San Simeone ProfetaView of church facade, facing east
 Chiesa di San Simeone ProfetaView of church facade, facing east
 Chiesa di San Simeone ProfetaView of church facade, facing east
 Chiesa di San Simeone ProfetaView of church facade, facing northeast from Campo Santo
 Chiesa di San Simeone ProfetaView of church portal, facing northeast from Campo Santo
 Chiesa di San Simeone ProfetaView of part of the northwestern facade of the church behind a porch, from Campo San Simon Grando
 Chiesa di San Simeone ProfetaView of part of the northwestern facade of the church behind a porch, from Campo San Simon Grando
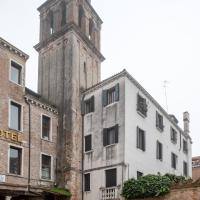 Chiesa di San Simeone ProfetaView of bell tower, facing south from Campo San Simon Grande
 Chiesa di San Simeone ProfetaView of bell tower, facing south from Campo San Simon Grande
 Chiesa di San Simeone ProfetaView of rear facade, facing south
 Chiesa di San Simeone ProfetaView of rear facade, facing south
 Chiesa di San Simeone ProfetaView of rear facade, facing southeast
 Chiesa di San Simeone ProfetaView of rear facade with lateral entrance, facing west
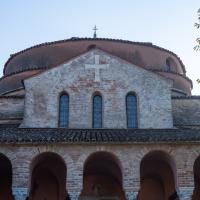 Chiesa di Santa Fosca, TorcelloView of church facade, facing southeast
 Chiesa di Santa Fosca, TorcelloView of the church, from north