Basilica di San Pietro in Vaticano
Exterior: Facade Elevation
Basilica di San Pietro in Vaticano
Exterior: Facade Detail, South Clock
Basilica di San Pietro in Vaticano
Exterior: Facade Detail, Statues of Saints
Basilica di San Pietro in Vaticano
Exterior: Facade Detail, North Clock
Basilica di San Pietro in Vaticano
Exterior: Facade Detail, Statues of Saints
Basilica di San Pietro in Vaticano
Exterior: Facade, Portico Inscription, Detail
Basilica di San Pietro in Vaticano
Exterior: Facade, Detail of relief sculpture over central doorway
Basilica di San Pietro in Vaticano
Exterior: Facade, Detail
Basilica di San Pietro in Vaticano
Exterior: Facade Detail, South Clock
Obelisco Vaticano
Exterior: Obelisk Base
Obelisco Vaticano
Exterior: Obelisk Base
Obelisco Vaticano
Exterior: Obelisk Base
Obelisco Vaticano
Exterior: Obelisk Base, Basilica in the Background
Obelisco Vaticano
Exterior: Obelisk Base, Basilica in the Background
Piazza San Pietro
Exterior: North Colonnade, Statues above northern entrance flanking the Pope Alexander VII Coat of Arms
Piazza San Pietro
Exterior: North Colonnade, Coat of Arms of Pope Alexander VII and Keys
Piazza San Pietro
Exterior: North Colonnade, statues of San Marco Evangelista and Santa Maria Egiziaca above entrance
Piazza San Pietro
Exterior: North Colonnade, statues of Efrem il Siro and Teodosia di Cesarea above entrance
Piazza San Pietro
Exterior: North Colonnade, Constantine Wing, Statues above entrance flanking the Pope Alexander VII Coat of Arms
Piazza San Pietro
Detail: North Colonnade, Pope Alexander VII Coat of Arms and Keys
Piazza San Pietro
Exterior: North Colonnade, Sant'Agnese and Genesio di Arles
Colomba di Sens
Exterior: North Colonnade, Colomba di Sens
Mamete di Cesarea
Exterior: North Colonnade, Mamete di Cesarea
San Malco di Siria
Exterior: North Colonnade, San Malco di Siria
Benigno di Digione
Exterior: North Colonnade, Benigno di Digione
Santa Barbara
Exterior: North Colonnade, Santa Barbara
Fausta di Sirmio
Exterior: North Colonnade, Fausta di Sirmio
Santa Candida
Exterior: North Colonnade, Santa Candida
Fontane di Piazza San Pietro
Exterior: View of North Fountain
Fontane di Piazza San Pietro
Detail: North Fountain
Remigio di Reims
Exterior: Northeast Colonnade, Remigio di Reims
Ignazio di Loyola
Exterior: Northeast Colonnade, Ignazio di Loyola
Benedetto da Norcia
Exterior: North Colonnade, Benedetto da Norcia
Bernardo di Chiaravalle
Exterior: North Colonnade, Bernardo di Chiaravalle
San Francesco d'Assisi
Exterior: North Colonnade, San Francesco d'Assisi
San Domenico di Guzmán
Exterior: North Colonnade, San Domenico di Guzmán
Santa Macrina
Exterior: North Colonnade, Santa Macrina
Piazza San Pietro
Exterior: North Colonnade, Efrem il Siro and Teodosia di Cesarea
Basilica di San Pietro in Vaticano
Exterior: Dome Detail, Statues of San Giovanni and San Giacomo il Minore in the foreground
Basilica di San Pietro in Vaticano
Exterior: Dome Detail, Statues of Saints in the foreground
Piazza San Pietro
Exterior: North Colonnade, Statues above north entrance, flanking Pope Alexander VII Coat of Arms
Piazza San Pietro
Colonnade Detail: Capitals
Piazza San Pietro
Colonnade Detail: Columns
Piazza San Pietro
Colonnade Detail: Arcade Ceiling
Piazza San Pietro
Colonnade Detail: Chandelier
Piazza San Pietro
Exterior: Looking down the Colonnade
Piazza San Pietro
Exterior: Chandelier in a section of the Colonnade
Piazza San Pietro
Exterior: Chandelier in a section of the Colonnade
Piazza San Pietro
Colonnade Exterior: Chandelier
San Paolo
Exterior: View of the Statue, Facade of the Basilica in the background
Basilica di San Pietro in Vaticano
Interior: Statues of Saint Cletus and Saint Linus in Portico, View from the Northwest
Basilica di San Pietro in Vaticano
Exterior: View of Portico Ceiling looking South
Allegoria della Speranza
Exterior: Allegoria della Speranza, Portico View from Northeast
Allegoria della Speranza
Exterior: Allegoria della Speranza, Detail
Allegoria della Speranza
Exterior: Allegoria della Speranza, Detail
Basilica di San Pietro in Vaticano
Interior: Portico Ceiling, Sculptures
Allegoria della Carità
Exterior: Allegoria della Carità, Portico View from Northwest
Allegoria della Carità
Interior: Allegoria della Carità, Detail
Basilica di San Pietro in Vaticano
Interior: Saint Peter's Basilica looking West towards the Altar
Pietà
Detail: View of the head of the Virgin
Pietà
Detail: View of drapery of the Virgin's robes
Basilica di San Pietro in Vaticano
Interior: Mosaic Detail, Martyrdom of the Seven Maccabee Brothers
Ritratto di Papa Innocenzo XII
Interior: View in situ
Ritratto di Papa Innocenzo XII
Interior: View in situ, Detail
Basilica di San Pietro in Vaticano
Interior Detail: Carving of dove holding an olive branch adjacent to the Chapel of Saint Sebastian
Basilica di San Pietro in Vaticano
Interior Detail: Carving of dove holding an olive branch adjacent to the Chapel of Saint Sebastian
Basilica di San Pietro in Vaticano
Interior: Marble Flooring, Detail
Basilica di San Pietro in Vaticano
Interior: Marble Flooring, Detail
Basilica di San Pietro in Vaticano
Interior: Marble Flooring, Detail
Basilica di San Pietro in Vaticano
Interior: Marble Flooring, Detail
Basilica di San Pietro in Vaticano
Interior: Marble Flooring, Detail
Basilica di San Pietro in Vaticano
Interior: Marble Flooring, Detail
Basilica di San Pietro in Vaticano
Interior: Marble Flooring, Detail
Basilica di San Pietro in Vaticano
Interior: Marble Flooring with a Metal Grate, Detail
San Pietro
Interior: Installation View
San Pietro
Detail: Installation View, Right Side
San Pietro
Detail: Installation View, Left Side
Cathedra Petri
Interior: Cathedra Petri in the Apse of the Basilica
San Pietro
Detail: Installation View
Baldacchino di San Pietro
Detail: Baldachin top with the mosaic of Saint John the Evangelist in the Background
Baldacchino di San Pietro
Detail: top
Baldacchino di San Pietro
Detail: Figure on the top
Baldacchino di San Pietro
Detail: Figure on the top
Baldacchino di San Pietro
Detail: Column Base
Baldacchino di San Pietro
Detail: Column Base
Baldacchino di San Pietro
Detail: Figure on the top
Interior: Detail of 18th century mosaic copy after Andrea Sacchi (1599–1661)
Basilica di San Pietro in Vaticano
Interior: Painting Detail, Figure Crucified
Basilica di San Pietro in Vaticano
Interior: Bronze Figural Scene, Detail
Basilica di San Pietro in Vaticano
Interior: Bronze Relief, Detail
Basilica di San Pietro in Vaticano
Interior: Bronze Relief, Detail
Obelisco Vaticano
Exterior: Obelisk Base
San Paolo
Exterior: Statua di San Paolo, Frontal view from East
San Pietro
Exterior: Statua di San Pietro Frontal view, in front of the Basilica
San Pietro
Detail: Statua di San Pietro
San Pietro
Exterior: Statua di San Pietro Frontal view
San Pietro
Detail: Base
Basilica di San Pietro in Vaticano
Exterior: Facade Detail, South Clock
Oltremontano
Exterior: South Clock Detail
Oltremontano
Exterior: South Clock Detail
Oltremontano
Exterior: South Clock Detail
Basilica di San Pietro in Vaticano
Detail: Corinthian Capital
Basilica di San Pietro in Vaticano
Detail: Small pediment
Basilica di San Pietro in Vaticano
Detail: Small niche
Obelisco Vaticano
Detail: Obelisk top
Obelisco Vaticano
Detail: Obelisk top
Obelisco Vaticano
Detail: Obelisk base
Obelisco Vaticano
Detail: Obelisk base
Saranrom Park
View of a modern shrine
Saranrom Park
Detail of palm tree fruit
Saranrom Park
Detail of palm tree fruit
Saranrom Park
Detail of palm tree fruit
Saranrom Park
Detail of the Chao Mae Takhian Thong Shrine
Saranrom Park
Detail of the Chao Mae Takhian Thong Shrine
Saranrom Park
View of a model of a traditional Thai teak house
View of a shrine
View of a wooden panel with a painting of a bird
View of a wooden panel with a painting of a bird
View of a wooden panel with painting of flowers
View of a shrine
Wat Pho
Street view of Wat Pho
Wat Pho
Street view of Wat Pho
Street view of shopfronts
Wat Ratchabophit
Image of watchman at the front entrance
Wat Ratchabophit
View of façade
Wat Ratchabophit
Exterior
Wat Ratchabophit
View of the chedi
Wat Ratchabophit
View of the chedi
Wat Ratchabophit
View of façade
Wat Ratchabophit
Detail of façade, view of a monk
Wat Ratchabophit
Oblique view of façade
Wat Ratchabophit
View of the complex and the chedi
Wat Ratchabophit
Detail
Wat Ratchabophit
Detail
Wat Ratchabophit
Detail
Wat Ratchabophit
View of the ubosot, or ordination hall, in Gothic revival style
Wat Ratchabophit
Detail of the ubosot, or ordination hall
Wat Ratchabophit
Detail of the ubosot, or ordination hall
Wat Ratchabophit
Detail of the ubosot, or ordination hall
Wat Ratchabophit
Detail of the ubosot, or ordination hall
Wat Ratchabophit
Detail of the ubosot, or ordination hall
Wat Ratchabophit
Detail of the ubosot, or ordination hall
Wat Ratchabophit
Detail of entrance
Wat Ratchabophit
Detail of entrance
Wat Ratchabophit
Detail of entrance
Wat Ratchabophit
Detail of a shrine
Wat Ratchabophit
Detail of a shrine
Wat Ratchabophit
View of the royal cemetery
Wat Ratchabophit
View of the royal cemetery
Wat Ratchabophit
View of the royal cemetery
Wat Ratchabophit
View of the royal cemetery
Wat Ratchabophit
View of the royal cemetery
Wat Arun
View of the prang, or spire
Wat Pho
Detail of the Reclining Buddha
Wat Pho
Detail of the Reclining Buddha
Wat Pho
Detail of the Reclining Buddha, seen through vihara pillars
Wat Pho
Detail of the Reclining Buddha, seen through vihara pillars
Wat Pho
Detail of the Reclining Buddha
Wat Pho
Detail of the Reclining Buddha
Wat Pho
Detail of the Reclining Buddha
Wat Pho
Detail of the Reclining Buddha
Wat Pho
Detail of the Reclining Buddha and column
Wat Pho
Detail of the Reclining Buddha and column
Wat Pho
Detail of the Reclining Buddha and column
Wat Pho
Detail of the Reclining Buddha and column
Wat Pho
Detail of the Reclining Buddha
Wat Pho
Interior
Wat Pho
Interior
Wat Pho
Detail of the Reclining Buddha
Wat Pho
Detail of the Reclining Buddha
Wat Pho
Detail of the Reclining Buddha
Wat Pho
Detail of the Reclining Buddha with view of the mural in the backdrop
Wat Pho
Detail of the Reclining Buddha with view of the mural in the backdrop
Wat Pho
Detail of the Reclining Buddha with view of the mural in the backdrop
Wat Pho
Detail of the Reclining Buddha
Wat Pho
Detail of the Reclining Buddha
Wat Pho
Detail of the Reclining Buddha
Wat Pho
Detail of the Reclining Buddha and the sculptural base
Wat Pho
Detail of the Reclining Buddha and the sculptural base
Wat Pho
Detail of the Reclining Buddha and the sculptural base
Wat Pho
Detail of Buddha's feet
Wat Pho
Detail of Buddha's feet
Wat Pho
Detail of Buddha's feet
Wat Pho
Detail of Buddha's feet
Wat Pho
Detail of the Reclining Buddha's feet from the back showing the 108 Auspicious Symbols, and view of murals behind the sculpture
Wat Pho
Detail of the Reclining Buddha's feet from the back showing the 108 Auspicious Symbols
Wat Pho
Detail of the Reclining Buddha's feet from the back showing the 108 Auspicious Symbols
Wat Pho
Detail of the Reclining Buddha's feet from the back showing the 108 Auspicious Symbols
Wat Pho
Detail of the Reclining Buddha's feet from the back showing the 108 Auspicious Symbols
Wat Pho
Detail of the Reclining Buddha's feet from the back showing the 108 Auspicious Symbols
Wat Pho
Detail of the Reclining Buddha's feet from the back showing the 108 Auspicious Symbols
Wat Pho
Detail of the Reclining Buddha's feet from the back showing the 108 Auspicious Symbols
Wat Pho
Detail of the Reclining Buddha's feet from the back showing the 108 Auspicious Symbols
Wat Pho
Detail of the Reclining Buddha's feet from the back showing the 108 Auspicious Symbols
Wat Pho
Detail of the Reclining Buddha from the back with view of cushions
Wat Pho
Detail of the Reclining Buddha from the back with view of cushions
Wat Pho
Detail of the Reclining Buddha from the back with view of cushions
Wat Pho
Detail of the Reclining Buddha's curls and cushion from the back
Wat Pho
Detail of the Reclining Buddha from the back with view of cushions
Wat Pho
Detail of the Reclining Buddha from the back with view of cushions
 Basilica di San Pietro in VaticanoExterior: Facade Elevation
 Basilica di San Pietro in VaticanoExterior: Facade Detail, South Clock
 Basilica di San Pietro in VaticanoExterior: Facade Detail, Statues of Saints
 Basilica di San Pietro in VaticanoExterior: Facade Detail, North Clock
 Basilica di San Pietro in VaticanoExterior: Facade Detail, Statues of Saints
 Basilica di San Pietro in VaticanoExterior: Facade, Portico Inscription, Detail
 Basilica di San Pietro in VaticanoExterior: Facade, Detail of relief sculpture over central doorway
 Basilica di San Pietro in VaticanoExterior: Facade, Detail
 Basilica di San Pietro in VaticanoExterior: Facade Detail, South Clock
 Obelisco VaticanoExterior: Obelisk Base
 Obelisco VaticanoExterior: Obelisk Base
 Obelisco VaticanoExterior: Obelisk Base
 Obelisco VaticanoExterior: Obelisk Base, Basilica in the Background
 Obelisco VaticanoExterior: Obelisk Base, Basilica in the Background
, Mary of Egypt (by Lazzaro Morelli), Ephraim, and Theodosia (by Andrea Baratta) flanking Alexander VII Coat of Arms on the North Colonnade") Piazza San PietroExterior: North Colonnade, Statues above northern entrance flanking the Pope Alexander VII Coat of Arms
Piazza San PietroExterior: North Colonnade, Statues above northern entrance flanking the Pope Alexander VII Coat of Arms Piazza San PietroExterior: North Colonnade, Coat of Arms of Pope Alexander VII and Keys
 on the North Colonnade") Piazza San PietroExterior: North Colonnade, statues of San Marco Evangelista and Santa Maria Egiziaca above entrance
Piazza San PietroExterior: North Colonnade, statues of San Marco Evangelista and Santa Maria Egiziaca above entrance on the North Colonnade") Piazza San PietroExterior: North Colonnade, statues of Efrem il Siro and Teodosia di Cesarea above entrance
Piazza San PietroExterior: North Colonnade, statues of Efrem il Siro and Teodosia di Cesarea above entrance, Justin (by Lazzaro Morelli), Catherine (by Lazzaro Morelli), Agnes (by Lazzaro Morelli), and Genesius (by Bartolomeo Cennini), flanking Alexander VII Coat of Arms on North Colonnade") Piazza San PietroExterior: North Colonnade, Constantine Wing, Statues above entrance flanking the Pope Alexander VII Coat of Arms
Piazza San PietroExterior: North Colonnade, Constantine Wing, Statues above entrance flanking the Pope Alexander VII Coat of Arms Piazza San PietroDetail: North Colonnade, Pope Alexander VII Coat of Arms and Keys
 and Genesius (by Bartolomeo Cennini) on the North Colonnade") Piazza San PietroExterior: North Colonnade, Sant'Agnese and Genesio di Arles
Piazza San PietroExterior: North Colonnade, Sant'Agnese and Genesio di Arles on the North Colonnade") Colomba di SensExterior: North Colonnade, Colomba di Sens
Colomba di SensExterior: North Colonnade, Colomba di Sens on the North Colonnade") Mamete di CesareaExterior: North Colonnade, Mamete di Cesarea
Mamete di CesareaExterior: North Colonnade, Mamete di Cesarea on the North Colonnade") San Malco di SiriaExterior: North Colonnade, San Malco di Siria
San Malco di SiriaExterior: North Colonnade, San Malco di Siria on the North Colonnade") Benigno di DigioneExterior: North Colonnade, Benigno di Digione
Benigno di DigioneExterior: North Colonnade, Benigno di Digione Santa BarbaraExterior: North Colonnade, Santa Barbara
 Fausta di SirmioExterior: North Colonnade, Fausta di Sirmio
 Santa CandidaExterior: North Colonnade, Santa Candida
 Fontane di Piazza San PietroExterior: View of North Fountain
 Fontane di Piazza San PietroDetail: North Fountain
 on the Northeast Colonnade") Remigio di ReimsExterior: Northeast Colonnade, Remigio di Reims
Remigio di ReimsExterior: Northeast Colonnade, Remigio di Reims on the Northeast Colonnade") Ignazio di LoyolaExterior: Northeast Colonnade, Ignazio di Loyola
Ignazio di LoyolaExterior: Northeast Colonnade, Ignazio di Loyola Benedetto da NorciaExterior: North Colonnade, Benedetto da Norcia
 on the North Colonnade") Bernardo di ChiaravalleExterior: North Colonnade, Bernardo di Chiaravalle
Bernardo di ChiaravalleExterior: North Colonnade, Bernardo di Chiaravalle on the North Colonnade") San Francesco d'AssisiExterior: North Colonnade, San Francesco d'Assisi
San Francesco d'AssisiExterior: North Colonnade, San Francesco d'Assisi on the North Colonnade") San Domenico di GuzmánExterior: North Colonnade, San Domenico di Guzmán
San Domenico di GuzmánExterior: North Colonnade, San Domenico di Guzmán Santa MacrinaExterior: North Colonnade, Santa Macrina
 on the North Colonnade") Piazza San PietroExterior: North Colonnade, Efrem il Siro and Teodosia di Cesarea
Piazza San PietroExterior: North Colonnade, Efrem il Siro and Teodosia di Cesarea and James the Less (by Cristoforo Stati) in the foreground") Basilica di San Pietro in VaticanoExterior: Dome Detail, Statues of San Giovanni and San Giacomo il Minore in the foreground
Basilica di San Pietro in VaticanoExterior: Dome Detail, Statues of San Giovanni and San Giacomo il Minore in the foreground, John the Evangelist (by Antonio Valsoldo), James the Less (by Cristoforo Stati), and Bartholomew (by Egidio Moretti) in the foreground") Basilica di San Pietro in VaticanoExterior: Dome Detail, Statues of Saints in the foreground
Basilica di San Pietro in VaticanoExterior: Dome Detail, Statues of Saints in the foreground, Mary of Egypt (by Lazzaro Morelli), Ephraim, and Theodosia (by Andrea Baratta) flanking Alexander VII Coat of Arms on the North Colonnade") Piazza San PietroExterior: North Colonnade, Statues above north entrance, flanking Pope Alexander VII Coat of Arms
Piazza San PietroExterior: North Colonnade, Statues above north entrance, flanking Pope Alexander VII Coat of Arms Piazza San PietroColonnade Detail: Capitals
 Piazza San PietroColonnade Detail: Columns
 Piazza San PietroColonnade Detail: Arcade Ceiling
 Piazza San PietroColonnade Detail: Chandelier
 Piazza San PietroExterior: Looking down the Colonnade
 Piazza San PietroExterior: Chandelier in a section of the Colonnade
 Piazza San PietroExterior: Chandelier in a section of the Colonnade
 Piazza San PietroColonnade Exterior: Chandelier
 San PaoloExterior: View of the Statue, Facade of the Basilica in the background
 Basilica di San Pietro in VaticanoInterior: Statues of Saint Cletus and Saint Linus in Portico, View from the Northwest
 Basilica di San Pietro in VaticanoExterior: View of Portico Ceiling looking South
 Allegoria della SperanzaExterior: Allegoria della Speranza, Portico View from Northeast
 Allegoria della SperanzaExterior: Allegoria della Speranza, Detail
 Allegoria della SperanzaExterior: Allegoria della Speranza, Detail
 Basilica di San Pietro in VaticanoInterior: Portico Ceiling, Sculptures
 Allegoria della CaritàExterior: Allegoria della Carità, Portico View from Northwest
 Allegoria della CaritàInterior: Allegoria della Carità, Detail
 Basilica di San Pietro in VaticanoInterior: Saint Peter's Basilica looking West towards the Altar
 PietàDetail: View of the head of the Virgin
 PietàDetail: View of drapery of the Virgin's robes
 Basilica di San Pietro in VaticanoInterior: Mosaic Detail, Martyrdom of the Seven Maccabee Brothers
 Ritratto di Papa Innocenzo XIIInterior: View in situ
 Ritratto di Papa Innocenzo XIIInterior: View in situ, Detail
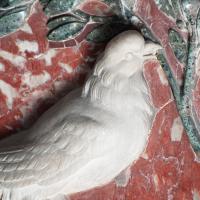 Basilica di San Pietro in VaticanoInterior Detail: Carving of dove holding an olive branch adjacent to the Chapel of Saint Sebastian
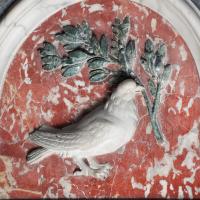 Basilica di San Pietro in VaticanoInterior Detail: Carving of dove holding an olive branch adjacent to the Chapel of Saint Sebastian
 Basilica di San Pietro in VaticanoInterior: Marble Flooring, Detail
 Basilica di San Pietro in VaticanoInterior: Marble Flooring, Detail
 Basilica di San Pietro in VaticanoInterior: Marble Flooring, Detail
 Basilica di San Pietro in VaticanoInterior: Marble Flooring, Detail
 Basilica di San Pietro in VaticanoInterior: Marble Flooring, Detail
 Basilica di San Pietro in VaticanoInterior: Marble Flooring, Detail
 Basilica di San Pietro in VaticanoInterior: Marble Flooring, Detail
 Basilica di San Pietro in VaticanoInterior: Marble Flooring with a Metal Grate, Detail
 San PietroInterior: Installation View
 from the right side") San PietroDetail: Installation View, Right Side
San PietroDetail: Installation View, Right Side from the left side") San PietroDetail: Installation View, Left Side
San PietroDetail: Installation View, Left Side by Bernini in the Apse of the Basilica") Cathedra PetriInterior: Cathedra Petri in the Apse of the Basilica
Cathedra PetriInterior: Cathedra Petri in the Apse of the Basilica") San PietroDetail: Installation View
San PietroDetail: Installation View Baldacchino di San PietroDetail: Baldachin top with the mosaic of Saint John the Evangelist in the Background
 Baldacchino di San PietroDetail: top
 Baldacchino di San PietroDetail: Figure on the top
 Baldacchino di San PietroDetail: Figure on the top
 Baldacchino di San PietroDetail: Column Base
 Baldacchino di San PietroDetail: Column Base
 Baldacchino di San PietroDetail: Figure on the top
 Interior: Detail of 18th century mosaic copy after Andrea Sacchi (1599–1661)
 Basilica di San Pietro in VaticanoInterior: Painting Detail, Figure Crucified
 Basilica di San Pietro in VaticanoInterior: Bronze Figural Scene, Detail
 Basilica di San Pietro in VaticanoInterior: Bronze Relief, Detail
 Basilica di San Pietro in VaticanoInterior: Bronze Relief, Detail
 Obelisco VaticanoExterior: Obelisk Base
 San PaoloExterior: Statua di San Paolo, Frontal view from East
 San PietroExterior: Statua di San Pietro Frontal view, in front of the Basilica
 San PietroDetail: Statua di San Pietro
 San PietroExterior: Statua di San Pietro Frontal view
 San PietroDetail: Base
 Basilica di San Pietro in VaticanoExterior: Facade Detail, South Clock
 OltremontanoExterior: South Clock Detail
 OltremontanoExterior: South Clock Detail
 OltremontanoExterior: South Clock Detail
 Basilica di San Pietro in VaticanoDetail: Corinthian Capital
 Basilica di San Pietro in VaticanoDetail: Small pediment
 Basilica di San Pietro in VaticanoDetail: Small niche
 Obelisco VaticanoDetail: Obelisk top
 Obelisco VaticanoDetail: Obelisk top
 Obelisco VaticanoDetail: Obelisk base
 Obelisco VaticanoDetail: Obelisk base
 Saranrom ParkView of a modern shrine
 Saranrom ParkDetail of palm tree fruit
 Saranrom ParkDetail of palm tree fruit
 Saranrom ParkDetail of palm tree fruit
 Saranrom ParkDetail of the Chao Mae Takhian Thong Shrine
 Saranrom ParkDetail of the Chao Mae Takhian Thong Shrine
 Saranrom ParkView of a model of a traditional Thai teak house
 View of a shrine
 View of a wooden panel with a painting of a bird
 View of a wooden panel with a painting of a bird
 View of a wooden panel with painting of flowers
 View of a shrine
 Wat PhoStreet view of Wat Pho
 Wat PhoStreet view of Wat Pho
 Street view of shopfronts
 Wat RatchabophitImage of watchman at the front entrance
 Wat RatchabophitView of façade
 Wat RatchabophitExterior
 Wat RatchabophitView of the chedi
 Wat RatchabophitView of the chedi
 Wat RatchabophitView of façade
 Wat RatchabophitDetail of façade, view of a monk
 Wat RatchabophitOblique view of façade
 Wat RatchabophitView of the complex and the chedi
 Wat RatchabophitDetail
 Wat RatchabophitDetail
 Wat RatchabophitDetail
 Wat RatchabophitView of the ubosot, or ordination hall, in Gothic revival style
 Wat RatchabophitDetail of the ubosot, or ordination hall
 Wat RatchabophitDetail of the ubosot, or ordination hall
 Wat RatchabophitDetail of the ubosot, or ordination hall
 Wat RatchabophitDetail of the ubosot, or ordination hall
 Wat RatchabophitDetail of the ubosot, or ordination hall
 Wat RatchabophitDetail of the ubosot, or ordination hall
 Wat RatchabophitDetail of entrance
 Wat RatchabophitDetail of entrance
 Wat RatchabophitDetail of entrance
 Wat RatchabophitDetail of a shrine
 Wat RatchabophitDetail of a shrine
 Wat RatchabophitView of the royal cemetery
 Wat RatchabophitView of the royal cemetery
 Wat RatchabophitView of the royal cemetery
 Wat RatchabophitView of the royal cemetery
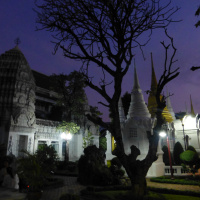 Wat RatchabophitView of the royal cemetery
 Wat ArunView of the prang, or spire
 Wat PhoDetail of the Reclining Buddha
 Wat PhoDetail of the Reclining Buddha
 Wat PhoDetail of the Reclining Buddha, seen through vihara pillars
 Wat PhoDetail of the Reclining Buddha, seen through vihara pillars
 Wat PhoDetail of the Reclining Buddha
 Wat PhoDetail of the Reclining Buddha
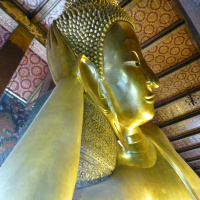 Wat PhoDetail of the Reclining Buddha
 Wat PhoDetail of the Reclining Buddha
 Wat PhoDetail of the Reclining Buddha and column
 Wat PhoDetail of the Reclining Buddha and column
 Wat PhoDetail of the Reclining Buddha and column
 Wat PhoDetail of the Reclining Buddha and column
 Wat PhoDetail of the Reclining Buddha
 Wat PhoInterior
 Wat PhoInterior
 Wat PhoDetail of the Reclining Buddha
 Wat PhoDetail of the Reclining Buddha
 Wat PhoDetail of the Reclining Buddha
 Wat PhoDetail of the Reclining Buddha with view of the mural in the backdrop
 Wat PhoDetail of the Reclining Buddha with view of the mural in the backdrop
 Wat PhoDetail of the Reclining Buddha with view of the mural in the backdrop
 Wat PhoDetail of the Reclining Buddha
 Wat PhoDetail of the Reclining Buddha
 Wat PhoDetail of the Reclining Buddha
 Wat PhoDetail of the Reclining Buddha and the sculptural base
 Wat PhoDetail of the Reclining Buddha and the sculptural base
 Wat PhoDetail of the Reclining Buddha and the sculptural base
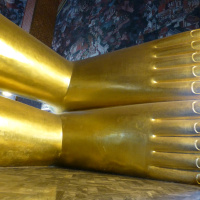 Wat PhoDetail of Buddha's feet
 Wat PhoDetail of Buddha's feet
 Wat PhoDetail of Buddha's feet
 Wat PhoDetail of Buddha's feet
 Wat PhoDetail of the Reclining Buddha's feet from the back showing the 108 Auspicious Symbols, and view of murals behind the sculpture
 Wat PhoDetail of the Reclining Buddha's feet from the back showing the 108 Auspicious Symbols
 Wat PhoDetail of the Reclining Buddha's feet from the back showing the 108 Auspicious Symbols
 Wat PhoDetail of the Reclining Buddha's feet from the back showing the 108 Auspicious Symbols
 Wat PhoDetail of the Reclining Buddha's feet from the back showing the 108 Auspicious Symbols
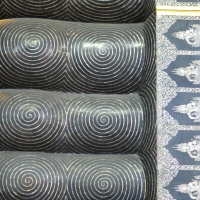 Wat PhoDetail of the Reclining Buddha's feet from the back showing the 108 Auspicious Symbols
 Wat PhoDetail of the Reclining Buddha's feet from the back showing the 108 Auspicious Symbols
 Wat PhoDetail of the Reclining Buddha's feet from the back showing the 108 Auspicious Symbols
 Wat PhoDetail of the Reclining Buddha's feet from the back showing the 108 Auspicious Symbols
 Wat PhoDetail of the Reclining Buddha's feet from the back showing the 108 Auspicious Symbols
 Wat PhoDetail of the Reclining Buddha from the back with view of cushions
 Wat PhoDetail of the Reclining Buddha from the back with view of cushions
 Wat PhoDetail of the Reclining Buddha from the back with view of cushions
 Wat PhoDetail of the Reclining Buddha's curls and cushion from the back
 Wat PhoDetail of the Reclining Buddha from the back with view of cushions
 Wat PhoDetail of the Reclining Buddha from the back with view of cushions