View of an inscribed base in the museum's courtyard
View of a column fragment in the museum's courtyard
View of a sculpted base in the museum's courtyard
Detail: View of South face of obelisk
Detail: View of top South face of obelisk
Detail: View of South face obelisk inscriptions
Detail: View of South face obelisk base
Detail: View of South face obelisk inscription base
Detail: View of South face obelisk base
Detail: View of obelisk facing South
Detail: View of obelisk facing South
View of inscribed plaque near Porta Maggiore
View of inscribed plaque near Porta Maggiore
View of inscribed plaque near Porta Maggiore
View of inscribed plaque near Porta Maggiore
View of the western face
View of the western face
Detail: View of an inscribed base in front of the Arch of Septimius Severus (Arco di Settimio Severo)
View of the western face
Detail: View of the carved ornament over the center of the western face
Detail: View of a victory with a trophy on the left Spandrel of the western face
Detail: View of a victory with a trophy on the right Spandrel of the western face
Detail: View of the right relief panel of the western face which depicts Romans fighting Osroenes
Detail: View of the right relief panel of the western face which depicts Romans fighting Osroenes
View of the western face
Detail: View of captive Parthians on the base of a column
View of a relief of a Mounted Warrior on a fragment in front of the Arch of Septimius Severus (Arco di Settimio Severo)
Detail: View of the right relief panel of the western face which depicts Romans fighting Osroenes
Detail: View of captive Parthians on the base of a columns
Detail: View of the right relief panel of the eastern face which depicts Romans attacking Ctesiphon
View of the eastern face
Detail: View of the left relief panel of the eastern face which depicts Romans attacking Seleucia
View of the eastern face
View parallel to the eastern face
View of the eastern face
View of the western face
View of the western face
View of the western face
View of the eastern face
View of the eastern face
View from the south
View of the carved ornaments on top
View of the western face
Detail: View of the lower cornice
Detail: View of the lower cornice
Detail: View of the lower cornice
Detail: View of the Attic
View of the Western Face
Detail: View of a Victory in the right Spandrel of the Western Face
Detail: View of the carved ornament over the center of the Western face
Detail: View of a relief panel depicting the Emperor in a triumphal procession from the south pier
Detail: View of carved coffering on the underside
Detail: View of a relief panel depicting the Emperor in a triumphal procession from the south pier
Detail: View of a relief panel depicting the Emperor in a triumphal procession from the south pier
Detail: View of central relief sculpture depicting the Emperor and an eagle on the underside
Detail: View of central relief sculpture depicting the Emperor and an eagle on the underside
Detail: View of the carved ornament over the center of the western face
Detail: View of a Victory in the left Spandrel of the Western Face
Detail: View of a Victory in the left Spandrel of the Western Face
Detail: View of a Victory in the right Spandrel of the Western Face
Detail: View of a relief panel depicting the Emperor in a triumphal procession from the south pier
Detail: View of the underside
Detail: View of the underside
Detail: View of a Capital
Detail: View of a Capital
Detail: View of a Capital
Detail: View of a Capital
Detail: View of carved ornamentation under a relief panel
Detail: View of a relief panel depicting the Emperor in a triumphal procession from the south pier
Detail: View of a relief panel depicting the spoils from the sack of Jerusalem on the north pier
Detail: View of a relief panel depicting the spoils from the sack of Jerusalem on the north pier
Detail: View of the Menorah from a relief panel depicting the spoils from the sack of Jerusalem on the north pier
Detail: View of a relief panel depicting the spoils from the sack of Jerusalem on the north pier
Detail: View of carved ornamentation next to a relief panel depicting the spoils from the sack of Jerusalem on the north pier
Detail: View of the carved ornament over the center of the western face
Detail: View of carved coffering on the underside
Detail: View of a frame from the western face of south pier
Detail: View of the western face of the south pier
Detail: View of the lower cornice
Detail: View of the lower cornice
Detail: View of a Victory in a Spandrel
Detail: View of a Victory in a Spandrel
Detail: View of the Keystone Decoration
Detail: View of the Keystone Decoration
Detail: View of central relief sculpture depicting the Emperor and an eagle on the underside
Detail: View of a relief panel depicting the spoils from the sack of Jerusalem on the north pier
Detail: View of a relief panel depicting the spoils from the sack of Jerusalem on the north pier
Detail: View of a Victory in a Spandrel
Detail: View of the Lower Cornice and Attic Inscription
View of the East Face and the coffering on the underside
Detail: View of the Lower Cornice on the East Face
Detail: View of a Column Capital on the East Face
Detail: View of a Column Capital on the East Face
Detail: View of Graffiti
Detail: View of a relief panel depicting the Emperor in a Triumphal Procession from the south pier
Detail: View of a relief panel depicting the Emperor in a Triumphal Procession from the south pier
Detail: View of a relief panel depicting the Emperor in a Triumphal Procession from the south pier
Detail: View of a relief panel depicting the Emperor in a Triumphal Procession from the south pier
View of a Fragment of Stairs near the Arch of Titus (Arco di Tito)
Detail: View of the Attic Inscription
Detail: View of the Eastern face and Attic Inscription
Detail: View of the Eastern face and Attic Inscription
Detail: View of the Figural Frieze on the Eastern face
Detail: View of the Figural Frieze on the Eastern face
Detail: View of the Figural Frieze on the Eastern face
Detail: View of the Figural Frieze on the Eastern face
Detail: View of the Figural Frieze on the Eastern face
Detail: View of the Attic Inscription on the Western face
View from the West
View from the South
View from the West
View from the West
View from the East
View from the East
View of the southern frieze
View of the southern face
View of the southern frieze
View of the southern frieze
View of the southern frieze
View of the southern frieze
View of the southwestern pilaster
View of the southern face
View of the southern inscription
Detail: View of the southern inscription
Detail: View of the southern inscription
Detail: View of the southern inscription
Side view of the southern face
Side view of the southern face and exposed brick on eastern side
Detail: View of exposed bricks on eastern side
Detail: Base of eastern side
Detail: Base of eastern side
Detail: Base pillars on northern face
Detail: Base pillars on northern face
Detail: Inscription on northern face
Detail: Inscription on northern face
Detail: Inscription on northern face
Detail: Inscription on northern face
Detail: Inscription on northern face
View of the northern face
Detail: Frieze on the northern face
Detail: Frieze on the northern face
Detail: Frieze on the northern face
Detail: Frieze on the northern face
View of the northern face
Detail: Northern face
Detail: Frieze on the northern face
Detail: Frieze on the northern face
Detail: Frieze on the northern face
Detail: Frieze on the northern face
Detail: Frieze on the northern face
Detail: Frieze on the northern face
Detail: Frieze on the northern face
Detail: Frieze on the northern face
Detail: Face on the northern face
Detail: Inscription on the northern face
Detail: Inscription on the northern face
Detail: Inscription on the northern face
Detail: Inscription on the northern face
Detail: Inscription on the northern face
Detail: Inscription on the northern face
Detail: Western Frieze
Detail: Western Frieze
Detail: Western Frieze
View of Trajan's Column looking Northeast
View of Trajan's Column looking East
View of Trajan's Column looking Southeast
View of Trajan's Column looking South
View of Trajan's Column looking Southwest
View of Trajan's Column looking West
View of Trajan's Column looking West
View of Trajan's Column looking West
View of Trajan's Column looking West
View of Trajan's Column looking Northwest
View of Trajan's Column looking West
View of the Base of Trajan's Column looking West
View of Trajan's Column looking West
View of Trajan's Column looking West
View of Trajan's Column looking South
View of Trajan's Column looking Southeast
View of Trajan's Column looking East
Side View of Saint Peter on top of Trajan's Column
View of Saint Peter on top of Trajan's Column with Inscription "B PETRO" Visible
View of the Western Side of the Frieze on Trajan's Column Scenes CXLVI-CXLVII (Romans capturing Dacians and Roman soldiers displaying Decebalus's head in fort) and CLIII-CLIV (Romans burning Dacian buildings and the expulsion of Dacians)
View of the Western Side of the Frieze on Trajan's Column Scenes CXXXI-CXXXIII (Romans crossing a bridge, Dacians leaving a fort and marching onwards) and CXXXIX-CXLI (Dacian king addressing men, Dacians retreating and committing suicide, Dacians appealing to Trajan)
View of the Western Side of the Frieze on Trajan's Column Scenes CXVI-CXVIII (Romans attacking walls, building siege machines, and a Dacian kneeling before Trajan) and CXXIII-CXXIV (Dacians fleeing their fort and begging Trajan for mercy)
View of the Western Side of the Frieze on Trajan's Column Scenes CV-CVI (Trajan holding a council and soldiers marching) and CXII-CXIII (Romans and Dacians fighting, Romans attacking a fortress)
View of the Western Side of the Frieze on Trajan's Column Scenes C-CI (Trajan receiving foreigners and leading infantry over a bridge)
View of the Western Side of the Frieze on Trajan's Column Scenes LXXXVI-LXXXVII (Trajan making a sacrifice and moving to his next destination) and XCII-XCIII (soldiers clearing forest and Dacians planning an attack)
View of the Western Side of the Frieze on Trajan's Column Scenes LXXIX-LXXX (Trajan and his troops sailing out and arriving on Dalmatian shore)
View of the Western Side of the Frieze on Trajan's Column Scenes LXVII-LXVIII (Dacians cutting down trees and Trajan receiving a prisoner as Romans build camp) and LXXIII-LXXV (Trajan addressing soldiers and Romans subjugating the Dacians)
View of the Western Side of the Frieze on Trajan's Column Scenes LIV-LVI (Trajan addressing his soldiers, Romans climbing a steep hill and clearing trees for a road)
View of the Western Side of the Frieze on Trajan's Column Scenes XXXIX-XL (Trajan receiving Dacian embassy and second major battle scene) and XLVI-XLVIII (soldiers disembarking on shore, crossing a bridge and marching onwards)
View of the Western Side of the Frieze on Trajan's Column Scenes XXXIII-XXXIV (Trajan and troops leaving in boats and traveling along the river)
View of the Western Side of the Frieze on Trajan's Column Scenes XIX-XXI (building a bridge and a fort, marching in front of fort) and XXV-XXVII (Trajan observing a Dacian town, Romans crossing a river, Trajan giving a speech)
View of the Western Side of the Frieze on Trajan's Column Scenes X-XI (Roman soldiers building a fort under Trajan's watch)
View of the Western Side of the Frieze on Trajan's Column Scenes III-IV (a town on the banks of the Danube, the Danube personified, and Roman soldiers crossing the river)
View of Saint Peter from Behind
View of Saint Peter from Behind and Below with Inscription "B PETRO APOST" Visible
View of the Southwestern Side of the Frieze on Trajan's Column Scene CXLI (Dacians appealing to Trajan), CXLVII-CXLVIII (Display of Decebalus's head and the capture of Dacians), and CLIV-CLV (Expulsion of the Dacians and their livestock)
View of the Southwestern Side of the Frieze on Trajan's Column Scenes CXXIII-CXXV (Dacians seeking mercy from Trajan, Roman soldiers taking spoils, Trajan speaking to his troops), CXXXII-CXXXIV (Dacians leaving fort, marching, and attacking a Roman fort), and CXLI (Dacians appealing to Trajan)
 View of an inscribed base in the museum's courtyard
 View of a column fragment in the museum's courtyard
 View of a sculpted base in the museum's courtyard
 Detail: View of South face of obelisk
 Detail: View of top South face of obelisk
 Detail: View of South face obelisk inscriptions
 Detail: View of South face obelisk base
 Detail: View of South face obelisk inscription base
 Detail: View of South face obelisk base
 Detail: View of obelisk facing South
 Detail: View of obelisk facing South
 View of inscribed plaque near Porta Maggiore
 View of inscribed plaque near Porta Maggiore
 View of inscribed plaque near Porta Maggiore
 View of inscribed plaque near Porta Maggiore
 View of the western face
 View of the western face
 Detail: View of an inscribed base in front of the Arch of Septimius Severus (Arco di Settimio Severo)
 View of the western face
 Detail: View of the carved ornament over the center of the western face
 Detail: View of a victory with a trophy on the left Spandrel of the western face
 Detail: View of a victory with a trophy on the right Spandrel of the western face
 Detail: View of the right relief panel of the western face which depicts Romans fighting Osroenes
 Detail: View of the right relief panel of the western face which depicts Romans fighting Osroenes
 View of the western face
 Detail: View of captive Parthians on the base of a column
 View of a relief of a Mounted Warrior on a fragment in front of the Arch of Septimius Severus (Arco di Settimio Severo)
 Detail: View of the right relief panel of the western face which depicts Romans fighting Osroenes
 Detail: View of captive Parthians on the base of a columns
 Detail: View of the right relief panel of the eastern face which depicts Romans attacking Ctesiphon
 View of the eastern face
 Detail: View of the left relief panel of the eastern face which depicts Romans attacking Seleucia
 View of the eastern face
 View parallel to the eastern face
 View of the eastern face
 View of the western face
 View of the western face
 View of the western face
 View of the eastern face
 View of the eastern face
 View from the south
 View of the carved ornaments on top
 View of the western face
 Detail: View of the lower cornice
 Detail: View of the lower cornice
 Detail: View of the lower cornice
 Detail: View of the Attic
 View of the Western Face
 Detail: View of a Victory in the right Spandrel of the Western Face
 Detail: View of the carved ornament over the center of the Western face
 Detail: View of a relief panel depicting the Emperor in a triumphal procession from the south pier
 Detail: View of carved coffering on the underside
 Detail: View of a relief panel depicting the Emperor in a triumphal procession from the south pier
 Detail: View of a relief panel depicting the Emperor in a triumphal procession from the south pier
 Detail: View of central relief sculpture depicting the Emperor and an eagle on the underside
 Detail: View of central relief sculpture depicting the Emperor and an eagle on the underside
 Detail: View of the carved ornament over the center of the western face
 Detail: View of a Victory in the left Spandrel of the Western Face
 Detail: View of a Victory in the left Spandrel of the Western Face
 Detail: View of a Victory in the right Spandrel of the Western Face
 Detail: View of a relief panel depicting the Emperor in a triumphal procession from the south pier
 Detail: View of the underside
 Detail: View of the underside
 Detail: View of a Capital
 Detail: View of a Capital
 Detail: View of a Capital
 Detail: View of a Capital
 Detail: View of carved ornamentation under a relief panel
 Detail: View of a relief panel depicting the Emperor in a triumphal procession from the south pier
 Detail: View of a relief panel depicting the spoils from the sack of Jerusalem on the north pier
 Detail: View of a relief panel depicting the spoils from the sack of Jerusalem on the north pier
 Detail: View of the Menorah from a relief panel depicting the spoils from the sack of Jerusalem on the north pier
 Detail: View of a relief panel depicting the spoils from the sack of Jerusalem on the north pier
 Detail: View of carved ornamentation next to a relief panel depicting the spoils from the sack of Jerusalem on the north pier
 Detail: View of the carved ornament over the center of the western face
 Detail: View of carved coffering on the underside
 Detail: View of a frame from the western face of south pier
 Detail: View of the western face of the south pier
 Detail: View of the lower cornice
 Detail: View of the lower cornice
 Detail: View of a Victory in a Spandrel
 Detail: View of a Victory in a Spandrel
 Detail: View of the Keystone Decoration
 Detail: View of the Keystone Decoration
 Detail: View of central relief sculpture depicting the Emperor and an eagle on the underside
 Detail: View of a relief panel depicting the spoils from the sack of Jerusalem on the north pier
 Detail: View of a relief panel depicting the spoils from the sack of Jerusalem on the north pier
 Detail: View of a Victory in a Spandrel
 Detail: View of the Lower Cornice and Attic Inscription
 View of the East Face and the coffering on the underside
 Detail: View of the Lower Cornice on the East Face
 Detail: View of a Column Capital on the East Face
 Detail: View of a Column Capital on the East Face
 Detail: View of Graffiti
 Detail: View of a relief panel depicting the Emperor in a Triumphal Procession from the south pier
 Detail: View of a relief panel depicting the Emperor in a Triumphal Procession from the south pier
 Detail: View of a relief panel depicting the Emperor in a Triumphal Procession from the south pier
 Detail: View of a relief panel depicting the Emperor in a Triumphal Procession from the south pier
 View of a Fragment of Stairs near the Arch of Titus (Arco di Tito)
 Detail: View of the Attic Inscription
 Detail: View of the Eastern face and Attic Inscription
 Detail: View of the Eastern face and Attic Inscription
 Detail: View of the Figural Frieze on the Eastern face
 Detail: View of the Figural Frieze on the Eastern face
 Detail: View of the Figural Frieze on the Eastern face
 Detail: View of the Figural Frieze on the Eastern face
 Detail: View of the Figural Frieze on the Eastern face
 Detail: View of the Attic Inscription on the Western face
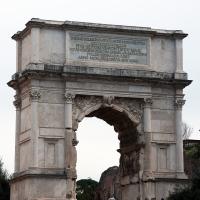 View from the West
 View from the South
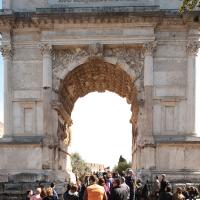 View from the West
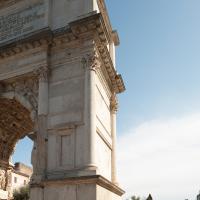 View from the West
 View from the East
 View from the East
 View of the southern frieze
 View of the southern face
 View of the southern frieze
 View of the southern frieze
 View of the southern frieze
 View of the southern frieze
 View of the southwestern pilaster
 View of the southern face
 View of the southern inscription
 Detail: View of the southern inscription
 Detail: View of the southern inscription
 Detail: View of the southern inscription
 Side view of the southern face
 Side view of the southern face and exposed brick on eastern side
 Detail: View of exposed bricks on eastern side
 Detail: Base of eastern side
 Detail: Base of eastern side
 Detail: Base pillars on northern face
 Detail: Base pillars on northern face
 Detail: Inscription on northern face
 Detail: Inscription on northern face
 Detail: Inscription on northern face
 Detail: Inscription on northern face
 Detail: Inscription on northern face
 View of the northern face
 Detail: Frieze on the northern face
 Detail: Frieze on the northern face
 Detail: Frieze on the northern face
 Detail: Frieze on the northern face
 View of the northern face
 Detail: Northern face
 Detail: Frieze on the northern face
 Detail: Frieze on the northern face
 Detail: Frieze on the northern face
 Detail: Frieze on the northern face
 Detail: Frieze on the northern face
 Detail: Frieze on the northern face
 Detail: Frieze on the northern face
 Detail: Frieze on the northern face
 Detail: Face on the northern face
 Detail: Inscription on the northern face
 Detail: Inscription on the northern face
 Detail: Inscription on the northern face
 Detail: Inscription on the northern face
 Detail: Inscription on the northern face
 Detail: Inscription on the northern face
 Detail: Western Frieze
 Detail: Western Frieze
 Detail: Western Frieze
 View of Trajan's Column looking Northeast
 View of Trajan's Column looking East
 View of Trajan's Column looking Southeast
 View of Trajan's Column looking South
 View of Trajan's Column looking Southwest
 View of Trajan's Column looking West
 View of Trajan's Column looking West
 View of Trajan's Column looking West
 View of Trajan's Column looking West
 View of Trajan's Column looking Northwest
 View of Trajan's Column looking West
 View of the Base of Trajan's Column looking West
 View of Trajan's Column looking West
 View of Trajan's Column looking West
 View of Trajan's Column looking South
 View of Trajan's Column looking Southeast
 View of Trajan's Column looking East
 Side View of Saint Peter on top of Trajan's Column
 View of Saint Peter on top of Trajan's Column with Inscription "B PETRO" Visible
 and CLIII-CLIV (Romans burning Dacian buildings and the expulsion of Dacians)") View of the Western Side of the Frieze on Trajan's Column Scenes CXLVI-CXLVII (Romans capturing Dacians and Roman soldiers displaying Decebalus's head in fort) and CLIII-CLIV (Romans burning Dacian buildings and the expulsion of Dacians)
View of the Western Side of the Frieze on Trajan's Column Scenes CXLVI-CXLVII (Romans capturing Dacians and Roman soldiers displaying Decebalus's head in fort) and CLIII-CLIV (Romans burning Dacian buildings and the expulsion of Dacians) and CXXXIX-CXLI (Dacian king addressing men, Dacians retreating and committing suicide, Dacians appealing to Trajan)") View of the Western Side of the Frieze on Trajan's Column Scenes CXXXI-CXXXIII (Romans crossing a bridge, Dacians leaving a fort and marching onwards) and CXXXIX-CXLI (Dacian king addressing men, Dacians retreating and committing suicide, Dacians appealing to Trajan)
View of the Western Side of the Frieze on Trajan's Column Scenes CXXXI-CXXXIII (Romans crossing a bridge, Dacians leaving a fort and marching onwards) and CXXXIX-CXLI (Dacian king addressing men, Dacians retreating and committing suicide, Dacians appealing to Trajan) and CXXIII-CXXIV (Dacians fleeing their fort and begging Trajan for mercy)") View of the Western Side of the Frieze on Trajan's Column Scenes CXVI-CXVIII (Romans attacking walls, building siege machines, and a Dacian kneeling before Trajan) and CXXIII-CXXIV (Dacians fleeing their fort and begging Trajan for mercy)
View of the Western Side of the Frieze on Trajan's Column Scenes CXVI-CXVIII (Romans attacking walls, building siege machines, and a Dacian kneeling before Trajan) and CXXIII-CXXIV (Dacians fleeing their fort and begging Trajan for mercy) and CXII-CXIII (Romans and Dacians fighting, Romans attacking a fortress)") View of the Western Side of the Frieze on Trajan's Column Scenes CV-CVI (Trajan holding a council and soldiers marching) and CXII-CXIII (Romans and Dacians fighting, Romans attacking a fortress)
View of the Western Side of the Frieze on Trajan's Column Scenes CV-CVI (Trajan holding a council and soldiers marching) and CXII-CXIII (Romans and Dacians fighting, Romans attacking a fortress)") View of the Western Side of the Frieze on Trajan's Column Scenes C-CI (Trajan receiving foreigners and leading infantry over a bridge)
View of the Western Side of the Frieze on Trajan's Column Scenes C-CI (Trajan receiving foreigners and leading infantry over a bridge) and XCII-XCIII (soldiers clearing forest and Dacians planning an attack)") View of the Western Side of the Frieze on Trajan's Column Scenes LXXXVI-LXXXVII (Trajan making a sacrifice and moving to his next destination) and XCII-XCIII (soldiers clearing forest and Dacians planning an attack)
View of the Western Side of the Frieze on Trajan's Column Scenes LXXXVI-LXXXVII (Trajan making a sacrifice and moving to his next destination) and XCII-XCIII (soldiers clearing forest and Dacians planning an attack)") View of the Western Side of the Frieze on Trajan's Column Scenes LXXIX-LXXX (Trajan and his troops sailing out and arriving on Dalmatian shore)
View of the Western Side of the Frieze on Trajan's Column Scenes LXXIX-LXXX (Trajan and his troops sailing out and arriving on Dalmatian shore) and LXXIII-LXXV (Trajan addressing soldiers and Romans subjugating the Dacians)") View of the Western Side of the Frieze on Trajan's Column Scenes LXVII-LXVIII (Dacians cutting down trees and Trajan receiving a prisoner as Romans build camp) and LXXIII-LXXV (Trajan addressing soldiers and Romans subjugating the Dacians)
View of the Western Side of the Frieze on Trajan's Column Scenes LXVII-LXVIII (Dacians cutting down trees and Trajan receiving a prisoner as Romans build camp) and LXXIII-LXXV (Trajan addressing soldiers and Romans subjugating the Dacians)") View of the Western Side of the Frieze on Trajan's Column Scenes LIV-LVI (Trajan addressing his soldiers, Romans climbing a steep hill and clearing trees for a road)
View of the Western Side of the Frieze on Trajan's Column Scenes LIV-LVI (Trajan addressing his soldiers, Romans climbing a steep hill and clearing trees for a road) and XLVI-XLVIII (soldiers disembarking on shore, crossing a bridge and marching onwards)") View of the Western Side of the Frieze on Trajan's Column Scenes XXXIX-XL (Trajan receiving Dacian embassy and second major battle scene) and XLVI-XLVIII (soldiers disembarking on shore, crossing a bridge and marching onwards)
View of the Western Side of the Frieze on Trajan's Column Scenes XXXIX-XL (Trajan receiving Dacian embassy and second major battle scene) and XLVI-XLVIII (soldiers disembarking on shore, crossing a bridge and marching onwards)") View of the Western Side of the Frieze on Trajan's Column Scenes XXXIII-XXXIV (Trajan and troops leaving in boats and traveling along the river)
View of the Western Side of the Frieze on Trajan's Column Scenes XXXIII-XXXIV (Trajan and troops leaving in boats and traveling along the river) and XXV-XXVII (Trajan observing a Dacian town, Romans crossing a river, Trajan giving a speech)") View of the Western Side of the Frieze on Trajan's Column Scenes XIX-XXI (building a bridge and a fort, marching in front of fort) and XXV-XXVII (Trajan observing a Dacian town, Romans crossing a river, Trajan giving a speech)
View of the Western Side of the Frieze on Trajan's Column Scenes XIX-XXI (building a bridge and a fort, marching in front of fort) and XXV-XXVII (Trajan observing a Dacian town, Romans crossing a river, Trajan giving a speech)") View of the Western Side of the Frieze on Trajan's Column Scenes X-XI (Roman soldiers building a fort under Trajan's watch)
View of the Western Side of the Frieze on Trajan's Column Scenes X-XI (Roman soldiers building a fort under Trajan's watch)") View of the Western Side of the Frieze on Trajan's Column Scenes III-IV (a town on the banks of the Danube, the Danube personified, and Roman soldiers crossing the river)
View of the Western Side of the Frieze on Trajan's Column Scenes III-IV (a town on the banks of the Danube, the Danube personified, and Roman soldiers crossing the river) View of Saint Peter from Behind
 View of Saint Peter from Behind and Below with Inscription "B PETRO APOST" Visible
, CXLVII-CXLVIII (Display of Decebalus's head and the capture of Dacians), and CLIV-CLV (Expulsion of the Dacians and their livestock)") View of the Southwestern Side of the Frieze on Trajan's Column Scene CXLI (Dacians appealing to Trajan), CXLVII-CXLVIII (Display of Decebalus's head and the capture of Dacians), and CLIV-CLV (Expulsion of the Dacians and their livestock)
View of the Southwestern Side of the Frieze on Trajan's Column Scene CXLI (Dacians appealing to Trajan), CXLVII-CXLVIII (Display of Decebalus's head and the capture of Dacians), and CLIV-CLV (Expulsion of the Dacians and their livestock), CXXXII-CXXXIV (Dacians leaving fort, marching, and attacking a Roman fort), and CXLI (Dacians appealing to Trajan)") View of the Southwestern Side of the Frieze on Trajan's Column Scenes CXXIII-CXXV (Dacians seeking mercy from Trajan, Roman soldiers taking spoils, Trajan speaking to his troops), CXXXII-CXXXIV (Dacians leaving fort, marching, and attacking a Roman fort), and CXLI (Dacians appealing to Trajan)
View of the Southwestern Side of the Frieze on Trajan's Column Scenes CXXIII-CXXV (Dacians seeking mercy from Trajan, Roman soldiers taking spoils, Trajan speaking to his troops), CXXXII-CXXXIV (Dacians leaving fort, marching, and attacking a Roman fort), and CXLI (Dacians appealing to Trajan)