interior
: View > interior
See Also:
interior, former
References
Contains information from the J. Paul Getty Trust, Getty Research Institute – the Art & Architecture Thesaurus, the Getty Thesaurus of Geographic Names, the Union List of Artist Names, the Cultural Objects Name Authority, and/or the Getty Iconography Authority – which is made available under the ODC Attribution License.
View on the Getty Vocabularies.
View on the Getty Vocabularies.
 Interior: Southern Window Detail
 Interior: View from Gallery, Northern Side Aisle
 Interior: Central Dome, Pendentives with Inscriptions
 Interior: Narthex, Womens' Prayer Area, Facing South
 Interior: Narthex Vaulting
 Interior: Narthex Facing North
 Interior: Narthex Corner Detail
 Interior: Narthex Detail
 Interior: Narthex Vault Detail
 Interior: Southern Side Aisle, Facing East
 Interior: Northern Side Aisle, Facing East
 Interior: Minbar
 Interior: Western Elevation
 Interior: Northern Side Aisle
 Interior: Minbar, Main Prayer Hall, Nave
 Interior: South Elevation
 Interior: Central Dome, Pendentives
 Interior: North Elevation
 Interior: Outer narthex
 Interior: Middle gallery
 Interior: Second level gallery
 Interior: Narthex
 Interior: Narthex
 Interior: Main prayer area, dome
 Interior: Main prayer area
 Interior: Southern side chapel
 Interior: Altar
 Interior: Cornice Detail
 Interior: Cornice Detail
 Interior: Arch Detail
 Interior: Arch Detail
 Interior: Pier Detail
 Interior: Northeast Corner Detail; Cornice; Stained Glass Window
 Interior: Vaults, South Aisle
 Interior: South Aisle, Minbar,
 Interior: South Aisle Facing Northeast
 Interior: Central Prayer Hall, Facing North Aisle
 Interior: Central Prayer Hall, Facing Northwest
 Interior: Narthex
 Interior: Central Prayer Hall, Facing Northern Side Aisle, Muezzin's Pulpit
 Interior: Central Prayer Hall; Nave, Facing East
 Interior: Central Prayer Hall, South Aisle, Minbar, Support Piers, Mihrab Niche in Background
 Interior: Central Dome, Pendentives
 Interior: Central Prayer Hall; Nave; Entrance; Facing West
 Interior: Central Prayer Hall; Nave; Northwest Corner Detail
 Interior: Central Prayer Hall; Nave; Minbar; Muezzin's Pulpit
 Interior: Central Prayer Hall; Nave
 Interior: North Aisle, Facing East
 Interior: North Aisle looking East
 Interior: Column Detail
 Interior: Dome Detail, Pendentives; Stained Glass
 Interior: Southern Side Aisle
 Interior: Support Column, Facing Southwest
 Interior: Nave and main prayer area
 Interior: Minbar area
 Interior: Narthex
 Interior: Prayer aisle for women
 Interior: Narthex, Gallery Stairs; Arch
 Interior: Narthex
 Interior: South Side Aisle, Vaulting
 Interior: Narthex, Gallery Stairs
 Interior: Arcade between South Aisle and Prayer Hall
 Interior: Minbar, Gallery
 Interior: Southeast Niche
 Interior: Facing Southwest from Southeast Niche
 Interior: Central Prayer Hall; Nave; Support Piers; Facing North
 Interior: Central Prayer Hall; Nave; Pulpit; Gallery; Pendentives; Entrance Portal in Northwest; Inscriptions
 Interior: Minbar; Pulpit; Gallery; Entrance; Facing West
 Interior: Dome Detail; Vault Detail; Half-Dome Detail
 Interior: Central Dome Detail; Pendentives Bearing Inscriptions
 Interior: Prayer Hall, Gallery
 Interior: Minbar, Gallery
 Interior: Northeast Chapel
 Interior: Northern Aisle, Facing Northwest
 Interior: Central Prayer Hall Facing Qibla Wall, Mihrab Niche; Apse
 Interior: Gallery Stairway
 Interior: Gallery View, Central Apse, Main Prayer Area, Nave, Pendentives Bearing Inscriptions
 Interior: Central Apse, Central Dome, Pendentives Bearing Inscriptions
 Interior: South Gallery, Support Piers, Pendentive With Inscription; Star Motif in Arch and Vault
 Interior: North Gallery, Support Piers, Mosaics, Pendentive With Inscription; Star Motif
 Interior: West Gallery, Shield Windows
 Interior: West Gallery Looking South
 Interior: View of Central Dome, Support Domes and Arches, From Gallery
 Interior: View of Central Dome and Support Structures from Northwest Gallery
 Interior: South Gallery
 Interior: View of Dome Support Structures and Shield Windows from South Gallery
 Interior: Central Prayer Hall, Gallery
 Interior: Central Dome, Pendentives, Arches Viewed from Above Gallery
 Interior: Central Dome, Pendentives, Arches Viewed from Above Gallery
 Interior: Nave, main prayer area
 Interior: Main prayer area
 Interior: Mihrab, Altar
 Interior: Gallery, Northwest
 Interior: Gallery, South wing
 Interior: Gallery, Western corner
 Interior: South side aisle
 Interior: South side altar
 Interior: Northeast side aisle
 Interior: Narthex
 Interior: Narthex
 Interior: Apse
 Interior: Gallery level
 Interior: Gallery level
 Interior: Southwestern Entrance, Mosaic
 Interior: Southwestern Entrance Mosaic (10th century) Detail, Virgin, Flanked by Justinian and Constantine
 Interior: Southwestern Entrance Mosaic (10th century) Detail, Virgin and Child
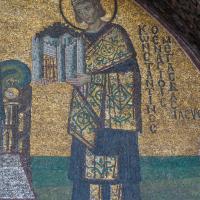 Interior: Southwestern Entrance Mosaic (10th century) Detail, Emperor Constantine
 Interior: Southwestern Entrance Mosaic (10th century) Detail, Emperor Justinian
 Interior: Imperial Gate Mosaic (late 9th - early 10th century)
 Interior: Imperial Gate Mosaic (late 9th - early 10th century) Detail, Leo the Wise
 Interior: Imperial Gate Mosaic (late 9th - early 10th century) Detail; Christ Pantokrator
 Interior: Imperial Gate Mosaic (late 9th - early 10th century) Detail, Leo the Wise and the Virgin
 Interior: Imperial Gate Mosaic (late 9th - early 10th century) Detail, Archangel Gabriel
 Interior: Apse Mosaic of Virgin and Child
 Interior: Eastern Wall of Southern Gallery; Mosaic of Empress Zoe, Christ Pantokrator, Constantine IX Monomachus
 Interior: Eastern Wall of Southern Gallery, Comnenus Mosaic of Virgin and Child, Emperor John II Comnenus, Empress Irene, Alexius Comenenus
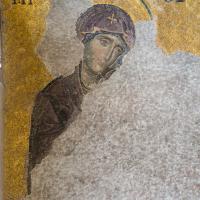 Interior: Deesis Mosaic Detail, Virgin Mary, South Upper Gallery
 Interior: Deesis Mosaic Detail, Christ, South Upper Gallery
 Interior: Deesis Mosaic Detail, John the Baptist, Upper Gallery
 Interior: Deesis Mosaic Detail, South Upper Gallery
 Interior: Deesis Mosaic, Upper Gallery
 Interior: Comnenus Mosaic of Virgin and Child, Emperor John II Comnenus, Empress Irene, Eastern Wall of Southern Gallery
 Interior: Comnenus Mosaic Detail
 Interior: Comnenus Mosaic Detail, Alexius I Comnenus, Eastern Wall of Southern Gallery
 Interior: Comnenus Mosaic Detail
 Interior: Comnenus Mosaic Detail, Virgin Mary, Eastern Wall of Southern Gallery
 Interior: Comnenus Mosaic Detail, Eastern Wall of Southern Gallery
 Interior: Comnenus Mosaic Detail, Eastern Wall of Southern Gallery
 Interior: Central Dome, Calligraphic Inscription
 Interior: Southwest Gallery Vault Detail
 Interior: Northeast Arcade Detail
 Interior: Southwest Column Capital Detail
 Interior: Southwest Gallery Column Capital Detail, Monogram
 Interior: Southwest Gallery Column Capital Detail
 Interior: Southwest Column Capital Detail
 Interior: Empress Zoe Mosaic Detail
 Interior: Southwest Gallery
 Interior: Vault Detail, Window
 Interior: Northwestern Gallery, Dome Detail, Roundel
 Interior: Southwestern Arcade Detail
 Interior: Southwest Gallery Column Detail, Vault Detail
 Interior: Pendentive, Seraphim Mosaic
 Interior: Central Dome, Calligraphic Inscription
 Interior: Column Capital Detail
 Interior: View of Western Gallery
 Interior: Northeast Half-Dome Detail
 Interior: Nave, Central Dome, Apse, Roundels, Pendentives
 Interior: Nave, Central Dome, Apse, Roundels, Cherub, Pendentives
 Interior: Nave, Central Dome, Apse, Roundels, Cherub, Pendentives
 Interior: Nave, Central Dome, Apse, Roundels, Pendentives
 Interior: Mihrab
 Interior: Main prayer area and entrance
 Interior: Side aisle, East
 Interior: Northwestern Side Chamber
 Interior: View Along Northeast Side Aisle
 Interior: Central Prayer Hall Facing West
 Interior: Central Dome, Inscription
 Interior: Minbar, Central Prayer Area; Gallery
 Interior: Northeast Aisle Detail, Column Detail; Polychrome Marble
 Interior: Mihrab Niche, Muqarnas, Iznik Tilework
 Interior: Central Prayer Space Facing Northwest, Gallery, Side Chamber
 Interior: Central Prayer Hall Facing North, Gallery
 Interior: Mihrab, Qibla Wall, Iznik Tiles, Muqarnas, Inscription
 Interior: Central Dome, Inscription
 Interior: Northeast Side Aisle, Central Prayer Hall, Mihrab Niche, Qibla Wall
 Interior: Mihrab Niche Detail, Iznik Tilework Detail
 Interior: Mihrab Niche Detail, Iznik Tilework Detail
 Interior: Northeast Side Aisle, Lozenge Column Capital Detail
 Interior: Quranic Inscription, Qibla Wall, Mihrab Niche
 Interior: Northwest Arcade, Cornice Detail
 Interior: Northwest Arcade, Lozenge Column Capital Detail, Arch Detail, False Polychrome Marble
 Interior: Nave, Main prayer area
 Interior view: Outer Narthex
 Interior view: Inner Narthex
 Interior: Side Aisle, North
 Interior: Northeast Side Aisle
 Interior: Altar/Mihrab Area
 Interior: Narthex, Fresco Fragment
 Interior: Sanctuary, Central Prayer Space, Eastern Apse, Mihrab
 Interior: Nave, Central Space Facing Southeast, Mihrab, Minbar
 Interior: Central Dome, Facing Southeast
 Interior: Northeast Side Chapel Entrance
 Interior: Southern Elevation, Central Prayer Space
 Interior: Central Dome, Southern Wall
 Interior: Northwest Side Chapel Entrance
 Interior: Central Prayer Area, Western Elevation
 Interior: Facing Southwest, Side Chapel Entrance, Main Entrance, Esonarthex
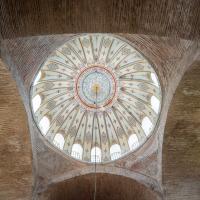 Interior: Central Dome
 Interior: Side Chapel Entrance, Facing Southwest
 Interior: Entrance to Esonarthex
 Interior: Southwestern Side Chapel
 Interior: Central Dome
 Interior: Esonarthex, Entrance to Exonarthex, Facing Northwest
 Interior: Esonarthex Facing North
 Interior: Esonarthex, Womens' Prayer Area, Facing South
 Interior: Main Entrance Viewed From Esonarthex, Exonarthex
 Interior: Main Entrance Viewed From Esonarthex, Exonarthex
 Interior: Southwest Side Chapel Gallery Level Ornamentation
 Interior: Southwest Side Chapel Gallery Level Ornamentation
 Interior: Marble Ornamentation Above Esonarthex Entrance Columns