Interior View from under Dome
Front view of Elephant and Obelisk at Piazza della Minerva, facing north
Frontal view of Elephant and Obelisk at Piazza della Minerva, facing north
Detail: Elephant and Obelisk at Piazza della Minerva, facing north
Detail: View of Elephant facing east
Detail: Side view of Elephant facing east
Side view of Elephant and Obelisk facing east
Detail: Side view of Elephant facing east
Detail: Rear view of Elephant, facing south
Detail: View of Elephant, facing west
Detail: View of Elephant, facing west
Detail: View of Elephant, facing northwest
Detail: Frontal view of Elephant, facing north
Side view of Elephant and Obelisk, facing east
Detail: Side view of Elephant and Obelisk, facing east
Front view of Elephant and Obelisk at Piazza della Minerva, facing north
View of Fountain facing East
Detail: View of the Moor facing East
Detail: View of the Moor facing East
Detail: Conch shell base facing East
Detail: Three-quarter view of one of four Tritons facing East
Three-quarter view of one of four Tritons facing East
Profile of one of four Tritons facing East
Detail: Decoration on basin rim facing East
Detail: Head of a Tritons facing East
Detail: Profile view of decoration on basin rim facing East
Frontal view of the Moor and a Triton facing South
Frontal view of the Moor facing South
Frontal view of a Triton facing South
Detail: Decoration on basin rim facing Southeast
Frontal view of the Moor and a Triton facing South
Frontal view of the Moor and a Triton facing South
Detail: Profile view of a Triton facing East
Profile view of a Triton facing East
Detail: Decoration on basin rim facing Southeast
View of Fountain facing South
Detail: Frontal view of the Moor facing South
Detail: Frontal view of the Moor torso facing South
Detail: Frontal view of the Moor and dolphin facing South
Detail: Frontal view of the Moor and dolphin facing South
Detail: Frontal view of the dolphin facing South
Detail: Frontal view of a Triton facing East
Detail: Frontal view of a Triton facing West
Detail: Frontal view of a Triton facing West
Detail: Frontal view of the head of Triton facing West
Detail: Profile view of the head of the Moor facing West
Detail: Frontal view of a Triton facing West
Detail: Basin Decoration facing West
Detail: Basin Decoration facing West
Detail: Basin Decoration facing West
Detail: Profile view of Basin Decoration facing West
View of the Moor facing South
Detail: View of the conch shell facing North
Detail: Rear view of the Moor facing North
Detail: Rear view of the Moor facing North
Detail: View of a Triton facing North
View of the Moor facing North
View of the Moor facing North
Detail: View of the basin decoration facing North
View of the obelisk and Fountain of the Four Rivers facing North
Detail: View of coat of arms and two river gods facing North
Detail: View of coat of arms and two river gods facing North
Detail: River god Ganges
Detail: Coat of arms
Detail: Coat of arms
Detail: Coat of arms and hand
Detail: View of coat of arms and two river gods facing North
Detail: River god Ganges
Detail: Fountain and relief sculpture
Detail: Coat of arms facing North
Detail: Back of river god Danube facing North
Detail: Back of river god Danube facing Northeast
Detail: Profile of river god Danube facing Northeast
Detail: Snake decoration facing Northeast
Detail: Head of river god facing Northeast
Detail: Fountain basin
Detail: Snake facing East
Detail: Inner Fountain Horse
Detail: Snake facing East
Detail: River god Rio de la Plata
Detail: River god Rio de la Plata
River god Rio de la Plata
Profile of river god Danube
View of three river gods facing Southeast
River god Rio de la Plata
Profile of river god Rio de la Plata
Detail: Coat of arms facing South
Rio de la Plata facing South
Detail: Decoration below coat of arms facing South
Detail: Inner sculpture of fountain
Detail: Fountain basin
Detail: dragon relief sculpture in fountain
Detail: dragon relief sculpture in fountain
Detail: back of river god Nile facing South
Detail: back of river god Nile facing Southwest
Detail: back of river god Nile facing Southwest
River god Nile facing Southwest
Detail: River god Nile facing Southwest
Detail: Palm tree relief sculpture on East face of sculpture
Detail: Front view of river god Ganges
Detail: River god Nile facing West
Detail: River god Nile head
Detail: Inscription at base of Obelisk
Detail: Inner fountain lion sculpture
Detail: River god Ganges facing West
Detail: Inner fountain lion sculpture
Detail: Top of Palm tree relief sculpture on East face of sculpture
Detail: View of obelisk and sculptural base facing South
View of the Moor facing North
Exterior: View from South of Fontana dei Quattro Fiumi
Interior: Main altar
Interior: Upper view of main altar
Interior: Main altar
Interior: Main altar looking toward dome with inscription
Interior: Main altar dome
Interior: Detail of dome fresco
Interior: Detail of dome fresco
Interior: Detail of main altar ceiling
Interior: Detail of Shrine of Saint Agnes
Interior: Detail of painting above shrine
Interior: Main altar dome
Interior: Main altar looking toward dome
Interior: Chapel of Saint Agnes
Interior: Gilded vault before main altar and dome
Interior: Gilded vault before main altar
Interior: Left arm of Chapel of Saint Sebastian, view of decoration above altar
Interior: View of Saint Sebastian sculpture on left hand arm of the Chapel of Saint Sebastian
Interior: View of organ inserted in barrel vault above the Tomb of Pope Innocent X
Interior: View of Chapel of Saint Agnes on right hand arm of church
Interior: View of vault ceiling above Saint Agnes sculpture
Interior: View of entrance to the narthex, church organ, and Tomb of Pope Innocent X
Interior: View of entrance to the narthex, church organ, and Tomb of Pope Innocent X
Interior: Left hand entrance to the narthex
Interior: Right hand entrance to the narthex
Interior: Right hand entrance to the narthex
Interior: View of entrance to the narthex, church organ, and Tomb of Pope Innocent X
Interior: Detail of Chapel of Saint Agnes
Interior: Detail of Chapel of Saint Agnes
Interior: Detail of Chapel of Saint Agnes altar framing
Interior: Detail of Chapel of Saint Agnes marble decoration
Interior: Detail of Chapel of Saint Agnes marble decoration fleur-de-lys
Interior: Detail of Chapel of Saint Agnes marble decoration dove holding olive leaf
Interior: Detail of altar to Saint Emerentiana
Interior: Detail of altar relief sculpture
Interior: Detail of main altar relief sculpture
Interior: Detail of main altar frame
Interior: Detail of chapel altar relief sculpture
Interior: Detail of Chapel of Saint Sebastian
Interior: Detail of Chapel of Saint Sebastian altar
Interior: Detail of chapel altar relief sculpture
Interior: Detail of chapel altar relief sculpture
Interior: Detail of dome fresco
Interior: Main altar
Interior: Detail of main altar relief sculpture
Interior: Detail of chapel altar relief sculpture
Interior: Detail of Chapel of Saint Eustace altar relief sculpture
Interior: Detail of Chapel of Saint Alexis altar relief sculpture
Interior: View of Raimondi Chapel
View of the ceiling of the Raimondi Chapel in San Pietro in Montorio
Interior: Monumento a Matilde di Canossa, Installation View
Interior: View of Baldachin
Exterior: View of Piazza San Pietro from Basilica Dome, looking East
Exterior: View of Piazza San Pietro from Basilica Dome, looking East
Exterior: Facade Detail, South Clock
Exterior: Facade Detail, North Clock
Exterior: Facade Detail, South Clock
Colonnade Detail: Capitals
Colonnade Detail: Columns
Colonnade Detail: Arcade Ceiling
Colonnade Detail: Chandelier
Exterior: Looking down the Colonnade
Exterior: Chandelier in a section of the Colonnade
Exterior: Chandelier in a section of the Colonnade
Colonnade Exterior: Chandelier
Interior: Cathedra Petri in the Apse of the Basilica
Detail: Baldachin top with the mosaic of Saint John the Evangelist in the Background
Detail: top
Detail: Figure on the top
Detail: Figure on the top
Detail: Column Base
Detail: Column Base
Detail: Figure on the top
Exterior: View of Saint Peter's Square from Basilica Portico looking East along Constantinian Wing
Interior: Installation View
Interior: Installation View
Interior: View of Baldachin from Nave
Interior: View of Baldachin from Nave
Interior: View of Baldachin from Nave
Interior: Cathedra Petri in the Apse of the Basilica
Interior: San Longino, Installation View
Exterior: Columns, Detail
Exterior: Capital, Detail
Exterior: View of Piazza San Pietro from Basilica Dome looking East
Exterior: View from Basilica Dome looking East
Interior: San Longino, Installation View
Exterior: View from Basilica steps looking North
Exterior: View of Piazza San Pietro from the Dome looking East
Exterior: View of Piazza San Pietro from the Dome looking East
Exterior: View of Piazza San Pietro from the Dome looking East
Exterior: Saints on South Colonnade looking East
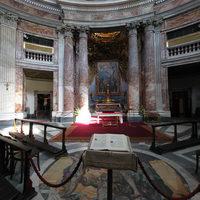 Interior View from under Dome
 Front view of Elephant and Obelisk at Piazza della Minerva, facing north
 Frontal view of Elephant and Obelisk at Piazza della Minerva, facing north
 Detail: Elephant and Obelisk at Piazza della Minerva, facing north
 Detail: View of Elephant facing east
 Detail: Side view of Elephant facing east
 Side view of Elephant and Obelisk facing east
 Detail: Side view of Elephant facing east
 Detail: Rear view of Elephant, facing south
 Detail: View of Elephant, facing west
 Detail: View of Elephant, facing west
 Detail: View of Elephant, facing northwest
 Detail: Frontal view of Elephant, facing north
 Side view of Elephant and Obelisk, facing east
 Detail: Side view of Elephant and Obelisk, facing east
 Front view of Elephant and Obelisk at Piazza della Minerva, facing north
 View of Fountain facing East
 Detail: View of the Moor facing East
 Detail: View of the Moor facing East
 Detail: Conch shell base facing East
 Detail: Three-quarter view of one of four Tritons facing East
 Three-quarter view of one of four Tritons facing East
 Profile of one of four Tritons facing East
 Detail: Decoration on basin rim facing East
 Detail: Head of a Tritons facing East
 Detail: Profile view of decoration on basin rim facing East
 Frontal view of the Moor and a Triton facing South
 Frontal view of the Moor facing South
 Frontal view of a Triton facing South
 Detail: Decoration on basin rim facing Southeast
 Frontal view of the Moor and a Triton facing South
 Frontal view of the Moor and a Triton facing South
 Detail: Profile view of a Triton facing East
 Profile view of a Triton facing East
 Detail: Decoration on basin rim facing Southeast
 View of Fountain facing South
 Detail: Frontal view of the Moor facing South
 Detail: Frontal view of the Moor torso facing South
 Detail: Frontal view of the Moor and dolphin facing South
 Detail: Frontal view of the Moor and dolphin facing South
 Detail: Frontal view of the dolphin facing South
 Detail: Frontal view of a Triton facing East
 Detail: Frontal view of a Triton facing West
 Detail: Frontal view of a Triton facing West
 Detail: Frontal view of the head of Triton facing West
 Detail: Profile view of the head of the Moor facing West
 Detail: Frontal view of a Triton facing West
 Detail: Basin Decoration facing West
 Detail: Basin Decoration facing West
 Detail: Basin Decoration facing West
 Detail: Profile view of Basin Decoration facing West
 View of the Moor facing South
 Detail: View of the conch shell facing North
 Detail: Rear view of the Moor facing North
 Detail: Rear view of the Moor facing North
 Detail: View of a Triton facing North
 View of the Moor facing North
 View of the Moor facing North
 Detail: View of the basin decoration facing North
 View of the obelisk and Fountain of the Four Rivers facing North
 Detail: View of coat of arms and two river gods facing North
 Detail: View of coat of arms and two river gods facing North
 Detail: River god Ganges
 Detail: Coat of arms
 Detail: Coat of arms
 Detail: Coat of arms and hand
 Detail: View of coat of arms and two river gods facing North
 Detail: River god Ganges
 Detail: Fountain and relief sculpture
 Detail: Coat of arms facing North
 Detail: Back of river god Danube facing North
 Detail: Back of river god Danube facing Northeast
 Detail: Profile of river god Danube facing Northeast
 Detail: Snake decoration facing Northeast
 Detail: Head of river god facing Northeast
 Detail: Fountain basin
 Detail: Snake facing East
 Detail: Inner Fountain Horse
 Detail: Snake facing East
 Detail: River god Rio de la Plata
 Detail: River god Rio de la Plata
 River god Rio de la Plata
 Profile of river god Danube
 View of three river gods facing Southeast
 River god Rio de la Plata
 Profile of river god Rio de la Plata
 Detail: Coat of arms facing South
 Rio de la Plata facing South
 Detail: Decoration below coat of arms facing South
 Detail: Inner sculpture of fountain
 Detail: Fountain basin
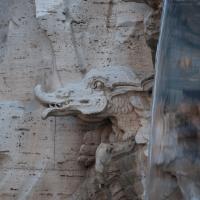 Detail: dragon relief sculpture in fountain
 Detail: dragon relief sculpture in fountain
 Detail: back of river god Nile facing South
 Detail: back of river god Nile facing Southwest
 Detail: back of river god Nile facing Southwest
 River god Nile facing Southwest
 Detail: River god Nile facing Southwest
 Detail: Palm tree relief sculpture on East face of sculpture
 Detail: Front view of river god Ganges
 Detail: River god Nile facing West
 Detail: River god Nile head
 Detail: Inscription at base of Obelisk
 Detail: Inner fountain lion sculpture
 Detail: River god Ganges facing West
 Detail: Inner fountain lion sculpture
 Detail: Top of Palm tree relief sculpture on East face of sculpture
 Detail: View of obelisk and sculptural base facing South
 View of the Moor facing North
 Exterior: View from South of Fontana dei Quattro Fiumi
 Interior: Main altar
 Interior: Upper view of main altar
 Interior: Main altar
 Interior: Main altar looking toward dome with inscription
 Interior: Main altar dome
 Interior: Detail of dome fresco
 Interior: Detail of dome fresco
 Interior: Detail of main altar ceiling
 Interior: Detail of Shrine of Saint Agnes
 Interior: Detail of painting above shrine
 Interior: Main altar dome
 Interior: Main altar looking toward dome
 Interior: Chapel of Saint Agnes
 Interior: Gilded vault before main altar and dome
 Interior: Gilded vault before main altar
 Interior: Left arm of Chapel of Saint Sebastian, view of decoration above altar
 Interior: View of Saint Sebastian sculpture on left hand arm of the Chapel of Saint Sebastian
 Interior: View of organ inserted in barrel vault above the Tomb of Pope Innocent X
 Interior: View of Chapel of Saint Agnes on right hand arm of church
 Interior: View of vault ceiling above Saint Agnes sculpture
 Interior: View of entrance to the narthex, church organ, and Tomb of Pope Innocent X
 Interior: View of entrance to the narthex, church organ, and Tomb of Pope Innocent X
 Interior: Left hand entrance to the narthex
 Interior: Right hand entrance to the narthex
 Interior: Right hand entrance to the narthex
 Interior: View of entrance to the narthex, church organ, and Tomb of Pope Innocent X
 Interior: Detail of Chapel of Saint Agnes
 Interior: Detail of Chapel of Saint Agnes
 Interior: Detail of Chapel of Saint Agnes altar framing
 Interior: Detail of Chapel of Saint Agnes marble decoration
 Interior: Detail of Chapel of Saint Agnes marble decoration fleur-de-lys
 Interior: Detail of Chapel of Saint Agnes marble decoration dove holding olive leaf
 Interior: Detail of altar to Saint Emerentiana
 Interior: Detail of altar relief sculpture
 Interior: Detail of main altar relief sculpture
 Interior: Detail of main altar frame
 Interior: Detail of chapel altar relief sculpture
 Interior: Detail of Chapel of Saint Sebastian
 Interior: Detail of Chapel of Saint Sebastian altar
 Interior: Detail of chapel altar relief sculpture
 Interior: Detail of chapel altar relief sculpture
 Interior: Detail of dome fresco
 Interior: Main altar
 Interior: Detail of main altar relief sculpture
 Interior: Detail of chapel altar relief sculpture
 Interior: Detail of Chapel of Saint Eustace altar relief sculpture
 Interior: Detail of Chapel of Saint Alexis altar relief sculpture
 Interior: View of Raimondi Chapel
 View of the ceiling of the Raimondi Chapel in San Pietro in Montorio
 Interior: Monumento a Matilde di Canossa, Installation View
 Interior: View of Baldachin
 Exterior: View of Piazza San Pietro from Basilica Dome, looking East
 Exterior: View of Piazza San Pietro from Basilica Dome, looking East
 Exterior: Facade Detail, South Clock
 Exterior: Facade Detail, North Clock
 Exterior: Facade Detail, South Clock
 Colonnade Detail: Capitals
 Colonnade Detail: Columns
 Colonnade Detail: Arcade Ceiling
 Colonnade Detail: Chandelier
 Exterior: Looking down the Colonnade
 Exterior: Chandelier in a section of the Colonnade
 Exterior: Chandelier in a section of the Colonnade
 Colonnade Exterior: Chandelier
 by Bernini in the Apse of the Basilica") Interior: Cathedra Petri in the Apse of the Basilica
Interior: Cathedra Petri in the Apse of the Basilica Detail: Baldachin top with the mosaic of Saint John the Evangelist in the Background
 Detail: top
 Detail: Figure on the top
 Detail: Figure on the top
 Detail: Column Base
 Detail: Column Base
 Detail: Figure on the top
 Exterior: View of Saint Peter's Square from Basilica Portico looking East along Constantinian Wing
 Interior: Installation View
 Interior: Installation View
 Interior: View of Baldachin from Nave
 Interior: View of Baldachin from Nave
 Interior: View of Baldachin from Nave
 by Bernini in the Apse of the Basilica") Interior: Cathedra Petri in the Apse of the Basilica
Interior: Cathedra Petri in the Apse of the Basilica Interior: San Longino, Installation View
 Exterior: Columns, Detail
 Exterior: Capital, Detail
 Exterior: View of Piazza San Pietro from Basilica Dome looking East
 Exterior: View from Basilica Dome looking East
 Interior: San Longino, Installation View
 Exterior: View from Basilica steps looking North
 Exterior: View of Piazza San Pietro from the Dome looking East
 Exterior: View of Piazza San Pietro from the Dome looking East
 Exterior: View of Piazza San Pietro from the Dome looking East
 Exterior: Saints on South Colonnade looking East