Detail: View of a Victory in a Spandrel
Detail: View of the Keystone Decoration
Detail: View of the Keystone Decoration
Detail: View of central relief sculpture depicting the Emperor and an eagle on the underside
Detail: View of a relief panel depicting the spoils from the sack of Jerusalem on the north pier
Detail: View of a relief panel depicting the spoils from the sack of Jerusalem on the north pier
Detail: View of a Victory in a Spandrel
Detail: View of the Lower Cornice and Attic Inscription
View of the East Face and the coffering on the underside
Detail: View of the Lower Cornice on the East Face
Detail: View of a Column Capital on the East Face
Detail: View of a Column Capital on the East Face
Detail: View of Graffiti
Detail: View of a relief panel depicting the Emperor in a Triumphal Procession from the south pier
Detail: View of a relief panel depicting the Emperor in a Triumphal Procession from the south pier
Detail: View of a relief panel depicting the Emperor in a Triumphal Procession from the south pier
Detail: View of a relief panel depicting the Emperor in a Triumphal Procession from the south pier
View of a Fragment of Stairs near the Arch of Titus (Arco di Tito)
Detail: View of the Attic Inscription
Detail: View of the Eastern face and Attic Inscription
Detail: View of the Eastern face and Attic Inscription
Detail: View of the Figural Frieze on the Eastern face
Detail: View of the Figural Frieze on the Eastern face
Detail: View of the Figural Frieze on the Eastern face
Detail: View of the Figural Frieze on the Eastern face
Detail: View of the Figural Frieze on the Eastern face
Detail: View of the Attic Inscription on the Western face
View from the West
View from the South
View from the West
View from the West
View from the East
View from the East
View of the southern frieze
View of the southern face
View of the southern frieze
View of the southern frieze
View of the southern frieze
View of the southern frieze
View of the southwestern pilaster
View of the southern face
View of the southern inscription
Detail: View of the southern inscription
Detail: View of the southern inscription
Detail: View of the southern inscription
Side view of the southern face
Side view of the southern face and exposed brick on eastern side
Detail: View of exposed bricks on eastern side
Detail: Base of eastern side
Detail: Base of eastern side
Detail: Base pillars on northern face
Detail: Base pillars on northern face
Detail: Inscription on northern face
Detail: Inscription on northern face
Detail: Inscription on northern face
Detail: Inscription on northern face
Detail: Inscription on northern face
View of the northern face
Detail: Frieze on the northern face
Detail: Frieze on the northern face
Detail: Frieze on the northern face
Detail: Frieze on the northern face
View of the northern face
Detail: Northern face
Detail: Frieze on the northern face
Detail: Frieze on the northern face
Detail: Frieze on the northern face
Detail: Frieze on the northern face
Detail: Frieze on the northern face
Detail: Frieze on the northern face
Detail: Frieze on the northern face
Detail: Frieze on the northern face
Detail: Face on the northern face
Detail: Inscription on the northern face
Detail: Inscription on the northern face
Detail: Inscription on the northern face
Detail: Inscription on the northern face
Detail: Inscription on the northern face
Detail: Inscription on the northern face
Detail: Western Frieze
Detail: Western Frieze
Detail: Western Frieze
Interior: View of Museum Gallery
Exterior: View of Via Biberatica from upper level
Exterior: Overlooking Via Biberatica
Interior: View of Central Hall
Interior: View of Central Hall
Interior: View of Room off Main Hall
Interior: View of Room off Main Hall
Interior: View of Room off Main Hall
Interior: View of Room off Main Hall
Interior: View of Room off Main Hall
Exterior: View onto Via Biberatica and First-floor Shops
Exterior: View of Via Biberatica
Exterior: View of Via Biberatica and First-Floor Shops
Exterior: View of Via Biberatica and First-Floor Shops
Exterior: View of Via Biberatica
Exterior: View Overlooking Imperial Fora
Exterior: View onto Via Biberatica
Exterior: View onto Via Biberatica
Exterior: View to Milizie Tower
Exterior: View to Milizie Tower
Exterior: View to Milizie Tower
Exterior: View of Via delle Torre
Exterior: View of Milizie Tower
Exterior: View of Milizie Tower
Exterior: View of Milizie Tower
Exterior: View of Milizie Garden
Exterior: View of Stairs to Via delle Torre
Interior: View below Milizie Tower
Interior: View of museum room with statue of Aeneas Aschanius and Anchises from the Forum of Augustus
Interior: View of museum exhibition space showing statue of Aeneas Aschanius and Anchises from the Forum of Augustus
Interior: View of Museum (vaulted room)
Interior: View of museum room dedicated to the remains from the Forum of Augustus (Caryatids and shield devices)
Interior: View of museum room dedicated to the remains from the Forum of Augustus
Interior: View of museum room dedicated to the remains from the Forum of Augustus (summi viri)
Interior: View of museum room dedicated to the remains from the Forum of Augustus (summi viri)
Interior: View of museum room dedicated to the remains from the Forum of Augustus (the colossal statue)
Interior: View of museum room dedicated to the remains from the Forum of Augustus (the colossal statue)
Interior: View of museum room dedicated to the remains from the Forum of Augustus (the colossal statue)
Interior: View of museum room dedicated to the remains from the Forum of Augustus (the colossal statue)
Interior: View of museum exhibition space
Interior: View of museum exhibition space
Interior: View of Main Hall of Museum
Interior: View of Main Hall of Museum
Interior: View of Main Hall of Museum
Interior: View of Main Hall of Museum
Interior: View of Main Hall of Museum (North end)
Interior: View of Main Hall of Museum (North end)
Interior: View of museum room dedicated to Temple of Mars Ultor
Interior: View of museum room with model reconstruction of the Forum of Augustus
Interior: View of museum
View of Trajan's Column looking Northeast
View of Trajan's Column looking East
View of Trajan's Column looking Southeast
View of Trajan's Column looking South
View of Trajan's Column looking Southwest
View of Trajan's Column looking West
View of Trajan's Column looking West
View of Trajan's Column looking West
View of Trajan's Column looking West
View of Trajan's Column looking Northwest
View of Trajan's Column looking West
View of the Base of Trajan's Column looking West
View of Trajan's Column looking West
View of Trajan's Column looking West
View of Trajan's Column looking South
View of Trajan's Column looking Southeast
View of Trajan's Column looking East
Side View of Saint Peter on top of Trajan's Column
View of Saint Peter on top of Trajan's Column with Inscription "B PETRO" Visible
View of the Western Side of the Frieze on Trajan's Column Scenes CXLVI-CXLVII (Romans capturing Dacians and Roman soldiers displaying Decebalus's head in fort) and CLIII-CLIV (Romans burning Dacian buildings and the expulsion of Dacians)
View of the Western Side of the Frieze on Trajan's Column Scenes CXXXI-CXXXIII (Romans crossing a bridge, Dacians leaving a fort and marching onwards) and CXXXIX-CXLI (Dacian king addressing men, Dacians retreating and committing suicide, Dacians appealing to Trajan)
View of the Western Side of the Frieze on Trajan's Column Scenes CXVI-CXVIII (Romans attacking walls, building siege machines, and a Dacian kneeling before Trajan) and CXXIII-CXXIV (Dacians fleeing their fort and begging Trajan for mercy)
View of the Western Side of the Frieze on Trajan's Column Scenes CV-CVI (Trajan holding a council and soldiers marching) and CXII-CXIII (Romans and Dacians fighting, Romans attacking a fortress)
View of the Western Side of the Frieze on Trajan's Column Scenes C-CI (Trajan receiving foreigners and leading infantry over a bridge)
View of the Western Side of the Frieze on Trajan's Column Scenes LXXXVI-LXXXVII (Trajan making a sacrifice and moving to his next destination) and XCII-XCIII (soldiers clearing forest and Dacians planning an attack)
View of the Western Side of the Frieze on Trajan's Column Scenes LXXIX-LXXX (Trajan and his troops sailing out and arriving on Dalmatian shore)
View of the Western Side of the Frieze on Trajan's Column Scenes LXVII-LXVIII (Dacians cutting down trees and Trajan receiving a prisoner as Romans build camp) and LXXIII-LXXV (Trajan addressing soldiers and Romans subjugating the Dacians)
View of the Western Side of the Frieze on Trajan's Column Scenes LIV-LVI (Trajan addressing his soldiers, Romans climbing a steep hill and clearing trees for a road)
View of the Western Side of the Frieze on Trajan's Column Scenes XXXIX-XL (Trajan receiving Dacian embassy and second major battle scene) and XLVI-XLVIII (soldiers disembarking on shore, crossing a bridge and marching onwards)
View of the Western Side of the Frieze on Trajan's Column Scenes XXXIII-XXXIV (Trajan and troops leaving in boats and traveling along the river)
View of the Western Side of the Frieze on Trajan's Column Scenes XIX-XXI (building a bridge and a fort, marching in front of fort) and XXV-XXVII (Trajan observing a Dacian town, Romans crossing a river, Trajan giving a speech)
View of the Western Side of the Frieze on Trajan's Column Scenes X-XI (Roman soldiers building a fort under Trajan's watch)
View of the Western Side of the Frieze on Trajan's Column Scenes III-IV (a town on the banks of the Danube, the Danube personified, and Roman soldiers crossing the river)
View of Saint Peter from Behind
View of Saint Peter from Behind and Below with Inscription "B PETRO APOST" Visible
View of the Southwestern Side of the Frieze on Trajan's Column Scene CXLI (Dacians appealing to Trajan), CXLVII-CXLVIII (Display of Decebalus's head and the capture of Dacians), and CLIV-CLV (Expulsion of the Dacians and their livestock)
View of the Southwestern Side of the Frieze on Trajan's Column Scenes CXXIII-CXXV (Dacians seeking mercy from Trajan, Roman soldiers taking spoils, Trajan speaking to his troops), CXXXII-CXXXIV (Dacians leaving fort, marching, and attacking a Roman fort), and CXLI (Dacians appealing to Trajan)
View of the Southwestern Side of the Frieze on Trajan's Column Scenes CXVII-CXVIII (Romans building siege machines and a Dacian man seeking mercy from Trajan) and CXXIII-CXXV (Dacians fleeing fort, seeking mercy from Trajan, Romans taking spoils)
View of the Southwestern Side of the Frieze on Trajan's Column Scenes CXIII-CXIV (Romans attacking a fortress and Trajan observing the fortress) and CXVII-CXVIII (Romans building siege machines and a Dacian man seeking mercy from Trajan)
View of the Southwestern Side of the Frieze on Trajan's Column Scenes CI-CII (Trajan crossing a bridge and being greeted by his troops) and CVI-CVIII (soldiers marching and approaching a fort)
View of the Southwestern Side of the Frieze on Trajan's Column Scenes and C-CII (Trajan receiving delegations, crossing a bridge and being greeted by his troops) and XCIII-XCIV (Dacians planning attack and attacking Roman fort)
View of the Southwestern Side of the Frieze on Trajan's Column Scenes LXXIV-LXXXI (Trajan and his arm leave the fort and arrive on the Dalmatian shore) and LXXXVII-LXXXVIII (Trajan and Roman soldiers traveling by town)
View of the Southwestern Side of the Frieze on Trajan's Column Scenes LXVIII-LXX (Romans build a camp, clear timber and advance against the Dacians) and LXXV (Dacians surrendering to Trajan)
View of the Southwestern Side of the Frieze on Trajan's Column Scene LXIV (Numidian allies of the Romans attack Dacians)
View of the Southwestern Side of the Frieze on Trajan's Column Scenes XLVIII-XLIX (soldiers crossing river on a pontoon bridge and marching) and LVI-LVII (soldiers clearing a forest and attacking Dacian town)
View of the Southwestern Side of the Frieze on Trajan's Column Scenes XXXIV-XXXV (Trajan and his soldiers traveling on the river and arriving on shore) and XL (second major battle against the Dacians)
View of the Southwestern Side of the Frieze on Trajan's Column Scenes XXVII-XXVIII (Trajan addresses troops and receives Dacian embassy) and XXXIV-XXXV (Trajan and his soldiers traveling on the river and arriving on shore)
View of the Southwestern Side of the Frieze on Trajan's Column Scenes XI-XIII (soldiers building fort under Trajan's watch)
View of the Southwestern Side of the Frieze on Trajan's Column Scenes III-IV (a town on the Danube, the Danube personified, and Roman soldiers crossing the river)
View of Inscription on the Southwestern Side of the Base of Trajan's Column
View of the Southwestern Side of the Base of Trajan's Column with Inscription Visible
View of Front of Saint Peter on top of Trajan's Column
View of Saint Peter on top of Trajan's Column with Inscription "SIXTUS V" Visible
View of the Northwestern Side of the Frieze on Trajan's Column Scenes CXLV-CXLVI (Decebalus commits suicide and Dacians capture Romans) and CLII-CLIII (Romans take prisoners and burn Dacian structures)
View of the Northwestern Side of the Frieze on Trajan's Column Scenes CXXX-CXXXI (Trajan confronts Dacians and Romans cross a bridge) and CXXXVIII-CXXXIX (Romans lead pack animals and a Dacian king addresses his troops)
View of the Northwestern Side of the Frieze on Trajan's Column Scenes CXVI-CXVII (Romans attack Dacian fort and build siege machines), CXXII-CXXIII (Dacians fleeing their fort and begging Trajan for mercy), and CXXXVIII-CXXXIX (Romans lead pack animals and a Dacian king addresses his troops)
View of the Northwestern Side of the Frieze on Trajan's Column Scenes CXI-CXII (Dacians and their walls, Romans and Dacians fighting) and CXVI-CXVII (Romans attack Dacian fort and build siege machines)
View of the Northwestern Side of the Frieze on Trajan's Column Scenes XCVIII-C (an imperial sacrifice in front of the Danube bridge, Trajan receiving foreign delegations) and CIV-CV (Trajan addressing his troops and holding a war council)
View of the Northwestern Side of the Frieze on Trajan's Column Scenes XCI-XCII (Trajan making a sacrifice and Roman soldiers clearing a forest)
View of the Northwestern Side of the Frieze on Trajan's Column Scenes LXXVIII (Winged Victory and shield commemorating Roman victory) and LXXXV-LXXXVI (sacrifice scenes)
View of the Northwestern Side of the Frieze on Trajan's Column Scenes LXXII-LXXIII (Last major battle of Dacian war, Trajan receiving severed heads of Dacians, and Trajan addressing his soldiers)
View of the Northwestern Side of the Frieze on Trajan's Column Scenes LXII-LXIII (Roman soldiers in mountains) and LXVI-LXVII (Trajan receiving an envoy and Dacians felling trees for defense)
View of the Northwestern Side of the Frieze on Trajan's Column Scenes LIII-LIV (sacrifice scene and Trajan addressing his troops)
View of the Northwestern Side of the Frieze on Trajan's Column Scenes XXXVIII-XXXIX (a night battle and Trajan receiving Dacian embassy) and XLIII-XLVI (Dacian prisoners being guarded, Roman soldiers getting rewards, people being tortured, and Trajan on a boat)
View of the Northwestern Side of the Frieze on Trajan's Column Scenes XXXII-XXXIII (Dacians attacking a Roman fort and Trajan traveling in a boat)
View of the Northwestern Side of the Frieze on Trajan's Column Scenes XVIII-XX (a Dacian prisoner is presented to Trajan, Roman soldiers build a bridge and a fort) and XXIV-XXV (the first great battle of the First Dacian War and Trajan looking at a Dacian town)
Trajan's Column, Looking West with View of Chiesa di Santa Maria di Loreto
View of Trajan's Column looking southwest
 Detail: View of a Victory in a Spandrel
 Detail: View of the Keystone Decoration
 Detail: View of the Keystone Decoration
 Detail: View of central relief sculpture depicting the Emperor and an eagle on the underside
 Detail: View of a relief panel depicting the spoils from the sack of Jerusalem on the north pier
 Detail: View of a relief panel depicting the spoils from the sack of Jerusalem on the north pier
 Detail: View of a Victory in a Spandrel
 Detail: View of the Lower Cornice and Attic Inscription
 View of the East Face and the coffering on the underside
 Detail: View of the Lower Cornice on the East Face
 Detail: View of a Column Capital on the East Face
 Detail: View of a Column Capital on the East Face
 Detail: View of Graffiti
 Detail: View of a relief panel depicting the Emperor in a Triumphal Procession from the south pier
 Detail: View of a relief panel depicting the Emperor in a Triumphal Procession from the south pier
 Detail: View of a relief panel depicting the Emperor in a Triumphal Procession from the south pier
 Detail: View of a relief panel depicting the Emperor in a Triumphal Procession from the south pier
 View of a Fragment of Stairs near the Arch of Titus (Arco di Tito)
 Detail: View of the Attic Inscription
 Detail: View of the Eastern face and Attic Inscription
 Detail: View of the Eastern face and Attic Inscription
 Detail: View of the Figural Frieze on the Eastern face
 Detail: View of the Figural Frieze on the Eastern face
 Detail: View of the Figural Frieze on the Eastern face
 Detail: View of the Figural Frieze on the Eastern face
 Detail: View of the Figural Frieze on the Eastern face
 Detail: View of the Attic Inscription on the Western face
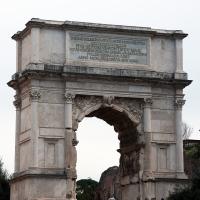 View from the West
 View from the South
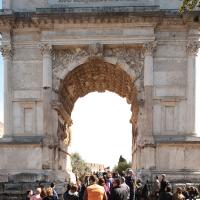 View from the West
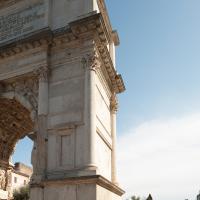 View from the West
 View from the East
 View from the East
 View of the southern frieze
 View of the southern face
 View of the southern frieze
 View of the southern frieze
 View of the southern frieze
 View of the southern frieze
 View of the southwestern pilaster
 View of the southern face
 View of the southern inscription
 Detail: View of the southern inscription
 Detail: View of the southern inscription
 Detail: View of the southern inscription
 Side view of the southern face
 Side view of the southern face and exposed brick on eastern side
 Detail: View of exposed bricks on eastern side
 Detail: Base of eastern side
 Detail: Base of eastern side
 Detail: Base pillars on northern face
 Detail: Base pillars on northern face
 Detail: Inscription on northern face
 Detail: Inscription on northern face
 Detail: Inscription on northern face
 Detail: Inscription on northern face
 Detail: Inscription on northern face
 View of the northern face
 Detail: Frieze on the northern face
 Detail: Frieze on the northern face
 Detail: Frieze on the northern face
 Detail: Frieze on the northern face
 View of the northern face
 Detail: Northern face
 Detail: Frieze on the northern face
 Detail: Frieze on the northern face
 Detail: Frieze on the northern face
 Detail: Frieze on the northern face
 Detail: Frieze on the northern face
 Detail: Frieze on the northern face
 Detail: Frieze on the northern face
 Detail: Frieze on the northern face
 Detail: Face on the northern face
 Detail: Inscription on the northern face
 Detail: Inscription on the northern face
 Detail: Inscription on the northern face
 Detail: Inscription on the northern face
 Detail: Inscription on the northern face
 Detail: Inscription on the northern face
 Detail: Western Frieze
 Detail: Western Frieze
 Detail: Western Frieze
 Interior: View of Museum Gallery
 Exterior: View of Via Biberatica from upper level
 Exterior: Overlooking Via Biberatica
 Interior: View of Central Hall
 Interior: View of Central Hall
 Interior: View of Room off Main Hall
 Interior: View of Room off Main Hall
 Interior: View of Room off Main Hall
 Interior: View of Room off Main Hall
 Interior: View of Room off Main Hall
 Exterior: View onto Via Biberatica and First-floor Shops
 Exterior: View of Via Biberatica
 Exterior: View of Via Biberatica and First-Floor Shops
 Exterior: View of Via Biberatica and First-Floor Shops
 Exterior: View of Via Biberatica
 Exterior: View Overlooking Imperial Fora
 Exterior: View onto Via Biberatica
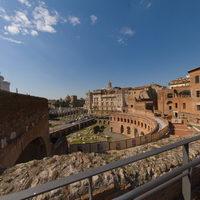 Exterior: View onto Via Biberatica
 Exterior: View to Milizie Tower
 Exterior: View to Milizie Tower
 Exterior: View to Milizie Tower
 Exterior: View of Via delle Torre
 Exterior: View of Milizie Tower
 Exterior: View of Milizie Tower
 Exterior: View of Milizie Tower
 Exterior: View of Milizie Garden
 Exterior: View of Stairs to Via delle Torre
 Interior: View below Milizie Tower
 Interior: View of museum room with statue of Aeneas Aschanius and Anchises from the Forum of Augustus
 Interior: View of museum exhibition space showing statue of Aeneas Aschanius and Anchises from the Forum of Augustus
") Interior: View of Museum (vaulted room)
Interior: View of Museum (vaulted room) Interior: View of museum room dedicated to the remains from the Forum of Augustus (Caryatids and shield devices)
 Interior: View of museum room dedicated to the remains from the Forum of Augustus
 Interior: View of museum room dedicated to the remains from the Forum of Augustus (summi viri)
 Interior: View of museum room dedicated to the remains from the Forum of Augustus (summi viri)
 Interior: View of museum room dedicated to the remains from the Forum of Augustus (the colossal statue)
 Interior: View of museum room dedicated to the remains from the Forum of Augustus (the colossal statue)
 Interior: View of museum room dedicated to the remains from the Forum of Augustus (the colossal statue)
 Interior: View of museum room dedicated to the remains from the Forum of Augustus (the colossal statue)
 Interior: View of museum exhibition space
 Interior: View of museum exhibition space
 Interior: View of Main Hall of Museum
 Interior: View of Main Hall of Museum
 Interior: View of Main Hall of Museum
 Interior: View of Main Hall of Museum
") Interior: View of Main Hall of Museum (North end)
Interior: View of Main Hall of Museum (North end)") Interior: View of Main Hall of Museum (North end)
Interior: View of Main Hall of Museum (North end) Interior: View of museum room dedicated to Temple of Mars Ultor
 Interior: View of museum room with model reconstruction of the Forum of Augustus
 Interior: View of museum
 View of Trajan's Column looking Northeast
 View of Trajan's Column looking East
 View of Trajan's Column looking Southeast
 View of Trajan's Column looking South
 View of Trajan's Column looking Southwest
 View of Trajan's Column looking West
 View of Trajan's Column looking West
 View of Trajan's Column looking West
 View of Trajan's Column looking West
 View of Trajan's Column looking Northwest
 View of Trajan's Column looking West
 View of the Base of Trajan's Column looking West
 View of Trajan's Column looking West
 View of Trajan's Column looking West
 View of Trajan's Column looking South
 View of Trajan's Column looking Southeast
 View of Trajan's Column looking East
 Side View of Saint Peter on top of Trajan's Column
 View of Saint Peter on top of Trajan's Column with Inscription "B PETRO" Visible
 and CLIII-CLIV (Romans burning Dacian buildings and the expulsion of Dacians)") View of the Western Side of the Frieze on Trajan's Column Scenes CXLVI-CXLVII (Romans capturing Dacians and Roman soldiers displaying Decebalus's head in fort) and CLIII-CLIV (Romans burning Dacian buildings and the expulsion of Dacians)
View of the Western Side of the Frieze on Trajan's Column Scenes CXLVI-CXLVII (Romans capturing Dacians and Roman soldiers displaying Decebalus's head in fort) and CLIII-CLIV (Romans burning Dacian buildings and the expulsion of Dacians) and CXXXIX-CXLI (Dacian king addressing men, Dacians retreating and committing suicide, Dacians appealing to Trajan)") View of the Western Side of the Frieze on Trajan's Column Scenes CXXXI-CXXXIII (Romans crossing a bridge, Dacians leaving a fort and marching onwards) and CXXXIX-CXLI (Dacian king addressing men, Dacians retreating and committing suicide, Dacians appealing to Trajan)
View of the Western Side of the Frieze on Trajan's Column Scenes CXXXI-CXXXIII (Romans crossing a bridge, Dacians leaving a fort and marching onwards) and CXXXIX-CXLI (Dacian king addressing men, Dacians retreating and committing suicide, Dacians appealing to Trajan) and CXXIII-CXXIV (Dacians fleeing their fort and begging Trajan for mercy)") View of the Western Side of the Frieze on Trajan's Column Scenes CXVI-CXVIII (Romans attacking walls, building siege machines, and a Dacian kneeling before Trajan) and CXXIII-CXXIV (Dacians fleeing their fort and begging Trajan for mercy)
View of the Western Side of the Frieze on Trajan's Column Scenes CXVI-CXVIII (Romans attacking walls, building siege machines, and a Dacian kneeling before Trajan) and CXXIII-CXXIV (Dacians fleeing their fort and begging Trajan for mercy) and CXII-CXIII (Romans and Dacians fighting, Romans attacking a fortress)") View of the Western Side of the Frieze on Trajan's Column Scenes CV-CVI (Trajan holding a council and soldiers marching) and CXII-CXIII (Romans and Dacians fighting, Romans attacking a fortress)
View of the Western Side of the Frieze on Trajan's Column Scenes CV-CVI (Trajan holding a council and soldiers marching) and CXII-CXIII (Romans and Dacians fighting, Romans attacking a fortress)") View of the Western Side of the Frieze on Trajan's Column Scenes C-CI (Trajan receiving foreigners and leading infantry over a bridge)
View of the Western Side of the Frieze on Trajan's Column Scenes C-CI (Trajan receiving foreigners and leading infantry over a bridge) and XCII-XCIII (soldiers clearing forest and Dacians planning an attack)") View of the Western Side of the Frieze on Trajan's Column Scenes LXXXVI-LXXXVII (Trajan making a sacrifice and moving to his next destination) and XCII-XCIII (soldiers clearing forest and Dacians planning an attack)
View of the Western Side of the Frieze on Trajan's Column Scenes LXXXVI-LXXXVII (Trajan making a sacrifice and moving to his next destination) and XCII-XCIII (soldiers clearing forest and Dacians planning an attack)") View of the Western Side of the Frieze on Trajan's Column Scenes LXXIX-LXXX (Trajan and his troops sailing out and arriving on Dalmatian shore)
View of the Western Side of the Frieze on Trajan's Column Scenes LXXIX-LXXX (Trajan and his troops sailing out and arriving on Dalmatian shore) and LXXIII-LXXV (Trajan addressing soldiers and Romans subjugating the Dacians)") View of the Western Side of the Frieze on Trajan's Column Scenes LXVII-LXVIII (Dacians cutting down trees and Trajan receiving a prisoner as Romans build camp) and LXXIII-LXXV (Trajan addressing soldiers and Romans subjugating the Dacians)
View of the Western Side of the Frieze on Trajan's Column Scenes LXVII-LXVIII (Dacians cutting down trees and Trajan receiving a prisoner as Romans build camp) and LXXIII-LXXV (Trajan addressing soldiers and Romans subjugating the Dacians)") View of the Western Side of the Frieze on Trajan's Column Scenes LIV-LVI (Trajan addressing his soldiers, Romans climbing a steep hill and clearing trees for a road)
View of the Western Side of the Frieze on Trajan's Column Scenes LIV-LVI (Trajan addressing his soldiers, Romans climbing a steep hill and clearing trees for a road) and XLVI-XLVIII (soldiers disembarking on shore, crossing a bridge and marching onwards)") View of the Western Side of the Frieze on Trajan's Column Scenes XXXIX-XL (Trajan receiving Dacian embassy and second major battle scene) and XLVI-XLVIII (soldiers disembarking on shore, crossing a bridge and marching onwards)
View of the Western Side of the Frieze on Trajan's Column Scenes XXXIX-XL (Trajan receiving Dacian embassy and second major battle scene) and XLVI-XLVIII (soldiers disembarking on shore, crossing a bridge and marching onwards)") View of the Western Side of the Frieze on Trajan's Column Scenes XXXIII-XXXIV (Trajan and troops leaving in boats and traveling along the river)
View of the Western Side of the Frieze on Trajan's Column Scenes XXXIII-XXXIV (Trajan and troops leaving in boats and traveling along the river) and XXV-XXVII (Trajan observing a Dacian town, Romans crossing a river, Trajan giving a speech)") View of the Western Side of the Frieze on Trajan's Column Scenes XIX-XXI (building a bridge and a fort, marching in front of fort) and XXV-XXVII (Trajan observing a Dacian town, Romans crossing a river, Trajan giving a speech)
View of the Western Side of the Frieze on Trajan's Column Scenes XIX-XXI (building a bridge and a fort, marching in front of fort) and XXV-XXVII (Trajan observing a Dacian town, Romans crossing a river, Trajan giving a speech)") View of the Western Side of the Frieze on Trajan's Column Scenes X-XI (Roman soldiers building a fort under Trajan's watch)
View of the Western Side of the Frieze on Trajan's Column Scenes X-XI (Roman soldiers building a fort under Trajan's watch)") View of the Western Side of the Frieze on Trajan's Column Scenes III-IV (a town on the banks of the Danube, the Danube personified, and Roman soldiers crossing the river)
View of the Western Side of the Frieze on Trajan's Column Scenes III-IV (a town on the banks of the Danube, the Danube personified, and Roman soldiers crossing the river) View of Saint Peter from Behind
 View of Saint Peter from Behind and Below with Inscription "B PETRO APOST" Visible
, CXLVII-CXLVIII (Display of Decebalus's head and the capture of Dacians), and CLIV-CLV (Expulsion of the Dacians and their livestock)") View of the Southwestern Side of the Frieze on Trajan's Column Scene CXLI (Dacians appealing to Trajan), CXLVII-CXLVIII (Display of Decebalus's head and the capture of Dacians), and CLIV-CLV (Expulsion of the Dacians and their livestock)
View of the Southwestern Side of the Frieze on Trajan's Column Scene CXLI (Dacians appealing to Trajan), CXLVII-CXLVIII (Display of Decebalus's head and the capture of Dacians), and CLIV-CLV (Expulsion of the Dacians and their livestock), CXXXII-CXXXIV (Dacians leaving fort, marching, and attacking a Roman fort), and CXLI (Dacians appealing to Trajan)") View of the Southwestern Side of the Frieze on Trajan's Column Scenes CXXIII-CXXV (Dacians seeking mercy from Trajan, Roman soldiers taking spoils, Trajan speaking to his troops), CXXXII-CXXXIV (Dacians leaving fort, marching, and attacking a Roman fort), and CXLI (Dacians appealing to Trajan)
View of the Southwestern Side of the Frieze on Trajan's Column Scenes CXXIII-CXXV (Dacians seeking mercy from Trajan, Roman soldiers taking spoils, Trajan speaking to his troops), CXXXII-CXXXIV (Dacians leaving fort, marching, and attacking a Roman fort), and CXLI (Dacians appealing to Trajan) and CXXIII-CXXV (Dacians fleeing fort, seeking mercy from Trajan, Romans taking spoils)") View of the Southwestern Side of the Frieze on Trajan's Column Scenes CXVII-CXVIII (Romans building siege machines and a Dacian man seeking mercy from Trajan) and CXXIII-CXXV (Dacians fleeing fort, seeking mercy from Trajan, Romans taking spoils)
View of the Southwestern Side of the Frieze on Trajan's Column Scenes CXVII-CXVIII (Romans building siege machines and a Dacian man seeking mercy from Trajan) and CXXIII-CXXV (Dacians fleeing fort, seeking mercy from Trajan, Romans taking spoils) and CXVII-CXVIII (Romans building siege machines and a Dacian man seeking mercy from Trajan)") View of the Southwestern Side of the Frieze on Trajan's Column Scenes CXIII-CXIV (Romans attacking a fortress and Trajan observing the fortress) and CXVII-CXVIII (Romans building siege machines and a Dacian man seeking mercy from Trajan)
View of the Southwestern Side of the Frieze on Trajan's Column Scenes CXIII-CXIV (Romans attacking a fortress and Trajan observing the fortress) and CXVII-CXVIII (Romans building siege machines and a Dacian man seeking mercy from Trajan) and CVI-CVIII (soldiers marching and approaching a fort)") View of the Southwestern Side of the Frieze on Trajan's Column Scenes CI-CII (Trajan crossing a bridge and being greeted by his troops) and CVI-CVIII (soldiers marching and approaching a fort)
View of the Southwestern Side of the Frieze on Trajan's Column Scenes CI-CII (Trajan crossing a bridge and being greeted by his troops) and CVI-CVIII (soldiers marching and approaching a fort) and XCIII-XCIV (Dacians planning attack and attacking Roman fort)") View of the Southwestern Side of the Frieze on Trajan's Column Scenes and C-CII (Trajan receiving delegations, crossing a bridge and being greeted by his troops) and XCIII-XCIV (Dacians planning attack and attacking Roman fort)
View of the Southwestern Side of the Frieze on Trajan's Column Scenes and C-CII (Trajan receiving delegations, crossing a bridge and being greeted by his troops) and XCIII-XCIV (Dacians planning attack and attacking Roman fort) and LXXXVII-LXXXVIII (Trajan and Roman soldiers traveling by town)") View of the Southwestern Side of the Frieze on Trajan's Column Scenes LXXIV-LXXXI (Trajan and his arm leave the fort and arrive on the Dalmatian shore) and LXXXVII-LXXXVIII (Trajan and Roman soldiers traveling by town)
View of the Southwestern Side of the Frieze on Trajan's Column Scenes LXXIV-LXXXI (Trajan and his arm leave the fort and arrive on the Dalmatian shore) and LXXXVII-LXXXVIII (Trajan and Roman soldiers traveling by town) and LXXV (Dacians surrendering to Trajan)") View of the Southwestern Side of the Frieze on Trajan's Column Scenes LXVIII-LXX (Romans build a camp, clear timber and advance against the Dacians) and LXXV (Dacians surrendering to Trajan)
View of the Southwestern Side of the Frieze on Trajan's Column Scenes LXVIII-LXX (Romans build a camp, clear timber and advance against the Dacians) and LXXV (Dacians surrendering to Trajan)") View of the Southwestern Side of the Frieze on Trajan's Column Scene LXIV (Numidian allies of the Romans attack Dacians)
View of the Southwestern Side of the Frieze on Trajan's Column Scene LXIV (Numidian allies of the Romans attack Dacians) and LVI-LVII (soldiers clearing a forest and attacking Dacian town)") View of the Southwestern Side of the Frieze on Trajan's Column Scenes XLVIII-XLIX (soldiers crossing river on a pontoon bridge and marching) and LVI-LVII (soldiers clearing a forest and attacking Dacian town)
View of the Southwestern Side of the Frieze on Trajan's Column Scenes XLVIII-XLIX (soldiers crossing river on a pontoon bridge and marching) and LVI-LVII (soldiers clearing a forest and attacking Dacian town) and XL (second major battle against the Dacians)") View of the Southwestern Side of the Frieze on Trajan's Column Scenes XXXIV-XXXV (Trajan and his soldiers traveling on the river and arriving on shore) and XL (second major battle against the Dacians)
View of the Southwestern Side of the Frieze on Trajan's Column Scenes XXXIV-XXXV (Trajan and his soldiers traveling on the river and arriving on shore) and XL (second major battle against the Dacians) and XXXIV-XXXV (Trajan and his soldiers traveling on the river and arriving on shore)") View of the Southwestern Side of the Frieze on Trajan's Column Scenes XXVII-XXVIII (Trajan addresses troops and receives Dacian embassy) and XXXIV-XXXV (Trajan and his soldiers traveling on the river and arriving on shore)
View of the Southwestern Side of the Frieze on Trajan's Column Scenes XXVII-XXVIII (Trajan addresses troops and receives Dacian embassy) and XXXIV-XXXV (Trajan and his soldiers traveling on the river and arriving on shore)") View of the Southwestern Side of the Frieze on Trajan's Column Scenes XI-XIII (soldiers building fort under Trajan's watch)
View of the Southwestern Side of the Frieze on Trajan's Column Scenes XI-XIII (soldiers building fort under Trajan's watch)") View of the Southwestern Side of the Frieze on Trajan's Column Scenes III-IV (a town on the Danube, the Danube personified, and Roman soldiers crossing the river)
View of the Southwestern Side of the Frieze on Trajan's Column Scenes III-IV (a town on the Danube, the Danube personified, and Roman soldiers crossing the river) View of Inscription on the Southwestern Side of the Base of Trajan's Column
 View of the Southwestern Side of the Base of Trajan's Column with Inscription Visible
 View of Front of Saint Peter on top of Trajan's Column
 View of Saint Peter on top of Trajan's Column with Inscription "SIXTUS V" Visible
 and CLII-CLIII (Romans take prisoners and burn Dacian structures)") View of the Northwestern Side of the Frieze on Trajan's Column Scenes CXLV-CXLVI (Decebalus commits suicide and Dacians capture Romans) and CLII-CLIII (Romans take prisoners and burn Dacian structures)
View of the Northwestern Side of the Frieze on Trajan's Column Scenes CXLV-CXLVI (Decebalus commits suicide and Dacians capture Romans) and CLII-CLIII (Romans take prisoners and burn Dacian structures) and CXXXVIII-CXXXIX (Romans lead pack animals and a Dacian king addresses his troops)") View of the Northwestern Side of the Frieze on Trajan's Column Scenes CXXX-CXXXI (Trajan confronts Dacians and Romans cross a bridge) and CXXXVIII-CXXXIX (Romans lead pack animals and a Dacian king addresses his troops)
View of the Northwestern Side of the Frieze on Trajan's Column Scenes CXXX-CXXXI (Trajan confronts Dacians and Romans cross a bridge) and CXXXVIII-CXXXIX (Romans lead pack animals and a Dacian king addresses his troops), CXXII-CXXIII (Dacians fleeing their fort and begging Trajan for mercy), and CXXXVIII-CXXXIX (Romans lead pack animals and a Dacian king addresses his troops)") View of the Northwestern Side of the Frieze on Trajan's Column Scenes CXVI-CXVII (Romans attack Dacian fort and build siege machines), CXXII-CXXIII (Dacians fleeing their fort and begging Trajan for mercy), and CXXXVIII-CXXXIX (Romans lead pack animals and a Dacian king addresses his troops)
View of the Northwestern Side of the Frieze on Trajan's Column Scenes CXVI-CXVII (Romans attack Dacian fort and build siege machines), CXXII-CXXIII (Dacians fleeing their fort and begging Trajan for mercy), and CXXXVIII-CXXXIX (Romans lead pack animals and a Dacian king addresses his troops) and CXVI-CXVII (Romans attack Dacian fort and build siege machines)") View of the Northwestern Side of the Frieze on Trajan's Column Scenes CXI-CXII (Dacians and their walls, Romans and Dacians fighting) and CXVI-CXVII (Romans attack Dacian fort and build siege machines)
View of the Northwestern Side of the Frieze on Trajan's Column Scenes CXI-CXII (Dacians and their walls, Romans and Dacians fighting) and CXVI-CXVII (Romans attack Dacian fort and build siege machines) and CIV-CV (Trajan addressing his troops and holding a war council)") View of the Northwestern Side of the Frieze on Trajan's Column Scenes XCVIII-C (an imperial sacrifice in front of the Danube bridge, Trajan receiving foreign delegations) and CIV-CV (Trajan addressing his troops and holding a war council)
View of the Northwestern Side of the Frieze on Trajan's Column Scenes XCVIII-C (an imperial sacrifice in front of the Danube bridge, Trajan receiving foreign delegations) and CIV-CV (Trajan addressing his troops and holding a war council)") View of the Northwestern Side of the Frieze on Trajan's Column Scenes XCI-XCII (Trajan making a sacrifice and Roman soldiers clearing a forest)
View of the Northwestern Side of the Frieze on Trajan's Column Scenes XCI-XCII (Trajan making a sacrifice and Roman soldiers clearing a forest) and LXXXV-LXXXVI (sacrifice scenes)") View of the Northwestern Side of the Frieze on Trajan's Column Scenes LXXVIII (Winged Victory and shield commemorating Roman victory) and LXXXV-LXXXVI (sacrifice scenes)
View of the Northwestern Side of the Frieze on Trajan's Column Scenes LXXVIII (Winged Victory and shield commemorating Roman victory) and LXXXV-LXXXVI (sacrifice scenes)") View of the Northwestern Side of the Frieze on Trajan's Column Scenes LXXII-LXXIII (Last major battle of Dacian war, Trajan receiving severed heads of Dacians, and Trajan addressing his soldiers)
View of the Northwestern Side of the Frieze on Trajan's Column Scenes LXXII-LXXIII (Last major battle of Dacian war, Trajan receiving severed heads of Dacians, and Trajan addressing his soldiers) and LXVI-LXVII (Trajan receiving an envoy and Dacians felling trees for defense)") View of the Northwestern Side of the Frieze on Trajan's Column Scenes LXII-LXIII (Roman soldiers in mountains) and LXVI-LXVII (Trajan receiving an envoy and Dacians felling trees for defense)
View of the Northwestern Side of the Frieze on Trajan's Column Scenes LXII-LXIII (Roman soldiers in mountains) and LXVI-LXVII (Trajan receiving an envoy and Dacians felling trees for defense)") View of the Northwestern Side of the Frieze on Trajan's Column Scenes LIII-LIV (sacrifice scene and Trajan addressing his troops)
View of the Northwestern Side of the Frieze on Trajan's Column Scenes LIII-LIV (sacrifice scene and Trajan addressing his troops) and XLIII-XLVI (Dacian prisoners being guarded, Roman soldiers getting rewards, people being tortured, and Trajan on a boat)") View of the Northwestern Side of the Frieze on Trajan's Column Scenes XXXVIII-XXXIX (a night battle and Trajan receiving Dacian embassy) and XLIII-XLVI (Dacian prisoners being guarded, Roman soldiers getting rewards, people being tortured, and Trajan on a boat)
View of the Northwestern Side of the Frieze on Trajan's Column Scenes XXXVIII-XXXIX (a night battle and Trajan receiving Dacian embassy) and XLIII-XLVI (Dacian prisoners being guarded, Roman soldiers getting rewards, people being tortured, and Trajan on a boat)") View of the Northwestern Side of the Frieze on Trajan's Column Scenes XXXII-XXXIII (Dacians attacking a Roman fort and Trajan traveling in a boat)
View of the Northwestern Side of the Frieze on Trajan's Column Scenes XXXII-XXXIII (Dacians attacking a Roman fort and Trajan traveling in a boat) and XXIV-XXV (the first great battle of the First Dacian War and Trajan looking at a Dacian town)") View of the Northwestern Side of the Frieze on Trajan's Column Scenes XVIII-XX (a Dacian prisoner is presented to Trajan, Roman soldiers build a bridge and a fort) and XXIV-XXV (the first great battle of the First Dacian War and Trajan looking at a Dacian town)
View of the Northwestern Side of the Frieze on Trajan's Column Scenes XVIII-XX (a Dacian prisoner is presented to Trajan, Roman soldiers build a bridge and a fort) and XXIV-XXV (the first great battle of the First Dacian War and Trajan looking at a Dacian town) Trajan's Column, Looking West with View of Chiesa di Santa Maria di Loreto
 View of Trajan's Column looking southwest