Detail: Fragments of black and white mosaics
Exterior: Mosaic section
Exterior: Mosaic section
Detail: Mosaic section
Exterior: Mosaic section
Exterior: Mosaic section
View of a fragmentary mosaic in the former atrium of Lateran Baptistery
View of a fragmentary mosaic in the former atrium of the Lateran Baptistery
View of a fragmentary mosaic in the former atrium of the Lateran Baptistery
View of a fragmentary mosaic in the former atrium of the Lateran Baptistery
View of a fragmentary mosaic in the former atrium of the Lateran Baptistery
View of a fragmentary mosaic in the former atrium of the Lateran Baptistery
View of a fragmentary mosaic in the former atrium of the Lateran Baptistery
View of marble revetments in the former atrium of the Lateran Baptistery
View of the ceiling of one of the chapels of the Lateran Baptistery
View of the ceiling of one of the chapels of the Lateran Baptistery
View of the Chapel of Saint Venatius in the Lateran Baptistery
View of a fragmentary mosaic in the former atrium of the Lateran Baptistery
Interior: View from north ambulatory
Interior: View from north ambulatory
Interior: Detail of Cosmatesque aisle pavement
Interior: Detail of Cosmatesque aisle pavement
Interior: Detail of apse mosaic
Interior: Detail mosaics in north ambulatory
Interior: Detail mosaics in north ambulatory
Interior: Detail mosaics in north ambulatory
Interior: Detail mosaics in north ambulatory
Interior: Detail mosaics in north ambulatory
Interior: Detail mosaics in south ambulatory
Interior: Detail mosaics in south ambulatory
Interior: Detail mosaics in south ambulatory
Interior: Detail mosaics in south ambulatory
Interior: Detail mosaics in south ambulatory
Interior: Detail mosaics in south ambulatory
Interior: Detail mosaics in south ambulatory
Interior: Detail mosaics in north ambulatory
Interior: Apse mosaic in southeast
Interior: Apse mosaic in northwest
Interior: Detail apse mosaic
Detail: marble floor mosaic of chapel
Detail: apse mosaic
Detail: apse mosaic
View of the apse and baldachin of Santa Prassede
View of the apse and baldachin of Santa Prassede
View of a chapel off an aisle of Santa Prassede
View of a mosaic on an aisle wall in Santa Prassede
View of a mosaic on an aisle wall in Santa Prassede
View of a mosaic and architrave on an aisle wall in Santa Prassede
View of a mosaic niche in Santa Prassede
View of the nave of Santa Prassede
View of the nave of Santa Prassede
View of the apse of Santa Prassede
View of the apse mosaic of Santa Prassede
View of the apse altar of Santa Prassede
View of a chapel of Santa Prassede
View of the apse mosaic and baldachin of Santa Prassede
View of the apse mosaic and baldachin of Santa Prassede
View of the apse mosaic and baldachin of Santa Prassede
View of the apse mosaic and baldachin of Santa Prassede
View of the apse mosaic and baldachin of Santa Prassede
View of the apse mosaic and baldachin of Santa Prassede
View of the apse mosaic and baldachin of Santa Prassede
View of the apse mosaic and baldachin of Santa Prassede
View of the Leonian Triclinium
View of the Leonian Triclinium
View of the Leonian Triclinium
Detail of Christ in the mosaic of the Leonian Triclinium
Detail of the right group of apostles in the mosaic of the Leonian Triclinium
Detail of the right group of apostles in the mosaic of the Leonian Triclinium
Detail of the left group of apostles in the mosaic of the Leonian Triclinium
Detail of the left group of apostles in the mosaic of the Leonian Triclinium
Detail of the left group of apostles in the mosaic of the Leonian Triclinium
Detail of Christ in the mosaic of the Leonian Triclinium
Detail of the mosaic of the Leonian Triclinium
Detail of the mosaic of the Leonian Triclinium
Detail of the mosaic of the Leonian Triclinium
Detail of the left group of apostles in the mosaic of the Leonian Triclinium
Detail of the mosaic of the Leonian Triclinium
Detail of Christ giving the keys to Saint Sylvester and the labarum to Constantine in the mosaic of the Leonian Triclinium
Detail of Christ and the right group of apostles in the mosaic of the Leonian Triclinium
Detail of Christ and the right group of apostles in the mosaic of the Leonian Triclinium
Detail of Christ giving the keys to Saint Sylvester and the labarum to Constantine in the mosaic of the Leonian Triclinium
Detail of Christ giving the keys to Saint Sylvester and the labarum to Constantine in the mosaic of the Leonian Triclinium
Detail of Saint Peter giving the papal stole to Leo III and the banner to Charlemagne in the mosaic of the Leonian Triclinium
Detail of Saint Peter giving the papal stole to Leo III and the banner to Charlemagne in the mosaic of the Leonian Triclinium
View of the Leonian Triclinium
View of the Leonian Triclinium
Detail of the mosaic of the Leonian Triclinium
Detail of Saint Peter giving the papal stole to Leo III and the banner to Charlemagne in the mosaic of the Leonian Triclinium
Interior: Mosaic Detail, Martyrdom of the Seven Maccabee Brothers
Detail: Baldachin top with the mosaic of Saint John the Evangelist in the Background
Interior: Detail of 18th century mosaic copy after Andrea Sacchi (1599–1661)
Interior: Mosaic Detail
Interior: Installation View
Interior: Installation View
Exterior: Southeastern Facade
Interior: Cornice Detail
Interior: Cornice Detail
Interior: Arch Detail
Interior: Arch Detail
Interior: Pier Detail
Interior: Northeast Corner Detail; Cornice; Stained Glass Window
Interior: Vaults, South Aisle
Interior: South Aisle, Minbar,
Interior: South Aisle Facing Northeast
Interior: Central Prayer Hall, Facing North Aisle
Interior: Central Prayer Hall, Facing Northwest
Interior: Narthex
Interior: Central Prayer Hall, Facing Northern Side Aisle, Muezzin's Pulpit
Interior: Central Prayer Hall; Nave, Facing East
Interior: Central Prayer Hall, South Aisle, Minbar, Support Piers, Mihrab Niche in Background
Interior: Central Dome, Pendentives
Interior: Central Prayer Hall; Nave; Entrance; Facing West
Interior: Central Prayer Hall; Nave; Northwest Corner Detail
Interior: Central Prayer Hall; Nave; Minbar; Muezzin's Pulpit
Interior: Central Prayer Hall; Nave
Interior: North Aisle, Facing East
Interior: North Aisle looking East
Interior: Column Detail
Interior: Dome Detail, Pendentives; Stained Glass
Interior: Southern Side Aisle
Interior: Support Column, Facing Southwest
Exterior: Western Facade Detail; Stained Glass
Exterior: Western Facade, Entrance
Exterior: Minaret
Exterior: Facade Detail
Interior: Nave and main prayer area
Interior: Minbar area
Interior: Narthex
Interior: Prayer aisle for women
Exterior: Baptistry
Interior: Narthex
Interior: Narthex
Interior: Apse
Interior: Gallery level
Interior: Gallery level
Exterior: Southwest Elevation
Exterior: Dome Detail
Exterior: Southwestern Elevation Detail
Interior: Southwestern Entrance, Mosaic
Interior: Southwestern Entrance Mosaic (10th century) Detail, Virgin, Flanked by Justinian and Constantine
Interior: Southwestern Entrance Mosaic (10th century) Detail, Virgin and Child
Interior: Southwestern Entrance Mosaic (10th century) Detail, Emperor Constantine
Interior: Southwestern Entrance Mosaic (10th century) Detail, Emperor Justinian
Interior: Imperial Gate Mosaic (late 9th - early 10th century)
Interior: Imperial Gate Mosaic (late 9th - early 10th century) Detail, Leo the Wise
Interior: Imperial Gate Mosaic (late 9th - early 10th century) Detail; Christ Pantokrator
Interior: Imperial Gate Mosaic (late 9th - early 10th century) Detail, Leo the Wise and the Virgin
Interior: Imperial Gate Mosaic (late 9th - early 10th century) Detail, Archangel Gabriel
Interior: Apse Mosaic of Virgin and Child
Interior: Eastern Wall of Southern Gallery; Mosaic of Empress Zoe, Christ Pantokrator, Constantine IX Monomachus
Interior: Eastern Wall of Southern Gallery, Comnenus Mosaic of Virgin and Child, Emperor John II Comnenus, Empress Irene, Alexius Comenenus
Interior: Deesis Mosaic Detail, Virgin Mary, South Upper Gallery
Interior: Deesis Mosaic Detail, Christ, South Upper Gallery
Interior: Deesis Mosaic Detail, John the Baptist, Upper Gallery
Interior: Deesis Mosaic Detail, South Upper Gallery
Interior: Deesis Mosaic, Upper Gallery
Interior: Comnenus Mosaic of Virgin and Child, Emperor John II Comnenus, Empress Irene, Eastern Wall of Southern Gallery
Interior: Comnenus Mosaic Detail
Interior: Comnenus Mosaic Detail, Alexius I Comnenus, Eastern Wall of Southern Gallery
Interior: Comnenus Mosaic Detail
Interior: Comnenus Mosaic Detail, Virgin Mary, Eastern Wall of Southern Gallery
Interior: Comnenus Mosaic Detail, Eastern Wall of Southern Gallery
Interior: Comnenus Mosaic Detail, Eastern Wall of Southern Gallery
Interior: Central Dome, Calligraphic Inscription
Interior: Southwest Gallery Vault Detail
Interior: Northeast Arcade Detail
Interior: Southwest Column Capital Detail
Interior: Southwest Gallery Column Capital Detail, Monogram
Interior: Southwest Gallery Column Capital Detail
Interior: Southwest Column Capital Detail
Interior: Empress Zoe Mosaic Detail
Interior: Southwest Gallery
Interior: Vault Detail, Window
Interior: Northwestern Gallery, Dome Detail, Roundel
Interior: Southwestern Arcade Detail
Interior: Southwest Gallery Column Detail, Vault Detail
Interior: Pendentive, Seraphim Mosaic
Interior: Central Dome, Calligraphic Inscription
Interior: Column Capital Detail
Interior: View of Western Gallery
Interior: Northeast Half-Dome Detail
Interior: Nave, Central Dome, Apse, Roundels, Pendentives
Interior: Nave, Central Dome, Apse, Roundels, Cherub, Pendentives
Interior: Nave, Central Dome, Apse, Roundels, Cherub, Pendentives
Interior: Nave, Central Dome, Apse, Roundels, Pendentives
Exterior: Southwest Elevation
Exterior: Southwest Elevation
Exterior: Southwest Elevation
Exterior: Central Dome Detail from Southwest
Exterior: Central Dome Detail From Southwest
Exterior: Central Dome Detail From Southwest
Exterior: Southwest Facade Detail
Exterior: Southwest Facade Detail
Exterior: Southwest Facade
Exterior: South Corner Detail
Exterior: Apse Detail
Exterior: Apse Detail
Exterior: Southeast Facade Detail, Buttress
Exterior: Southeast Facade Detail
 Detail: Fragments of black and white mosaics
 Exterior: Mosaic section
 Exterior: Mosaic section
 Detail: Mosaic section
 Exterior: Mosaic section
 Exterior: Mosaic section
 View of a fragmentary mosaic in the former atrium of Lateran Baptistery
 View of a fragmentary mosaic in the former atrium of the Lateran Baptistery
 View of a fragmentary mosaic in the former atrium of the Lateran Baptistery
 View of a fragmentary mosaic in the former atrium of the Lateran Baptistery
 View of a fragmentary mosaic in the former atrium of the Lateran Baptistery
 View of a fragmentary mosaic in the former atrium of the Lateran Baptistery
 View of a fragmentary mosaic in the former atrium of the Lateran Baptistery
 View of marble revetments in the former atrium of the Lateran Baptistery
 View of the ceiling of one of the chapels of the Lateran Baptistery
 View of the ceiling of one of the chapels of the Lateran Baptistery
 View of the Chapel of Saint Venatius in the Lateran Baptistery
 View of a fragmentary mosaic in the former atrium of the Lateran Baptistery
 Interior: View from north ambulatory
 Interior: View from north ambulatory
 Interior: Detail of Cosmatesque aisle pavement
 Interior: Detail of Cosmatesque aisle pavement
 Interior: Detail of apse mosaic
 Interior: Detail mosaics in north ambulatory
 Interior: Detail mosaics in north ambulatory
 Interior: Detail mosaics in north ambulatory
 Interior: Detail mosaics in north ambulatory
 Interior: Detail mosaics in north ambulatory
 Interior: Detail mosaics in south ambulatory
 Interior: Detail mosaics in south ambulatory
 Interior: Detail mosaics in south ambulatory
 Interior: Detail mosaics in south ambulatory
 Interior: Detail mosaics in south ambulatory
 Interior: Detail mosaics in south ambulatory
 Interior: Detail mosaics in south ambulatory
 Interior: Detail mosaics in north ambulatory
 Interior: Apse mosaic in southeast
 Interior: Apse mosaic in northwest
 Interior: Detail apse mosaic
 Detail: marble floor mosaic of chapel
 Detail: apse mosaic
 Detail: apse mosaic
 View of the apse and baldachin of Santa Prassede
 View of the apse and baldachin of Santa Prassede
 View of a chapel off an aisle of Santa Prassede
 View of a mosaic on an aisle wall in Santa Prassede
 View of a mosaic on an aisle wall in Santa Prassede
 View of a mosaic and architrave on an aisle wall in Santa Prassede
 View of a mosaic niche in Santa Prassede
 View of the nave of Santa Prassede
 View of the nave of Santa Prassede
 View of the apse of Santa Prassede
 View of the apse mosaic of Santa Prassede
 View of the apse altar of Santa Prassede
 View of a chapel of Santa Prassede
 View of the apse mosaic and baldachin of Santa Prassede
 View of the apse mosaic and baldachin of Santa Prassede
 View of the apse mosaic and baldachin of Santa Prassede
 View of the apse mosaic and baldachin of Santa Prassede
 View of the apse mosaic and baldachin of Santa Prassede
 View of the apse mosaic and baldachin of Santa Prassede
 View of the apse mosaic and baldachin of Santa Prassede
 View of the apse mosaic and baldachin of Santa Prassede
 View of the Leonian Triclinium
 View of the Leonian Triclinium
 View of the Leonian Triclinium
 Detail of Christ in the mosaic of the Leonian Triclinium
 Detail of the right group of apostles in the mosaic of the Leonian Triclinium
 Detail of the right group of apostles in the mosaic of the Leonian Triclinium
 Detail of the left group of apostles in the mosaic of the Leonian Triclinium
 Detail of the left group of apostles in the mosaic of the Leonian Triclinium
 Detail of the left group of apostles in the mosaic of the Leonian Triclinium
 Detail of Christ in the mosaic of the Leonian Triclinium
 Detail of the mosaic of the Leonian Triclinium
 Detail of the mosaic of the Leonian Triclinium
 Detail of the mosaic of the Leonian Triclinium
 Detail of the left group of apostles in the mosaic of the Leonian Triclinium
 Detail of the mosaic of the Leonian Triclinium
 Detail of Christ giving the keys to Saint Sylvester and the labarum to Constantine in the mosaic of the Leonian Triclinium
 Detail of Christ and the right group of apostles in the mosaic of the Leonian Triclinium
 Detail of Christ and the right group of apostles in the mosaic of the Leonian Triclinium
 Detail of Christ giving the keys to Saint Sylvester and the labarum to Constantine in the mosaic of the Leonian Triclinium
 Detail of Christ giving the keys to Saint Sylvester and the labarum to Constantine in the mosaic of the Leonian Triclinium
 Detail of Saint Peter giving the papal stole to Leo III and the banner to Charlemagne in the mosaic of the Leonian Triclinium
 Detail of Saint Peter giving the papal stole to Leo III and the banner to Charlemagne in the mosaic of the Leonian Triclinium
 View of the Leonian Triclinium
 View of the Leonian Triclinium
 Detail of the mosaic of the Leonian Triclinium
 Detail of Saint Peter giving the papal stole to Leo III and the banner to Charlemagne in the mosaic of the Leonian Triclinium
 Interior: Mosaic Detail, Martyrdom of the Seven Maccabee Brothers
 Detail: Baldachin top with the mosaic of Saint John the Evangelist in the Background
 Interior: Detail of 18th century mosaic copy after Andrea Sacchi (1599–1661)
 Interior: Mosaic Detail
 Interior: Installation View
 Interior: Installation View
 Exterior: Southeastern Facade
 Interior: Cornice Detail
 Interior: Cornice Detail
 Interior: Arch Detail
 Interior: Arch Detail
 Interior: Pier Detail
 Interior: Northeast Corner Detail; Cornice; Stained Glass Window
 Interior: Vaults, South Aisle
 Interior: South Aisle, Minbar,
 Interior: South Aisle Facing Northeast
 Interior: Central Prayer Hall, Facing North Aisle
 Interior: Central Prayer Hall, Facing Northwest
 Interior: Narthex
 Interior: Central Prayer Hall, Facing Northern Side Aisle, Muezzin's Pulpit
 Interior: Central Prayer Hall; Nave, Facing East
 Interior: Central Prayer Hall, South Aisle, Minbar, Support Piers, Mihrab Niche in Background
 Interior: Central Dome, Pendentives
 Interior: Central Prayer Hall; Nave; Entrance; Facing West
 Interior: Central Prayer Hall; Nave; Northwest Corner Detail
 Interior: Central Prayer Hall; Nave; Minbar; Muezzin's Pulpit
 Interior: Central Prayer Hall; Nave
 Interior: North Aisle, Facing East
 Interior: North Aisle looking East
 Interior: Column Detail
 Interior: Dome Detail, Pendentives; Stained Glass
 Interior: Southern Side Aisle
 Interior: Support Column, Facing Southwest
 Exterior: Western Facade Detail; Stained Glass
 Exterior: Western Facade, Entrance
 Exterior: Minaret
 Exterior: Facade Detail
 Interior: Nave and main prayer area
 Interior: Minbar area
 Interior: Narthex
 Interior: Prayer aisle for women
 Exterior: Baptistry
 Interior: Narthex
 Interior: Narthex
 Interior: Apse
 Interior: Gallery level
 Interior: Gallery level
 Exterior: Southwest Elevation
 Exterior: Dome Detail
 Exterior: Southwestern Elevation Detail
 Interior: Southwestern Entrance, Mosaic
 Interior: Southwestern Entrance Mosaic (10th century) Detail, Virgin, Flanked by Justinian and Constantine
 Interior: Southwestern Entrance Mosaic (10th century) Detail, Virgin and Child
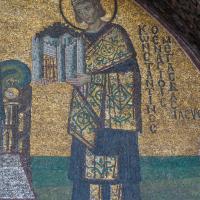 Interior: Southwestern Entrance Mosaic (10th century) Detail, Emperor Constantine
 Interior: Southwestern Entrance Mosaic (10th century) Detail, Emperor Justinian
 Interior: Imperial Gate Mosaic (late 9th - early 10th century)
 Interior: Imperial Gate Mosaic (late 9th - early 10th century) Detail, Leo the Wise
 Interior: Imperial Gate Mosaic (late 9th - early 10th century) Detail; Christ Pantokrator
 Interior: Imperial Gate Mosaic (late 9th - early 10th century) Detail, Leo the Wise and the Virgin
 Interior: Imperial Gate Mosaic (late 9th - early 10th century) Detail, Archangel Gabriel
 Interior: Apse Mosaic of Virgin and Child
 Interior: Eastern Wall of Southern Gallery; Mosaic of Empress Zoe, Christ Pantokrator, Constantine IX Monomachus
 Interior: Eastern Wall of Southern Gallery, Comnenus Mosaic of Virgin and Child, Emperor John II Comnenus, Empress Irene, Alexius Comenenus
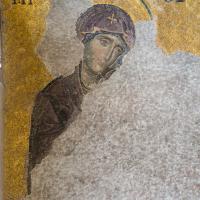 Interior: Deesis Mosaic Detail, Virgin Mary, South Upper Gallery
 Interior: Deesis Mosaic Detail, Christ, South Upper Gallery
 Interior: Deesis Mosaic Detail, John the Baptist, Upper Gallery
 Interior: Deesis Mosaic Detail, South Upper Gallery
 Interior: Deesis Mosaic, Upper Gallery
 Interior: Comnenus Mosaic of Virgin and Child, Emperor John II Comnenus, Empress Irene, Eastern Wall of Southern Gallery
 Interior: Comnenus Mosaic Detail
 Interior: Comnenus Mosaic Detail, Alexius I Comnenus, Eastern Wall of Southern Gallery
 Interior: Comnenus Mosaic Detail
 Interior: Comnenus Mosaic Detail, Virgin Mary, Eastern Wall of Southern Gallery
 Interior: Comnenus Mosaic Detail, Eastern Wall of Southern Gallery
 Interior: Comnenus Mosaic Detail, Eastern Wall of Southern Gallery
 Interior: Central Dome, Calligraphic Inscription
 Interior: Southwest Gallery Vault Detail
 Interior: Northeast Arcade Detail
 Interior: Southwest Column Capital Detail
 Interior: Southwest Gallery Column Capital Detail, Monogram
 Interior: Southwest Gallery Column Capital Detail
 Interior: Southwest Column Capital Detail
 Interior: Empress Zoe Mosaic Detail
 Interior: Southwest Gallery
 Interior: Vault Detail, Window
 Interior: Northwestern Gallery, Dome Detail, Roundel
 Interior: Southwestern Arcade Detail
 Interior: Southwest Gallery Column Detail, Vault Detail
 Interior: Pendentive, Seraphim Mosaic
 Interior: Central Dome, Calligraphic Inscription
 Interior: Column Capital Detail
 Interior: View of Western Gallery
 Interior: Northeast Half-Dome Detail
 Interior: Nave, Central Dome, Apse, Roundels, Pendentives
 Interior: Nave, Central Dome, Apse, Roundels, Cherub, Pendentives
 Interior: Nave, Central Dome, Apse, Roundels, Cherub, Pendentives
 Interior: Nave, Central Dome, Apse, Roundels, Pendentives
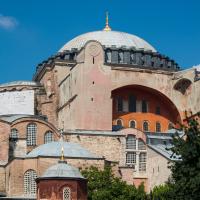 Exterior: Southwest Elevation
 Exterior: Southwest Elevation
 Exterior: Southwest Elevation
 Exterior: Central Dome Detail from Southwest
 Exterior: Central Dome Detail From Southwest
 Exterior: Central Dome Detail From Southwest
 Exterior: Southwest Facade Detail
 Exterior: Southwest Facade Detail
 Exterior: Southwest Facade
 Exterior: South Corner Detail
 Exterior: Apse Detail
 Exterior: Apse Detail
 Exterior: Southeast Facade Detail, Buttress
 Exterior: Southeast Facade Detail