mosaic
References
Contains information from the J. Paul Getty Trust, Getty Research Institute – the Art & Architecture Thesaurus, the Getty Thesaurus of Geographic Names, the Union List of Artist Names, the Cultural Objects Name Authority, and/or the Getty Iconography Authority – which is made available under the ODC Attribution License.
View on the Getty Vocabularies.
View on the Getty Vocabularies.
 Detail of the left group of apostles in the mosaic of the Leonian Triclinium
 Detail of the left group of apostles in the mosaic of the Leonian Triclinium
 Detail of Christ in the mosaic of the Leonian Triclinium
 Detail of the mosaic of the Leonian Triclinium
 Detail of the mosaic of the Leonian Triclinium
 Detail of the mosaic of the Leonian Triclinium
 Detail of the left group of apostles in the mosaic of the Leonian Triclinium
 Detail of the mosaic of the Leonian Triclinium
 Detail of Christ giving the keys to Saint Sylvester and the labarum to Constantine in the mosaic of the Leonian Triclinium
 Detail of Christ and the right group of apostles in the mosaic of the Leonian Triclinium
 Detail of Christ and the right group of apostles in the mosaic of the Leonian Triclinium
 Detail of Christ giving the keys to Saint Sylvester and the labarum to Constantine in the mosaic of the Leonian Triclinium
 Detail of Christ giving the keys to Saint Sylvester and the labarum to Constantine in the mosaic of the Leonian Triclinium
 Detail of Saint Peter giving the papal stole to Leo III and the banner to Charlemagne in the mosaic of the Leonian Triclinium
 Detail of Saint Peter giving the papal stole to Leo III and the banner to Charlemagne in the mosaic of the Leonian Triclinium
 View of the Leonian Triclinium
 View of the Leonian Triclinium
 Detail of the mosaic of the Leonian Triclinium
 Detail of Saint Peter giving the papal stole to Leo III and the banner to Charlemagne in the mosaic of the Leonian Triclinium
 Interior: Mosaic Detail, Martyrdom of the Seven Maccabee Brothers
 Exterior: Southeastern Facade
 Interior: Cornice Detail
 Interior: Cornice Detail
 Interior: Arch Detail
 Interior: Arch Detail
 Interior: Pier Detail
 Interior: Northeast Corner Detail; Cornice; Stained Glass Window
 Interior: Vaults, South Aisle
 Interior: South Aisle, Minbar,
 Interior: South Aisle Facing Northeast
 Interior: Central Prayer Hall, Facing North Aisle
 Interior: Central Prayer Hall, Facing Northwest
 Interior: Narthex
 Interior: Central Prayer Hall, Facing Northern Side Aisle, Muezzin's Pulpit
 Interior: Central Prayer Hall; Nave, Facing East
 Interior: Central Prayer Hall, South Aisle, Minbar, Support Piers, Mihrab Niche in Background
 Interior: Central Dome, Pendentives
 Interior: Central Prayer Hall; Nave; Entrance; Facing West
 Interior: Central Prayer Hall; Nave; Northwest Corner Detail
 Interior: Central Prayer Hall; Nave; Minbar; Muezzin's Pulpit
 Interior: Central Prayer Hall; Nave
 Interior: North Aisle, Facing East
 Interior: North Aisle looking East
 Interior: Column Detail
 Interior: Dome Detail, Pendentives; Stained Glass
 Interior: Southern Side Aisle
 Interior: Support Column, Facing Southwest
 Exterior: Western Facade Detail; Stained Glass
 Exterior: Western Facade, Entrance
 Exterior: Minaret
 Exterior: Facade Detail
 Interior: Nave and main prayer area
 Interior: Minbar area
 Interior: Narthex
 Interior: Prayer aisle for women
 Exterior: Baptistry
 Interior: Narthex
 Interior: Narthex
 Interior: Apse
 Interior: Gallery level
 Interior: Gallery level
 Exterior: Southwest Elevation
 Exterior: Dome Detail
 Exterior: Southwestern Elevation Detail
 Interior: Southwestern Entrance, Mosaic
 Interior: Southwestern Entrance Mosaic (10th century) Detail, Virgin, Flanked by Justinian and Constantine
 Interior: Southwestern Entrance Mosaic (10th century) Detail, Virgin and Child
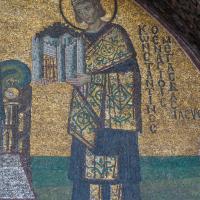 Interior: Southwestern Entrance Mosaic (10th century) Detail, Emperor Constantine
 Interior: Southwestern Entrance Mosaic (10th century) Detail, Emperor Justinian
 Interior: Imperial Gate Mosaic (late 9th - early 10th century)
 Interior: Imperial Gate Mosaic (late 9th - early 10th century) Detail, Leo the Wise
 Interior: Imperial Gate Mosaic (late 9th - early 10th century) Detail; Christ Pantokrator
 Interior: Imperial Gate Mosaic (late 9th - early 10th century) Detail, Leo the Wise and the Virgin
 Interior: Imperial Gate Mosaic (late 9th - early 10th century) Detail, Archangel Gabriel
 Interior: Apse Mosaic of Virgin and Child
 Interior: Eastern Wall of Southern Gallery; Mosaic of Empress Zoe, Christ Pantokrator, Constantine IX Monomachus
 Interior: Eastern Wall of Southern Gallery, Comnenus Mosaic of Virgin and Child, Emperor John II Comnenus, Empress Irene, Alexius Comenenus
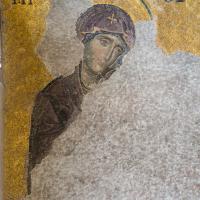 Interior: Deesis Mosaic Detail, Virgin Mary, South Upper Gallery
 Interior: Deesis Mosaic Detail, Christ, South Upper Gallery
 Interior: Deesis Mosaic Detail, John the Baptist, Upper Gallery
 Interior: Deesis Mosaic Detail, South Upper Gallery
 Interior: Deesis Mosaic, Upper Gallery
 Interior: Comnenus Mosaic of Virgin and Child, Emperor John II Comnenus, Empress Irene, Eastern Wall of Southern Gallery
 Interior: Comnenus Mosaic Detail
 Interior: Comnenus Mosaic Detail, Alexius I Comnenus, Eastern Wall of Southern Gallery
 Interior: Comnenus Mosaic Detail
 Interior: Comnenus Mosaic Detail, Virgin Mary, Eastern Wall of Southern Gallery
 Interior: Comnenus Mosaic Detail, Eastern Wall of Southern Gallery
 Interior: Comnenus Mosaic Detail, Eastern Wall of Southern Gallery
 Interior: Central Dome, Calligraphic Inscription
 Interior: Southwest Gallery Vault Detail
 Interior: Northeast Arcade Detail
 Interior: Southwest Column Capital Detail
 Interior: Southwest Gallery Column Capital Detail, Monogram
 Interior: Southwest Gallery Column Capital Detail
 Interior: Southwest Column Capital Detail
 Interior: Empress Zoe Mosaic Detail
 Interior: Southwest Gallery
 Interior: Vault Detail, Window
 Interior: Northwestern Gallery, Dome Detail, Roundel
 Interior: Southwestern Arcade Detail
 Interior: Southwest Gallery Column Detail, Vault Detail
 Interior: Pendentive, Seraphim Mosaic
 Interior: Central Dome, Calligraphic Inscription
 Interior: Column Capital Detail
 Interior: View of Western Gallery
 Interior: Northeast Half-Dome Detail
 Interior: Nave, Central Dome, Apse, Roundels, Pendentives
 Interior: Nave, Central Dome, Apse, Roundels, Cherub, Pendentives
 Interior: Nave, Central Dome, Apse, Roundels, Cherub, Pendentives
 Interior: Nave, Central Dome, Apse, Roundels, Pendentives
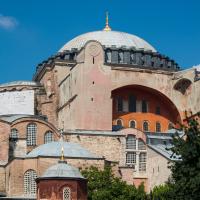 Exterior: Southwest Elevation
 Exterior: Southwest Elevation
 Exterior: Southwest Elevation
 Exterior: Central Dome Detail from Southwest
 Exterior: Central Dome Detail From Southwest
 Exterior: Central Dome Detail From Southwest
 Exterior: Southwest Facade Detail
 Exterior: Southwest Facade Detail
 Exterior: Southwest Facade
 Exterior: South Corner Detail
 Exterior: Apse Detail
 Exterior: Apse Detail
 Exterior: Southeast Facade Detail, Buttress
 Exterior: Southeast Facade Detail
 Exterior: Southeast Facade Detail
 Exterior: Apse, Southeast Facade
 Exterior: Southeast Elevation
 Exterior: Southeast Elevation
 Exterior: Southeast Facade, Apse
 Exterior: Southeast Elevation
 Exterior: Southern Facade
 Exterior: Southern Facade
 Exterior: Southern Facade
 Exterior: Southern Facade
 Exterior: Southern Facade
 Exterior: Western Facade, Entrance
 Exterior: Western Facade
 Exterior: Western Facade, Entrance
 Exterior: Western Facade, Entrance
 Exterior: Western Facade
 Exterior: Western Facade
 Exterior: Blind Niche, Northern Facade
 Exterior: Northern Facade, Blind Niche
 Exterior: Northern Facade, Blind NIche
 Exterior: Nearby Structures
 Exterior: Northern Facade
 Exterior: Northern Facade; Wall
 Exterior: Dome, Viewed from Garden
 Exterior: Dome, Apse, Viewed from East
 Exterior: Northern Facade
 Exterior: Western Facade; Entrance
 Interior: Outer Narthex, South Dome, Support Structures
 Interior: Outer Narthex, South Dome, Support Structures
 Interior: Outer Narthex, Facing North, Domed Bays
 Interior: Outer Narthex, Facing North, Domed Bays
 Interior: Outer narthex, Facing South, Domed Bays
 Interior: Outer Narthex, Central Dome
 Interior: Outer Narthex, South Dome
 Interior: Outer Narthex facing South
 Interior: Outer Narthex, Central Dome
 Interior: Outer Narthex, Central Dome
 Interior: Outer Narthex, South Dome
 Interior: Exonarthex, Looking into Narthex and Central Prayer Hall; Columns
 Interior: Exonarthex
 Interior: Exonarthex
 Interior: North Exonarthex looking East
 Interior: North Exonarthex looking West
 Interior: North Exonarthex looking West
 Interior: South Exonarthex looking West
 Interior: South Exonarthex looking West
 Interior: South Exonarthex Dome Mosaic Detail
 Interior: South Exonarthex Dome Mosaic Detail
 Interior: South Exonarthex Dome Mosaic Detail
 Interior: South Exonarthex Dome Mosaic Detail
 Interior: South Exonarthex Dome Mosaic Detail
 Interior: South Exonarthex Dome Mosaic Detail
 Interior: South Exonarthex Dome Mosaic Detail
 Interior: South Exonarthex Dome Mosaic Detail
 Interior: South Exonarthex Dome Mosaic Detail
 Interior: South Exonarthex Dome Mosaic Detail
 Interior: South Exonarthex Dome Mosaic Detail
 Interior: Mihrab Niche; Apse; Facing Southeast, Inscription
 Interior: Pulpit; North Wall
 Interior: Minbar; South Elevation
 Interior: Mihrab Niche, Apse
 Interior: North Aisle, Facing East; Pulpit
 Interior: Minbar; Southern Aisle
 Interior: Mihrab Niche; Apse, Calligraphic Inscription
 Interior: Central Dome
 Interior: Western Entrance; Entrances to Narthex, Exonarthex
 Interior: Window, North Narthex
 Interior: Window Detail, South Narthex
 Interior: Narthex facing North
 Interior: Narthex facing South
 Interior: Column Capital Detail
 Interior: Column Capital Detail
 Interior: Column Capital Detail
 Exterior: Apse, Viewed From Garden
 Exterior: Polygonal Apse