sculpture
References
Contains information from the J. Paul Getty Trust, Getty Research Institute – the Art & Architecture Thesaurus, the Getty Thesaurus of Geographic Names, the Union List of Artist Names, the Cultural Objects Name Authority, and/or the Getty Iconography Authority – which is made available under the ODC Attribution License.
View on the Getty Vocabularies.
View on the Getty Vocabularies.
 View of columns embedded in the exterior of Santa Prassede
 View of the facade of Santa Prassede
 View of the facade of Santa Prassede
 View of a column in the courtyard of Santa Prassede
 View of a column in the courtyard of Santa Prassede
 View of a brick passage with marble fragments near Santa Prassede
 View of a brick passage with marble fragments near Santa Prassede
 View of a brick passage with marble fragments near Santa Prassede
 View of a brick passage with marble fragments near Santa Prassede
 View of a brick passage with marble fragments near Santa Prassede
 View of a brick passage with marble fragments near Santa Prassede
 View of carved relief panels in Santa Prassede
 View of carved relief panels
 View of the apse of Santi Giovanni e Paolo
 View of the nave and organ of Santi Giovanni e Paolo looking towards the entrance
 View of the north aisle of Santi Giovanni e Paolo
 View of the apse of Santi Giovanni e Paolo
 View of the apse of Santi Giovanni e Paolo
 View of the nave and organ of Santi Giovanni e Paolo looking towards the entrance
 View of the nave and organ of Santi Giovanni e Paolo looking towards the entrance
 View of an altar in Santi Giovanni e Paolo
 View of the narthex of Santi Giovanni e Paolo
 View of the Chapel of Saint Paul of the Cross
 View of the dome of the Chapel of Saint Paul of the Cross
 View of the dome of the Chapel of Saint Paul of the Cross
 View of the nave of Santi Giovanni e Paolo
 View of the atrium of Santi Giovanni e Paolo
 View of the atrium of Santi Giovanni e Paolo
 View of the facade of Santi Giovanni e Paolo
 View of marble fragments embedded in a wall near Santi Giovanni e Paolo
 View of marble fragments embedded in a wall near Santi Giovanni e Paolo
 View of marble fragments embedded in a wall near Santi Giovanni e Paolo
 View of a column embedded in the exterior of Santi Giovanni e Paolo
 View of the entrance of Santi Giovanni e Paolo
 View of lions flanking the entrance of Santi Giovanni e Paolo
 View of lions flanking the entrance of Santi Giovanni e Paolo
 View of lions flanking the entrance of Santi Giovanni e Paolo
 View of a lion flanking the entrance of Santi Giovanni e Paolo
 View of a lion flanking the entrance of Santi Giovanni e Paolo
 View of a lion flanking the entrance of Santi Giovanni e Paolo
 View of a lion flanking the entrance of Santi Giovanni e Paolo
 View of a lion flanking the entrance of Santi Giovanni e Paolo
 View of a lion flanking the entrance of Santi Giovanni e Paolo
 View of a column capital in the atrium of Santi Giovanni e Paolo
 View of an eagle over the doorway of Santi Giovanni e Paolo
 View of a column in the atrium of Santi Giovanni e Paolo
 View of a column in the atrium of Santi Giovanni e Paolo
 View of an arched window in the atrium of Santi Giovanni e Paolo
 View of a column capital in the atrium of Santi Giovanni e Paolo
 View of a column capital in the atrium of Santi Giovanni e Paolo
 View of a column base in the atrium of Santi Giovanni e Paolo
 View of an arch and timber in the atrium of Santi Giovanni e Paolo
 View of an arch and timber in the atrium of Santi Giovanni e Paolo
 View of an arch and timber in the atrium of Santi Giovanni e Paolo
 View of the apature of Santi Giovanni e Paolo
 View of the spot of martyrdom of Santi Giovanni e Paolo
 View of the spot of martyrdom of Santi Giovanni e Paolo
 View of the apature of Santi Giovanni e Paolo
 View of the apature of Santi Giovanni e Paolo
 View of a column in the atrium of Santi Giovanni e Paolo
 View of the doorway of Santi Giovanni e Paolo
 View of marble fragments embedded in a wall of Santi Giovanni e Paolo
 View of marble fragments embedded in a wall of Santi Giovanni e Paolo
 View of a column in the atrium of Santi Giovanni e Paolo
 Interior: Niche with a sculpture of Saint Peter
 Interior: Sculpture relief panel
 Interior: Ceiling, Detail
 Interior: Basin in the lower chapel
 Interior: Inscription plaque
 Interior: Inscription plaque
 Interior: Inscription plaque
 Interior: Fragmentary vegetal frieze
 Exterior: Cross atop the Tempietto
 Interior: Statue of Saint Peter
 Interior: Grate to the lower chapel
 Interior: Spot marking the crucifixion of Saint Peter
 Interior: Frieze depicting the crucifixion of Saint Peter
 Interior: Frieze depicting the crucifixion of Saint Peter
 Interior: View through the grate to the lower chapel
 Interior: Ceiling
 Exterior: Facade elevation
 Exterior: Facade elevation
 Exterior: Facade elevation
 Exterior: Facade elevation
 Exterior: Facade elevation
 Interior: Side Door
 Interior: Statue of Saint Peter
 Interior: Side Door
 Interior: Ceiling
 Interior: Ceiling
 Interior: Ceiling
 Interior: Inscription plaque
 Interior: Lower chapel
 Exterior: Facade elevation
 Detail: View of the lower cornice
 Detail: View of the lower cornice
 Detail: View of the lower cornice
 Detail: View of the Attic
 View of the Western Face
 Detail: View of a Victory in the right Spandrel of the Western Face
 Detail: View of the carved ornament over the center of the Western face
 Detail: View of a relief panel depicting the Emperor in a triumphal procession from the south pier
 Detail: View of carved coffering on the underside
 Detail: View of a relief panel depicting the Emperor in a triumphal procession from the south pier
 Detail: View of a relief panel depicting the Emperor in a triumphal procession from the south pier
 Detail: View of central relief sculpture depicting the Emperor and an eagle on the underside
 Detail: View of central relief sculpture depicting the Emperor and an eagle on the underside
 Detail: View of the carved ornament over the center of the western face
 Detail: View of a Victory in the left Spandrel of the Western Face
 Detail: View of a Victory in the left Spandrel of the Western Face
 Detail: View of a Victory in the right Spandrel of the Western Face
 Detail: View of a relief panel depicting the Emperor in a triumphal procession from the south pier
 Detail: View of the underside
 Detail: View of the underside
 Detail: View of a Capital
 Detail: View of a Capital
 Detail: View of a Capital
 Detail: View of a Capital
 Detail: View of carved ornamentation under a relief panel
 Detail: View of a relief panel depicting the Emperor in a triumphal procession from the south pier
 Detail: View of a relief panel depicting the spoils from the sack of Jerusalem on the north pier
 Detail: View of a relief panel depicting the spoils from the sack of Jerusalem on the north pier
 Detail: View of the Menorah from a relief panel depicting the spoils from the sack of Jerusalem on the north pier
 Detail: View of a relief panel depicting the spoils from the sack of Jerusalem on the north pier
 Detail: View of carved ornamentation next to a relief panel depicting the spoils from the sack of Jerusalem on the north pier
 Detail: View of the carved ornament over the center of the western face
 Detail: View of carved coffering on the underside
 Detail: View of a frame from the western face of south pier
 Detail: View of the western face of the south pier
 Detail: View of the lower cornice
 Detail: View of the lower cornice
 Detail: View of a Victory in a Spandrel
 Detail: View of a Victory in a Spandrel
 Detail: View of the Keystone Decoration
 Detail: View of the Keystone Decoration
 Detail: View of central relief sculpture depicting the Emperor and an eagle on the underside
 Detail: View of a relief panel depicting the spoils from the sack of Jerusalem on the north pier
 Detail: View of a relief panel depicting the spoils from the sack of Jerusalem on the north pier
 Detail: View of a Victory in a Spandrel
 Detail: View of the Lower Cornice and Attic Inscription
 View of the East Face and the coffering on the underside
 Detail: View of the Lower Cornice on the East Face
 Detail: View of a Column Capital on the East Face
 Detail: View of a Column Capital on the East Face
 Detail: View of Graffiti
 Detail: View of a relief panel depicting the Emperor in a Triumphal Procession from the south pier
 Detail: View of a relief panel depicting the Emperor in a Triumphal Procession from the south pier
 Detail: View of a relief panel depicting the Emperor in a Triumphal Procession from the south pier
 Detail: View of a relief panel depicting the Emperor in a Triumphal Procession from the south pier
 Detail: View of the Attic Inscription
 Detail: View of the Eastern face and Attic Inscription
 Detail: View of the Eastern face and Attic Inscription
 Detail: View of the Figural Frieze on the Eastern face
 Detail: View of the Figural Frieze on the Eastern face
 Detail: View of the Figural Frieze on the Eastern face
 Detail: View of the Figural Frieze on the Eastern face
 Detail: View of the Figural Frieze on the Eastern face
 Detail: View of the Attic Inscription on the Western face
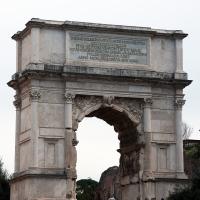 View from the West
 View from the South
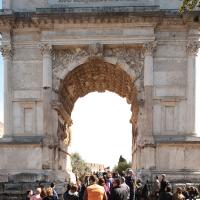 View from the West
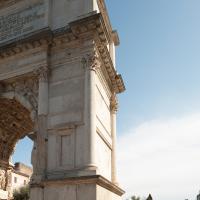 View from the West
 View from the East
 View from the East
 View of Trajan's Column looking Northeast
 View of Trajan's Column looking East
 View of Trajan's Column looking Southeast
 View of Trajan's Column looking South
 View of Trajan's Column looking Southwest
 View of Trajan's Column looking West
 View of Trajan's Column looking West
 View of Trajan's Column looking West
 View of Trajan's Column looking West
 View of Trajan's Column looking Northwest
 View of Trajan's Column looking West
 View of the Base of Trajan's Column looking West
 View of Trajan's Column looking West
 View of Trajan's Column looking West
 View of Trajan's Column looking South
 View of Trajan's Column looking Southeast
 View of Trajan's Column looking East
 Side View of Saint Peter on top of Trajan's Column
 View of Saint Peter on top of Trajan's Column with Inscription "B PETRO" Visible
 and CLIII-CLIV (Romans burning Dacian buildings and the expulsion of Dacians)") View of the Western Side of the Frieze on Trajan's Column Scenes CXLVI-CXLVII (Romans capturing Dacians and Roman soldiers displaying Decebalus's head in fort) and CLIII-CLIV (Romans burning Dacian buildings and the expulsion of Dacians)
View of the Western Side of the Frieze on Trajan's Column Scenes CXLVI-CXLVII (Romans capturing Dacians and Roman soldiers displaying Decebalus's head in fort) and CLIII-CLIV (Romans burning Dacian buildings and the expulsion of Dacians) and CXXXIX-CXLI (Dacian king addressing men, Dacians retreating and committing suicide, Dacians appealing to Trajan)") View of the Western Side of the Frieze on Trajan's Column Scenes CXXXI-CXXXIII (Romans crossing a bridge, Dacians leaving a fort and marching onwards) and CXXXIX-CXLI (Dacian king addressing men, Dacians retreating and committing suicide, Dacians appealing to Trajan)
View of the Western Side of the Frieze on Trajan's Column Scenes CXXXI-CXXXIII (Romans crossing a bridge, Dacians leaving a fort and marching onwards) and CXXXIX-CXLI (Dacian king addressing men, Dacians retreating and committing suicide, Dacians appealing to Trajan) and CXXIII-CXXIV (Dacians fleeing their fort and begging Trajan for mercy)") View of the Western Side of the Frieze on Trajan's Column Scenes CXVI-CXVIII (Romans attacking walls, building siege machines, and a Dacian kneeling before Trajan) and CXXIII-CXXIV (Dacians fleeing their fort and begging Trajan for mercy)
View of the Western Side of the Frieze on Trajan's Column Scenes CXVI-CXVIII (Romans attacking walls, building siege machines, and a Dacian kneeling before Trajan) and CXXIII-CXXIV (Dacians fleeing their fort and begging Trajan for mercy) and CXII-CXIII (Romans and Dacians fighting, Romans attacking a fortress)") View of the Western Side of the Frieze on Trajan's Column Scenes CV-CVI (Trajan holding a council and soldiers marching) and CXII-CXIII (Romans and Dacians fighting, Romans attacking a fortress)
View of the Western Side of the Frieze on Trajan's Column Scenes CV-CVI (Trajan holding a council and soldiers marching) and CXII-CXIII (Romans and Dacians fighting, Romans attacking a fortress)") View of the Western Side of the Frieze on Trajan's Column Scenes C-CI (Trajan receiving foreigners and leading infantry over a bridge)
View of the Western Side of the Frieze on Trajan's Column Scenes C-CI (Trajan receiving foreigners and leading infantry over a bridge) and XCII-XCIII (soldiers clearing forest and Dacians planning an attack)") View of the Western Side of the Frieze on Trajan's Column Scenes LXXXVI-LXXXVII (Trajan making a sacrifice and moving to his next destination) and XCII-XCIII (soldiers clearing forest and Dacians planning an attack)
View of the Western Side of the Frieze on Trajan's Column Scenes LXXXVI-LXXXVII (Trajan making a sacrifice and moving to his next destination) and XCII-XCIII (soldiers clearing forest and Dacians planning an attack)") View of the Western Side of the Frieze on Trajan's Column Scenes LXXIX-LXXX (Trajan and his troops sailing out and arriving on Dalmatian shore)
View of the Western Side of the Frieze on Trajan's Column Scenes LXXIX-LXXX (Trajan and his troops sailing out and arriving on Dalmatian shore) and LXXIII-LXXV (Trajan addressing soldiers and Romans subjugating the Dacians)") View of the Western Side of the Frieze on Trajan's Column Scenes LXVII-LXVIII (Dacians cutting down trees and Trajan receiving a prisoner as Romans build camp) and LXXIII-LXXV (Trajan addressing soldiers and Romans subjugating the Dacians)
View of the Western Side of the Frieze on Trajan's Column Scenes LXVII-LXVIII (Dacians cutting down trees and Trajan receiving a prisoner as Romans build camp) and LXXIII-LXXV (Trajan addressing soldiers and Romans subjugating the Dacians)") View of the Western Side of the Frieze on Trajan's Column Scenes LIV-LVI (Trajan addressing his soldiers, Romans climbing a steep hill and clearing trees for a road)
View of the Western Side of the Frieze on Trajan's Column Scenes LIV-LVI (Trajan addressing his soldiers, Romans climbing a steep hill and clearing trees for a road) and XLVI-XLVIII (soldiers disembarking on shore, crossing a bridge and marching onwards)") View of the Western Side of the Frieze on Trajan's Column Scenes XXXIX-XL (Trajan receiving Dacian embassy and second major battle scene) and XLVI-XLVIII (soldiers disembarking on shore, crossing a bridge and marching onwards)
View of the Western Side of the Frieze on Trajan's Column Scenes XXXIX-XL (Trajan receiving Dacian embassy and second major battle scene) and XLVI-XLVIII (soldiers disembarking on shore, crossing a bridge and marching onwards)") View of the Western Side of the Frieze on Trajan's Column Scenes XXXIII-XXXIV (Trajan and troops leaving in boats and traveling along the river)
View of the Western Side of the Frieze on Trajan's Column Scenes XXXIII-XXXIV (Trajan and troops leaving in boats and traveling along the river) and XXV-XXVII (Trajan observing a Dacian town, Romans crossing a river, Trajan giving a speech)") View of the Western Side of the Frieze on Trajan's Column Scenes XIX-XXI (building a bridge and a fort, marching in front of fort) and XXV-XXVII (Trajan observing a Dacian town, Romans crossing a river, Trajan giving a speech)
View of the Western Side of the Frieze on Trajan's Column Scenes XIX-XXI (building a bridge and a fort, marching in front of fort) and XXV-XXVII (Trajan observing a Dacian town, Romans crossing a river, Trajan giving a speech)") View of the Western Side of the Frieze on Trajan's Column Scenes X-XI (Roman soldiers building a fort under Trajan's watch)
View of the Western Side of the Frieze on Trajan's Column Scenes X-XI (Roman soldiers building a fort under Trajan's watch)") View of the Western Side of the Frieze on Trajan's Column Scenes III-IV (a town on the banks of the Danube, the Danube personified, and Roman soldiers crossing the river)
View of the Western Side of the Frieze on Trajan's Column Scenes III-IV (a town on the banks of the Danube, the Danube personified, and Roman soldiers crossing the river) View of Saint Peter from Behind
 View of Saint Peter from Behind and Below with Inscription "B PETRO APOST" Visible
, CXLVII-CXLVIII (Display of Decebalus's head and the capture of Dacians), and CLIV-CLV (Expulsion of the Dacians and their livestock)") View of the Southwestern Side of the Frieze on Trajan's Column Scene CXLI (Dacians appealing to Trajan), CXLVII-CXLVIII (Display of Decebalus's head and the capture of Dacians), and CLIV-CLV (Expulsion of the Dacians and their livestock)
View of the Southwestern Side of the Frieze on Trajan's Column Scene CXLI (Dacians appealing to Trajan), CXLVII-CXLVIII (Display of Decebalus's head and the capture of Dacians), and CLIV-CLV (Expulsion of the Dacians and their livestock)