Interior: Pietà, Installation View
Interior: Monumento a Leone XII, Installation View
Interior: Monumento di Pio XI, Installation View
Interior: Monumento a Matilde di Canossa, Installation View
Interior: Altare di San Girolamo, Installation View
Interior: View of Baldachin
Interior: Right (North) Nave, St. Madeleine Sophie Barat (top)
Interior: Saint Peter's Basilica looking West towards the Altar
Detail: View of the head of the Virgin
Detail: View of drapery of the Virgin's robes
Interior: Mosaic Detail, Martyrdom of the Seven Maccabee Brothers
Interior: View in situ
Interior: View in situ, Detail
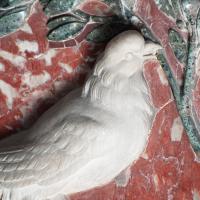
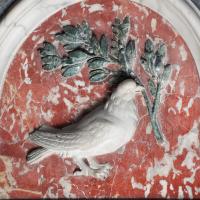
Interior Detail: Carving of dove holding an olive branch adjacent to the Chapel of Saint Sebastian
Interior Detail: Carving of dove holding an olive branch adjacent to the Chapel of Saint Sebastian
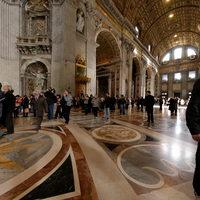
Interior: Marble Flooring, Detail
Interior: Marble Flooring, Detail
Interior: Marble Flooring, Detail
Interior: Marble Flooring, Detail
Interior: Marble Flooring, Detail
Interior: Marble Flooring, Detail
Interior: Marble Flooring, Detail
Interior: Marble Flooring with a Metal Grate, Detail
Interior: Installation View
Detail: Installation View, Right Side
Detail: Installation View, Left Side
Interior: Cathedra Petri in the Apse of the Basilica
Detail: Installation View
Detail: Baldachin top with the mosaic of Saint John the Evangelist in the Background
Detail: top
Detail: Figure on the top
Detail: Figure on the top
Detail: Column Base
Detail: Column Base
Detail: Figure on the top
Interior: Detail of 18th century mosaic copy after Andrea Sacchi (1599–1661)
Interior: Painting Detail, Figure Crucified
Interior: Bronze Figural Scene, Detail
Interior: Bronze Relief, Detail
Interior: Bronze Relief, Detail
Interior: Vestibule of Baptismal Chapel dome, from Cappella del Fonte Battesimale
Interior: Vestibule of Baptismal Chapel ceiling, from Cappella del Fonte Battesimale
Interior: South Nave, San Pietro d'Alcàntara (bottom)
Interior: View of Basilica di San Pietro looking West
Interior: View of Basilica di San Pietro looking upwards to the Ceiling
Interior: Vestibule of Pieta Chapel dome, Sculptures of Misericordia and Fortezza in the foreground
Interior: Installation View
Interior: Pilaster Detail, Portraits of Popes and Cherubs
Interior: Mosaic of St. Peter
Interior: Installation View
Interior: Installation View
Interior: Installation View
Interior: Installation View
Interior: Installation View
Interior: Installation View
Interior: View of dome over Cappella di San Sebastiano
Interior: Installation View
Interior: Installation View
Interior: South Nave, San Ignazio di Loyola (bottom)
Interior: Altare di San Girolamo, Installation View
Interior: View of Baldachin from Nave
Interior: View of Baldachin from Nave
Interior: View of Baldachin from Nave
Interior: Cathedra Petri in the Apse of the Basilica
Interior: Left Tribune - South Wall, looking up at Santa Francesca Romana
interior: Right Tribune - North Wall, Sant'Elia (bottom)
Detail: Urban VIII's family coat of arms
Interior: Sant'Elena, Installation View
Interior: View of Bernini Reliquary Balcony, Angels Raising the Cross of Saint Helen
Interior: San Longino, Installation View
Interior: Altare della Bugia, Installation View
Interior: Monumento di Pio VII, Installation View
Interior: Altare della Trasfigurazione, Installation View
Interior: View of Transept Looking North West
Interior: View of Arch Looking towards Gregorian Chapel
Interior: View of Gate looking towards Altar of the Immaculate Conception
Interior: View of Dome over the Presentation Chapel
Interior: Monumento of Maria Clementina Sobieski, Installation View
Interior: South Nave, looking up at Santa Lucia Filippini by Silvio Silva
Interior: Right (North) Nave, St. Madeleine Sophie Barat (top)
Interior: View of Dome and Vault, South Nave, San Luigi de Montfort (above)
Interior: View of the South Nave Looking West towards San Camillo de Lellis (bottom), San Luigi de Montfort (top)
Interior: Mosaic Detail
Interior: San Longino, Installation View
Interior: View of Nave looking towards the Apse
Interior: View of Nave towards the Presentation Chapel
Interior: Baldachin and the Apse
Interior: Baldachin and the Apse
Interior: View of Nave, looking towards the Pieta
Interior: View looking towards the Monument to Christina of Sweden
Interior: View looking towards the Monument to Christina of Sweden
Interior: South Nave
Interior: Looking Southeast, View of sculptures of Autorità ecclesiastica and Giustizia divina
Interior: South Nave
Interior: Looking towards the Presentation Chapel
Interior: View of Blessed Sacrament Chapel Dome
Interior: Altare di San Girolamo, Installation View
Interior: Nave Ceiling and Dome of the Blessed Sacrament Chapel
Interior: Nave Ceiling and Dome of the Blessed Sacrament Chapel
Interior: Nave Ceiling and Dome of the Blessed Sacrament Chapel
Interior: Dome of the Blessed Sacrament Chapel
Interior: Dome of the Blessed Sacrament Chapel
Interior: Nave looking East
Interior: Nave looking Southeast
Interior: View of the Crossing, Baldacchino di San Pietro
Interior: Cathedra Petri, Apse
Interior: Nave Looking Northeast
Interior: Dome above Baldachin
Interior: Dome of the Presentation Chapel
View of Crossing next to Baldacchino


 by Bernini in the Apse of the Basilica")


, John the Evangelist (by Antonio Valsoldo), James the Less (by Cristoforo Stati), and Bartholomew (by Egidio Moretti) in the foreground")


 from the right side")
 from the left side")
 by Bernini in the Apse of the Basilica")
")


 by Bernini in the Apse of the Basilica")