interior
: View > interior
See Also:
interior, former
References
Contains information from the J. Paul Getty Trust, Getty Research Institute – the Art & Architecture Thesaurus, the Getty Thesaurus of Geographic Names, the Union List of Artist Names, the Cultural Objects Name Authority, and/or the Getty Iconography Authority – which is made available under the ODC Attribution License.
View on the Getty Vocabularies.
View on the Getty Vocabularies.
 Interior: Christ Hyperagathos Mosaic Detail, Apse
 Interior: Mosaic Detail, Depiction of Saint
 Interior: Mosaic Detail, Depiction of Saint
 Interior: Central Dome, Christ Pantokrator Mosaic
 Interior: Central Dome, Christ Pantokrator Mosaic
 Interior: Mosaic Depicting Monk
 Interior: Mosaic Depicting Monk
 Interior: Saint Anthony Mosaic, Southern Side Aisle, Vault Mosaic Panel Details
 Interior: Apse Detail
 Interior: Apse Detail
 Interior: Baptism of Christ Mosaic Detail, South of Main Dome
 Interior: Christ Hyperagathos Mosaic Detail, Apse
 Interior: Mosaic Detail
 Interior: Mosaic Detail
 Interior: Christ Hyperagathos Mosaic Detail, Apse
 Interior: Northwest Elevation
 Interior: Southeast Elevation, Qibla Wall
 Interior: Central Dome, Support Structures, Roundels With Inscriptions
 Interior: Northeast Elevation
 Interior: Central Dome, Support Structures, Medallions With Inscriptions, Roundels With Inscriptions
 Interior: Western Dome and Support Domes, Muqarnas, Arches
 Interior: Southeast Support Pier, Inscriptions, Half-Domes, Muqarnas Transition Zones, Arched Dome Supports
 Interior: Prayer Hall, Main Entrance in Northwest, Facing West
, Detail of Iznik Tiles") Interior: Şehzade Mausoleum (turbe), Detail of Iznik Tiles
Interior: Şehzade Mausoleum (turbe), Detail of Iznik Tiles, Baldachino") Interior: Şehzade Mausoleum (turbe), Baldachino
Interior: Şehzade Mausoleum (turbe), Baldachino, Detail of Iznik Tiles") Interior: Şehzade Mausoleum (turbe), Detail of Iznik Tiles
Interior: Şehzade Mausoleum (turbe), Detail of Iznik Tiles Interior: Central Prayer Hall; Detail of Northwest Dome
 Interior: Central Prayer Hall; Northwest Entrance
 Interior: Central Prayer Hall
 Interior: Central Prayer Hall; Southwest Lunette; Shield Windows; Pendentives; Inscriptions
 Interior: Central Prayer Hall; Southwest Lunette; Shield Windows; Pendentives; Inscriptions
 Interior: Central Prayer Hall; Pendentives; Lunette; Shield Windows; Inscriptions
 Interior: Central Dome Detail; Support Domes; Inscription Medallions
 Interior: Central Prayer Hall Facing Southeast; Minbar; Half-Dome; Roundels; Calligraphic Inscriptions
 Interior: Lights; Support Dome; Southeastern End; Inscription Medallions
 Interior: Central and Support Dome; Lunette; Southeastern End; Inscription Medallions
 Interior: Central and Support Domes
 Interior: Central Dome
 Storage Hall, Interior: Kujaku-no-ma (Peacock Room), view of original screens from Kyaku-den (Guest Hall)
 Storage Hall, Interior: Kujaku-no-ma (Peacock Room), view of original screens from Kyaku-den (Guest Hall)
 Storage Hall, Interior: Sansui-no-ma (Landscape Room), view of original screens from Kyaku-den (Guest Hall)
 Storage Hall, Interior: Sansui-no-ma (Landscape Room), view of original screens from Kyaku-den (Guest Hall)
 Storage Hall, Interior: Sansui-no-ma (Landscape Room), view of original screens from Kyaku-den (Guest Hall)
 Room") Storage Hall, Interior: Bashō-no-ma (Kakushigi-no-ma) (Basho Room (Kakushigi Room)), view of original screens from Kyaku-den (Guest Hall)
Storage Hall, Interior: Bashō-no-ma (Kakushigi-no-ma) (Basho Room (Kakushigi Room)), view of original screens from Kyaku-den (Guest Hall) Room") Storage Hall, Interior: Hageyama-no-ma (Bare Mountains Room), view of original screens from Kyaku-den (Guest Hall)
Storage Hall, Interior: Hageyama-no-ma (Bare Mountains Room), view of original screens from Kyaku-den (Guest Hall), Interior: Duck Room") Kyaku-den (Guest Hall), Interior: Kamo-no-ma (Duck Room)
Kyaku-den (Guest Hall), Interior: Kamo-no-ma (Duck Room), Interior: Monkey Room") Kyaku-den (Guest Hall), Interior: Saru-no-ma (Monkey Room)
Kyaku-den (Guest Hall), Interior: Saru-no-ma (Monkey Room), Interior: Farming Room") Kyaku-den (Guest Hall), Interior: Nōgyō-no-ma (Agriculture Room)
Kyaku-den (Guest Hall), Interior: Nōgyō-no-ma (Agriculture Room), Interior: Peacock Room") Kyaku-den (Guest Hall), Interior: Kujaku-no-ma (Peacock Room)
Kyaku-den (Guest Hall), Interior: Kujaku-no-ma (Peacock Room), Interior: Peacock Room") Kyaku-den (Guest Hall), Interior: Kujaku-no-ma (Peacock Room)
Kyaku-den (Guest Hall), Interior: Kujaku-no-ma (Peacock Room), Interior: Kakushigi (Basho) Room") Kyaku-den (Guest Hall), Interior: Bashō-no-ma (Kakushigi-no-ma) (Basho Room (Kakushigi Room))
Kyaku-den (Guest Hall), Interior: Bashō-no-ma (Kakushigi-no-ma) (Basho Room (Kakushigi Room)), Interior: Bare Mountain Room") Kyaku-den (Guest Hall), Interior: Hageyama-no-ma (Bare Mountains Room)
Kyaku-den (Guest Hall), Interior: Hageyama-no-ma (Bare Mountains Room), Interior: Landscape Room") Kyaku-den (Guest Hall), Interior: Sansui-no-ma (Landscape Room)
Kyaku-den (Guest Hall), Interior: Sansui-no-ma (Landscape Room), Interior: Landscape Room") Kyaku-den (Guest Hall), Interior: Sansui-no-ma (Landscape Room)
Kyaku-den (Guest Hall), Interior: Sansui-no-ma (Landscape Room), Interior: Wisteria Room") Kyaku-den (Guest Hall), Interior: Fuji-no-ma (Wisteria Room)
Kyaku-den (Guest Hall), Interior: Fuji-no-ma (Wisteria Room), Interior: Carp Room") Kyaku-den (Guest Hall), Interior: Koi-no-ma (Carp Room)
Kyaku-den (Guest Hall), Interior: Koi-no-ma (Carp Room), Interior: Puppy Room") Kyaku-den (Guest Hall), Interior: Gōzu-no-ma (Puppy Room)
Kyaku-den (Guest Hall), Interior: Gōzu-no-ma (Puppy Room), Interior: Hermit Room") Kyaku-den (Guest Hall), Interior: Sennin-no-ma (Immortals/Hermit Room)
Kyaku-den (Guest Hall), Interior: Sennin-no-ma (Immortals/Hermit Room), Interior: Messenger Room") Kyaku-den (Guest Hall), Interior: Shisha-no-ma (Envoys Room)
Kyaku-den (Guest Hall), Interior: Shisha-no-ma (Envoys Room) Interior: Main Hall, 5th and 6th floors
 Interior: Main Hall, Nihonbashi Bridge
 Interior: Main Hall, 5th floor
 Interior: Kannon-den (Silver Pavilion) second floor, Chōonkaku (Wave Sound Pavilion), view of Statue of Seated Bodhisattva Kannon
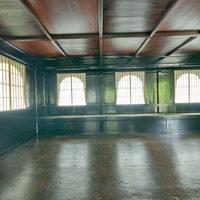 Interior: Kannon-den (Silver Pavilion) second floor, Chōonkaku (Wave Sound Pavilion), view of Statue of Seated Bodhisattva Kannon
 Interior: View of Garden from Kannon-den (Silver Pavilion) first floor, Shinkū-den (Empty Mind Hall)
 Interior: Kannon-den (Silver Pavilion) first floor, Shinkū-den (Empty Mind Hall)
 Interior: Tōgu-dō
 Interior: Tōgu-dō
 Interior: Tōgu-dō
 Interior: Tōgu-dō
 Interior
 Interior: Lounge Hall
 Interior: Dining Hall
 Interior: Lounge Hall Balcony
 Interior: Dining Hall
 Interior: Entrance Hall
 Interior
") Interior: Kon-dō (Golden Hall)
Interior: Kon-dō (Golden Hall)") Interior: Kon-dō (Golden Hall)
Interior: Kon-dō (Golden Hall)") Interior: Kon-dō (Golden Hall)
Interior: Kon-dō (Golden Hall)") Interior: Kon-dō (Golden Hall)
Interior: Kon-dō (Golden Hall) Interior: Miroku-dō (Maitreya Hall)
 Interior: Miroku-dō (Maitreya Hall)
") Interior: Hon-dō (first Main Hall)
Interior: Hon-dō (first Main Hall)") Interior: Hon-dō (first Main Hall)
Interior: Hon-dō (first Main Hall)") Interior: Oku-no-in (Sutra Hall)
Interior: Oku-no-in (Sutra Hall) Interior: Painting Gallery
 Interior: Sculpture Gallery
 Interior: Second Level Gallery 1
 Interior: Second Level Hall
 Interior: Second Level Gallery 2
 Interior: Mezzanine
 Interior: Mezzanine
 Interior: Main Gallery
 Interior: Main Gallery
 Hōjō (Main Hall), Interior: View of fusuma-e by Kakuō Satsuki
 Interior: Foyer
 Interior
 Interior
 Interior: Daibutsu-den
 - Interior: Lobby") Interior: Lobby
Interior: Lobby Interior: Galleria
 Interior: Galleria
 Interior: Galleria
 Interior: Galleria
 Interior
 Interior
 Interior: Main altar
 Interior: Main altar and apse mosaic
 Interior: View of chapel from the main altar
 View from inside the Colosseum looking east
 View from inside the Colosseum looking southeast
 View from inside the Colosseum looking southeast
 View from inside the Colosseum looking east
 View from inside the Colosseum looking southeast
 View from inside the Colosseum looking southeast
 Interior: View over the Pelta-shaped Fountain from Northeast
 Interior: View from North corner of the complex
 Interior: View from East corner of Complex; Nymphaeum
 Interior: View from East corner of Complex; Nymphaeum
 Interior: North Corner room: “Basilica”; view from the center
 Interior: North Corner room: “Basilica”; view from the apse
 - Interior: Center of Basilica") Interior: Center of Basilica
Interior: Center of Basilica - Interior: Center of Basilica") Interior: Center of Basilica
Interior: Center of Basilica Interior: View from East
 Interior: View from NW
 Interior: View from NW
 Interior: Staircase
 Interior: Entrance lobby
 Interior: View of the inside of the Pantheon looking west
 Interior: View of the inside of the Pantheon looking west
 Interior: View of the inside of the Pantheon looking west
 Interior: View of the inside of the Pantheon looking west
 Interior: View from West, from behind the main altar
 Interior: View from center of the nave
") Interior: View from North (apse)
Interior: View from North (apse) Interior: View from the center of the nave
") Interior: View from chancel (above the crypt)
Interior: View from chancel (above the crypt) Interior: View from nave near entrance
 Interior: View from Chancel
 Interior: View from nave
 Interior: View from crossing
 Interior: View from north aisle
") Interior: View from narthex
Interior: View from narthex Interior: Center
 Interior: View of Main Altar
 Interior: View from Chapel of Saint Sebastian, south of nave
 Interior: View of Borromini Sacristy
 Interior: View from Nave
 Interior: View of Chapel of St. Sylvester
 Interior: View from Nave
 View of the nave looking towards the apse
 View of the nave looking towards the entrance
 View of the colonnade looking towards the entrance
 View of the paving
 View of the baldachin
 View of an altar in a side aisle
 View of a side aisle
 View of a side aisle
 View of a side aisle
 View of the baldachin
 View of the baldachin
 Interior: View from center
 Interior: Pietà, Installation View
 Interior: Monumento a Leone XII, Installation View
 Interior: Monumento di Pio XI, Installation View
 Interior: Monumento a Matilde di Canossa, Installation View
 Interior: Altare di San Girolamo, Installation View
 Interior: View of Baldachin
 Interior: Right (North) Nave, St. Madeleine Sophie Barat (top)
 Interior: Saint Peter's Basilica looking West towards the Altar
 Detail: View of the head of the Virgin
 Detail: View of drapery of the Virgin's robes
 Interior: Mosaic Detail, Martyrdom of the Seven Maccabee Brothers
 Interior: View in situ
 Interior: View in situ, Detail
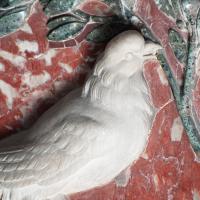 Interior Detail: Carving of dove holding an olive branch adjacent to the Chapel of Saint Sebastian
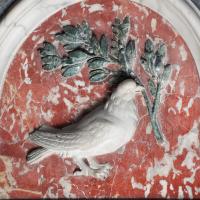 Interior Detail: Carving of dove holding an olive branch adjacent to the Chapel of Saint Sebastian
 Interior: Marble Flooring, Detail
 Interior: Marble Flooring, Detail
 Interior: Marble Flooring, Detail
 Interior: Marble Flooring, Detail
 Interior: Marble Flooring, Detail
 Interior: Marble Flooring, Detail
 Interior: Marble Flooring, Detail
 Interior: Marble Flooring with a Metal Grate, Detail
 Interior: Installation View
 from the right side") Detail: Installation View, Right Side
Detail: Installation View, Right Side from the left side") Detail: Installation View, Left Side
Detail: Installation View, Left Side by Bernini in the Apse of the Basilica") Interior: Cathedra Petri in the Apse of the Basilica
Interior: Cathedra Petri in the Apse of the Basilica") Detail: Installation View
Detail: Installation View Detail: Baldachin top with the mosaic of Saint John the Evangelist in the Background
 Detail: top
 Detail: Figure on the top
 Detail: Figure on the top
 Detail: Column Base
 Detail: Column Base
 Detail: Figure on the top
 Interior: Detail of 18th century mosaic copy after Andrea Sacchi (1599–1661)
 Interior: Painting Detail, Figure Crucified