View of the Forum Romanum near Basilica Aemilia, looking north
View on Via Sacra, looking northwest
View on Via Sacra, looking north
View on Via Sacra, looking west
View of fragments in the Roman Forum
View of fragments in the Roman Forum, looking towards the Palatine Hill
View of fragments in the Roman Forum, looking towards the Palatine Hill
View of fragments in the Roman Forum, looking towards the Palatine Hill
View on Via Sacra, looking northwest
View of fragments along Via Sacra, looking south
View of columns in the Roman Forum
View of the Roman Forum, looking west
View of a fragment of a Corinthian Capital in the Roman Forum
View of fragments of Corinthian Capitals in the Roman Forum
View of a fragment of a column with a coat of arms in the Roman Forum
View of fragments in the Roman Forum, looking towards the Palatine Hill
View of a fragment of a coffer with a rosette in the Roman Forum
View of fragments in the Roman Forum
View of fragments in the Roman Forum
Exterior: North End of the Palatine Hill, near Arch of Titus
Exterior: North End of the Palatine Hill, across Basilica of Maxentius, or NE corner of farnese gardens
Exterior: North End of the Palatine Hill, across Basilica of Maxentius, or NE corner of farnese gardens
Exterior: View from North Edge of Palatine
Exterior: View from North Edge of Palatine
View of the best preserved column in front of the Temple of Romulus
View of the best preserved column in front of the Temple of Romulus and the temple in the background
View of the columns in front of the Temple of Romulus and the cupola
View of statue bases in front of the Temple of Romulus
View of a wall with arches next to the Temple of Romulus
View of a wall and roof next to the Temple of Romulus
View of the southeast corner of the Temple of Romulus
View of the wall to the right of the entrance of the Temple of Romulus
View of the architrave over the Temple of Romulus
View of a well near the Temple of Romulus
View of the area to the left of the Temple of Romulus
View of the area to the left of the Temple of Romulus
View of the right Corinthian Capital of the Temple of Romulus
View of the right portion of the architrave of the Temple of Romulus
View of the left Corinthian Capital of the Temple of Romulus
View of the left portion of the architrave of the Temple of Romulus
View of the doors of the Temple of Romulus
View of the colonnade east of the Temple of Romulus
View of the southeast corner of the Temple of Romulus
View of the southeast corner of the Temple of Romulus
View of the southeast corner of the Temple of Romulus
View of the facade of the Temple of Romulus
View of the columns to the right of the Temple of Romulus
View of the Temple of Romulus from the west
View of the facade of the Temple of Romulus
View of the Temple of Romulus from the west
View of the Temple of Romulus from the west
View of the architrave of the Temple of Romulus from the west
View of the architrave of the Temple of Romulus from the west
View of the right Corinthian Capital of the Temple of Romulus
View of the left Corinthian Capital of the Temple of Romulus
View of the Corinthian Capitals in front of the Temple of Romulus
View of the architrave of the Temple of Romulus
View of the architrave of the Temple of Romulus
View of the architrave of the Temple of Romulus
View of the doors of the Temple of Romulus
View of the doors of the Temple of Romulus
View of one of the columns of the Temple of Romulus
View of one of the Corinthian Capitals of the Temple of Romulus
View of one of the Corinthian Capitals of the Temple of Romulus
View of the Temple of Romulus from the east
View of the Temple of Romulus from the east
View of a wall with arches next to the Temple of Romulus
View of the Temple of Romulus from the west
View of the Corinthian Capitals of the Temple of Romulus
View of the Temple of Romulus from the west
View of the Temple of Romulus from the west
View of the Temple of Romulus from the west
View of the Temple of Romulus from the west
View along the facade of the Temple of Romulus
View of the western face
View of the western face
Detail: View of an inscribed base in front of the Arch of Septimius Severus (Arco di Settimio Severo)
View of the western face
Detail: View of the carved ornament over the center of the western face
Detail: View of a victory with a trophy on the left Spandrel of the western face
Detail: View of a victory with a trophy on the right Spandrel of the western face
Detail: View of the right relief panel of the western face which depicts Romans fighting Osroenes
Detail: View of the right relief panel of the western face which depicts Romans fighting Osroenes
View of the western face
Detail: View of captive Parthians on the base of a column
View of a relief of a Mounted Warrior on a fragment in front of the Arch of Septimius Severus (Arco di Settimio Severo)
Detail: View of the right relief panel of the western face which depicts Romans fighting Osroenes
Detail: View of captive Parthians on the base of a columns
Detail: View of the right relief panel of the eastern face which depicts Romans attacking Ctesiphon
View of the eastern face
Detail: View of the left relief panel of the eastern face which depicts Romans attacking Seleucia
View of the eastern face
View parallel to the eastern face
View of the eastern face
View of the western face
View of the western face
View of the western face
View of the eastern face
View of the eastern face
View from the south
View of the carved ornaments on top
View of the western face
View of the three remaining columns of the Temple of Castor and Pollux from the northeast
View of the three remaining columns of the Temple of Castor and Pollux from the east
View of the three remaining columns of the Temple of Castor and Pollux from the northeast
View of the three remaining columns of the Temple of Castor and Pollux from the northwest
View of the northernmost capital of the Temple of Castor and Pollux
View of the central capital of the Temple of Castor and Pollux
View of the southernmost capital of the Temple of Castor and Pollux
View of the capitals of the Temple of Castor and Pollux
View of the capitals of the Temple of Castor and Pollux
View of the northernmost capital of the Temple of Castor and Pollux
View of the three remaining columns of the Temple of Castor and Pollux from the northeast
View of the three remaining columns of the Temple of Castor and Pollux from the northeast
View of the base of the three remaining columns of the Temple of Castor and Pollux
View of the Temple from the west
View of the Temple from the northwest
View of the Temple from the northwest
View of the Temple from the northwest
View of the Temple from the northwest
View of the Temple from the northwest
View of the Temple from the northwest
View of the Temple from the northwest
View of the Temple from the northwest
View of the Temple from the northwest
Exterior: View from NW
Exterior: View from SW
Detail: View of the lower cornice
Detail: View of the lower cornice
Detail: View of the lower cornice
Detail: View of the Attic
Detail: View of a relief panel depicting the Emperor in a triumphal procession from the south pier
Detail: View of carved coffering on the underside
Detail: View of a relief panel depicting the Emperor in a triumphal procession from the south pier
Detail: View of a relief panel depicting the Emperor in a triumphal procession from the south pier
Detail: View of central relief sculpture depicting the Emperor and an eagle on the underside
Detail: View of central relief sculpture depicting the Emperor and an eagle on the underside
Detail: View of a relief panel depicting the Emperor in a triumphal procession from the south pier
Detail: View of the underside
Detail: View of the underside
Detail: View of a Capital
Detail: View of a Capital
Detail: View of a Capital
Detail: View of a Capital
Detail: View of carved ornamentation under a relief panel
Detail: View of a relief panel depicting the Emperor in a triumphal procession from the south pier
Detail: View of a relief panel depicting the spoils from the sack of Jerusalem on the north pier
Detail: View of a relief panel depicting the spoils from the sack of Jerusalem on the north pier
Detail: View of the Menorah from a relief panel depicting the spoils from the sack of Jerusalem on the north pier
Detail: View of a relief panel depicting the spoils from the sack of Jerusalem on the north pier
Detail: View of carved ornamentation next to a relief panel depicting the spoils from the sack of Jerusalem on the north pier
Detail: View of carved coffering on the underside
Detail: View of a frame from the western face of south pier
Detail: View of the western face of the south pier
Detail: View of the lower cornice
Detail: View of the lower cornice
Detail: View of a Victory in a Spandrel
Detail: View of a Victory in a Spandrel
Detail: View of the Keystone Decoration
Detail: View of the Keystone Decoration
Detail: View of central relief sculpture depicting the Emperor and an eagle on the underside
Detail: View of a relief panel depicting the spoils from the sack of Jerusalem on the north pier
Detail: View of a relief panel depicting the spoils from the sack of Jerusalem on the north pier
Detail: View of a Victory in a Spandrel
Detail: View of the Lower Cornice and Attic Inscription
View of the East Face and the coffering on the underside
Detail: View of the Lower Cornice on the East Face
Detail: View of a Column Capital on the East Face
Detail: View of a Column Capital on the East Face
Detail: View of Graffiti
Detail: View of a relief panel depicting the Emperor in a Triumphal Procession from the south pier
Detail: View of a relief panel depicting the Emperor in a Triumphal Procession from the south pier
Detail: View of a relief panel depicting the Emperor in a Triumphal Procession from the south pier
Detail: View of a relief panel depicting the Emperor in a Triumphal Procession from the south pier
Detail: View of the Attic Inscription
Detail: View of the Eastern face and Attic Inscription
Detail: View of the Eastern face and Attic Inscription
Detail: View of the Figural Frieze on the Eastern face
Detail: View of the Figural Frieze on the Eastern face
Detail: View of the Figural Frieze on the Eastern face
Detail: View of the Figural Frieze on the Eastern face
Detail: View of the Figural Frieze on the Eastern face
View from the South
View from the East
View from the East
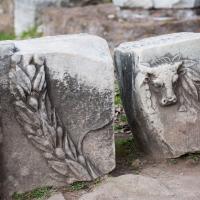
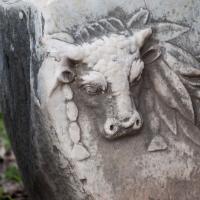
View of Fragments of Carved Ornament with a Garland and Cow Head
View of Fragments of Carved Ornament with a Garland and Cow Head
View of a Fragment of Entablature
View of Carved Fragments that look to be a Capital and Architrave
View of a Carved Fragment that looks to be a coffered Ceiling
View of the remains of the Temple of Vesta
View of a Headless Statue of a Vestal Virgin
View of a Carved Fragment
View of a Statue of a Vestal Virgin on an Inscribed Base
View of a Fragment of a Column
View of a headless Statue of a Vestal Virgin
View of an Inscribed Statue Base of a Vestal Virgin with Fragments of her feet
View of the Courtyard of the House of the Vestal Virgins
View of the Courtyard of the House of the Vestal Virgins
View of Fragmentary Entablature in the Atrium Vestae