Baldacchino di San Pietro
Detail: top
Baldacchino di San Pietro
Detail: Figure on the top
Baldacchino di San Pietro
Detail: Figure on the top
Baldacchino di San Pietro
Detail: Column Base
Baldacchino di San Pietro
Detail: Column Base
Baldacchino di San Pietro
Detail: Figure on the top
Interior: Detail of 18th century mosaic copy after Andrea Sacchi (1599–1661)
Basilica di San Pietro in Vaticano
Interior: Painting Detail, Figure Crucified
Basilica di San Pietro in Vaticano
Interior: Bronze Figural Scene, Detail
Basilica di San Pietro in Vaticano
Interior: Bronze Relief, Detail
Basilica di San Pietro in Vaticano
Interior: Bronze Relief, Detail
Obelisco Vaticano
Exterior: Obelisk Base
San Paolo
Exterior: Statua di San Paolo, Frontal view from East
San Pietro
Exterior: Statua di San Pietro Frontal view, in front of the Basilica
San Pietro
Detail: Statua di San Pietro
San Pietro
Exterior: Statua di San Pietro Frontal view
San Pietro
Detail: Base
Basilica di San Pietro in Vaticano
Exterior: Facade Detail, South Clock
Oltremontano
Exterior: South Clock Detail
Oltremontano
Exterior: South Clock Detail
Oltremontano
Exterior: South Clock Detail
Basilica di San Pietro in Vaticano
Detail: Corinthian Capital
Basilica di San Pietro in Vaticano
Detail: Small pediment
Basilica di San Pietro in Vaticano
Detail: Small niche
Obelisco Vaticano
Detail: Obelisk top
Obelisco Vaticano
Detail: Obelisk top
Obelisco Vaticano
Detail: Obelisk base
Obelisco Vaticano
Detail: Obelisk base
Hispanic Society of America
Interior View of Main Gallery
Hispanic Society of America
Interior View of Main Gallery
Hispanic Society of America
Interior View of Main Gallery, East
Hispanic Society of America
Interior View of Main Gallery, West
Hispanic Society of America
Interior View of Main Gallery, Corridor
Hispanic Society of America
Interior View of Main Gallery, Corridor
Hispanic Society of America
View of Sorolla Gallery
Hispanic Society of America
Interior View, Main Gallery, Corridor
Hispanic Society of America
View of Reading Room
Hispanic Society of America
Interior View of Mezzanine, East
Hispanic Society of America
Interior View of Mezzanine, North
Hispanic Society of America
Interior View of Mezzanine, West
Hispanic Society of America
Interior View of Upper Foyer
Hispanic Society of America
Interior View of Upper Foyer, Landing
Tomb of Commander Neknam Khan
Exterior: Western facade of the tomb of commander Neknam Khan, view of the twin-domes of the Hakims (physicians) across
Tomb of Commander Neknam Khan
Exterior: Southern facade
Tomb of Fatima Sultana
Exterior: Western facade ot the tomb of Fatima Sultana, view of the tomb of Sultan Muhammad Qutb Shah across
Tomb of Fatima Sultana
Exterior: Southern facade (southern tomb entrance)
Tomb of Fatima Sultana
Interior: view of the graves within
Tomb of Fatima Sultana
Exterior: Eastern facade (eastern tomb entrance), view of the unfinished tomb of Abul Hasan Tana Shah outside the walls
Tomb of Fatima Sultana
Exterior: Northern facade of the tomb of Fatima Sultana, view of the tomb of Hyath Bakshi Begum opposite
Tomb of Fatima Sultana
Exterior: Western facade with qibla
Tomb of Fatima Sultana
Exterior: Qibla
Tomb of Hyath Bakshi Begum
Exterior: Southern facade
Tomb of Hyath Bakshi Begum
Exterior: Eastern facade
Tomb of Hyath Bakshi Begum
Exterior: Western facade and view of adjacent mosque
Tomb of Hyath Bakshi Begum
Exterior: Western facade and view of adjacent mosque
Tomb of Hyath Bakshi Begum
Interior
Tomb of Hyath Bakshi Begum
Interior
Tomb of Hyath Bakshi Begum
Exterior: Northern and western facade of tomb, interior of adjacent mosque
Tomb of Ibrahim Qutb Shah
Exterior: Eastern facade of the tomb of Ibrahim Qutb Shah, view of the tomb of Muhammad Quli Qutb Shah on right
Tomb of Ibrahim Qutb Shah
Interior
Tomb of Muhammad Quli Qutb Shah
Exterior: Northern facade
Tomb of Muhammad Quli Qutb Shah
Exterior: Western facade entrance, view of the tomb of Ibrahim Qutb Shah on right
Tomb of Muhammad Quli Qutb Shah
Exterior: Southern facade entrance, view of the tomb of Ibrahim Qutb Shah to the southwest
Tomb of Muhammad Quli Qutb Shah
Interior
Tomb of Muhammad Quli Qutb Shah
Exterior: Eastern facade
Tomb of Muhammad Qutb Shah
Exterior: Eastern facade of the tomb of Muhammad Qutb Shah, the tomb of Fatima Sultana across
Tomb of Muhammad Qutb Shah
Exterior: Northern facade of the tomb of Muhammad Qutb Shah, view of the tombs of Taramati and Pemmati across on left
Tomb of Muhammad Qutb Shah
Exterior: Western facade of the tomb of Muhammad Qutb Shah, view of the tombs of Taramati and Pemmati on left
Tomb of Muhammad Qutb Shah
Exterior: Southern facade
Tomb of Muhammad Qutb Shah
Interior: View of archways
Tomb of Muhammad Qutb Shah
Interior
Tomb of Pemmati
Exterior: Eastern facade (eastern tomb entrance)
Tomb of Muhammad Qutb Shah
Exterior wall qibla
Tomb of Muhammad Qutb Shah
Interior of exterior wall qibla
Royal Mortuary Baths
Inner courtyard
Royal Mortuary Baths
Interior
Royal Mortuary Baths
Interior: View of archways
Tomb of Taramati
Interior
Tomb of Taramati
Exterior: Eastern facade of the tomb of Taramati, view of the western facade of the tomb of Pemmati on opposite
Twin-domes of the Hakims
Exterior western facade
Twin-domes of the Hakims
Interior mid-point between twin-domes
Twin-domes of the Hakims
Interior
Twin-domes of the Hakims
Interior
Saranrom Park
View of a modern shrine
Saranrom Park
Detail of palm tree fruit
Saranrom Park
Detail of palm tree fruit
Saranrom Park
Detail of palm tree fruit
Saranrom Park
Detail of the Chao Mae Takhian Thong Shrine
Saranrom Park
Detail of the Chao Mae Takhian Thong Shrine
Saranrom Park
View of a model of a traditional Thai teak house
View of a shrine
View of a wooden panel with a painting of a bird
View of a wooden panel with a painting of a bird
View of a wooden panel with painting of flowers
View of a shrine
Wat Pho
Street view of Wat Pho
Wat Pho
Street view of Wat Pho
Street view of shopfronts
Wat Ratchabophit
Image of watchman at the front entrance
Wat Ratchabophit
View of façade
Wat Ratchabophit
Exterior
Wat Ratchabophit
View of the chedi
Wat Ratchabophit
View of the chedi
Wat Ratchabophit
View of façade
Wat Ratchabophit
Detail of façade, view of a monk
Wat Ratchabophit
Oblique view of façade
Wat Ratchabophit
View of the complex and the chedi
Wat Ratchabophit
Detail
Wat Ratchabophit
Detail
Wat Ratchabophit
Detail
Wat Ratchabophit
View of the ubosot, or ordination hall, in Gothic revival style
Wat Ratchabophit
Detail of the ubosot, or ordination hall
Wat Ratchabophit
Detail of the ubosot, or ordination hall
Wat Ratchabophit
Detail of the ubosot, or ordination hall
Wat Ratchabophit
Detail of the ubosot, or ordination hall
Wat Ratchabophit
Detail of the ubosot, or ordination hall
Wat Ratchabophit
Detail of the ubosot, or ordination hall
Wat Ratchabophit
Detail of entrance
Wat Ratchabophit
Detail of entrance
Wat Ratchabophit
Detail of entrance
Wat Ratchabophit
Detail of a shrine
Wat Ratchabophit
Detail of a shrine
Wat Ratchabophit
View of the royal cemetery
Wat Ratchabophit
View of the royal cemetery
Wat Ratchabophit
View of the royal cemetery
Wat Ratchabophit
View of the royal cemetery
Wat Ratchabophit
View of the royal cemetery
Wat Arun
View of the prang, or spire
Wat Pho
Detail of the Reclining Buddha
Wat Pho
Detail of the Reclining Buddha
Wat Pho
Detail of the Reclining Buddha, seen through vihara pillars
Wat Pho
Detail of the Reclining Buddha, seen through vihara pillars
Wat Pho
Detail of the Reclining Buddha
Wat Pho
Detail of the Reclining Buddha
Wat Pho
Detail of the Reclining Buddha
Wat Pho
Detail of the Reclining Buddha
Wat Pho
Detail of the Reclining Buddha and column
Wat Pho
Detail of the Reclining Buddha and column
Wat Pho
Detail of the Reclining Buddha and column
Wat Pho
Detail of the Reclining Buddha and column
Wat Pho
Detail of the Reclining Buddha
Wat Pho
Interior
Wat Pho
Interior
Wat Pho
Detail of the Reclining Buddha
Wat Pho
Detail of the Reclining Buddha
Wat Pho
Detail of the Reclining Buddha
Wat Pho
Detail of the Reclining Buddha with view of the mural in the backdrop
Wat Pho
Detail of the Reclining Buddha with view of the mural in the backdrop
Wat Pho
Detail of the Reclining Buddha with view of the mural in the backdrop
Wat Pho
Detail of the Reclining Buddha
Wat Pho
Detail of the Reclining Buddha
Wat Pho
Detail of the Reclining Buddha
Wat Pho
Detail of the Reclining Buddha and the sculptural base
Wat Pho
Detail of the Reclining Buddha and the sculptural base
Wat Pho
Detail of the Reclining Buddha and the sculptural base
Wat Pho
Detail of Buddha's feet
Wat Pho
Detail of Buddha's feet
Wat Pho
Detail of Buddha's feet
Wat Pho
Detail of Buddha's feet
Wat Pho
Detail of the Reclining Buddha's feet from the back showing the 108 Auspicious Symbols, and view of murals behind the sculpture
Wat Pho
Detail of the Reclining Buddha's feet from the back showing the 108 Auspicious Symbols
Wat Pho
Detail of the Reclining Buddha's feet from the back showing the 108 Auspicious Symbols
Wat Pho
Detail of the Reclining Buddha's feet from the back showing the 108 Auspicious Symbols
Wat Pho
Detail of the Reclining Buddha's feet from the back showing the 108 Auspicious Symbols
Wat Pho
Detail of the Reclining Buddha's feet from the back showing the 108 Auspicious Symbols
Wat Pho
Detail of the Reclining Buddha's feet from the back showing the 108 Auspicious Symbols
Wat Pho
Detail of the Reclining Buddha's feet from the back showing the 108 Auspicious Symbols
Wat Pho
Detail of the Reclining Buddha's feet from the back showing the 108 Auspicious Symbols
Wat Pho
Detail of the Reclining Buddha's feet from the back showing the 108 Auspicious Symbols
Wat Pho
Detail of the Reclining Buddha from the back with view of cushions
Wat Pho
Detail of the Reclining Buddha from the back with view of cushions
Wat Pho
Detail of the Reclining Buddha from the back with view of cushions
Wat Pho
Detail of the Reclining Buddha's curls and cushion from the back
Wat Pho
Detail of the Reclining Buddha from the back with view of cushions
Wat Pho
Detail of the Reclining Buddha from the back with view of cushions
Wat Pho
Detail of the Reclining Buddha from the back with view of cushions
Wat Pho
Detail of the Reclining Buddha from the back with view of cushions
Wat Pho
Detail of the Reclining Buddha from the back with view of cushions
Wat Pho
Detail of the Reclining Buddha from the back with view of cushions
Wat Pho
Detail of the Reclining Buddha from the back with view of cushions
Wat Pho
Detail of the Reclining Buddha from the back with view of cushions, and the ceiling above
Wat Pho
Detail of the Reclining Buddha from the back with view of a mural
Wat Pho
View of a mural in front of the Reclining Buddha, seen from behind the sculpture
Wat Pho
View of the vihara door and the mural above it, seen from behind the Reclining Buddha
Wat Pho
Detail of the Reclining Buddha from the back
Wat Pho
Detail of the Reclining Buddha's hand and ushnisha
Wat Pho
Detail of the Reclining Buddha's hand and curls
Wat Pho
View of Phra Chedi Rai
Wat Pho
View of Phra Chedi Rai
Wat Pho
View of Phra Chedi Rai
Wat Pho
View of Phra Chedi Rai
Wat Pho
View of Phra Chedi Rai
Wat Pho
Site map of Wat Pho
Wat Pho
View of Phra Buddha Palili
Wat Pho
View of Phra Chedi Rai
Wat Pho
View of Phra Chedi Rai
Wat Pho
Wat Pho
View of a yantra, or a stone slab with Thai inscriptions
Wat Pho
Detail of a yantra, or a stone slab with Thai inscriptions
Wat Pho
View of the courtyard with a guardian figure, sculptures, and a row of Buddhas in the colonnade
 Baldacchino di San PietroDetail: top
 Baldacchino di San PietroDetail: Figure on the top
 Baldacchino di San PietroDetail: Figure on the top
 Baldacchino di San PietroDetail: Column Base
 Baldacchino di San PietroDetail: Column Base
 Baldacchino di San PietroDetail: Figure on the top
 Interior: Detail of 18th century mosaic copy after Andrea Sacchi (1599–1661)
 Basilica di San Pietro in VaticanoInterior: Painting Detail, Figure Crucified
 Basilica di San Pietro in VaticanoInterior: Bronze Figural Scene, Detail
 Basilica di San Pietro in VaticanoInterior: Bronze Relief, Detail
 Basilica di San Pietro in VaticanoInterior: Bronze Relief, Detail
 Obelisco VaticanoExterior: Obelisk Base
 San PaoloExterior: Statua di San Paolo, Frontal view from East
 San PietroExterior: Statua di San Pietro Frontal view, in front of the Basilica
 San PietroDetail: Statua di San Pietro
 San PietroExterior: Statua di San Pietro Frontal view
 San PietroDetail: Base
 Basilica di San Pietro in VaticanoExterior: Facade Detail, South Clock
 OltremontanoExterior: South Clock Detail
 OltremontanoExterior: South Clock Detail
 OltremontanoExterior: South Clock Detail
 Basilica di San Pietro in VaticanoDetail: Corinthian Capital
 Basilica di San Pietro in VaticanoDetail: Small pediment
 Basilica di San Pietro in VaticanoDetail: Small niche
 Obelisco VaticanoDetail: Obelisk top
 Obelisco VaticanoDetail: Obelisk top
 Obelisco VaticanoDetail: Obelisk base
 Obelisco VaticanoDetail: Obelisk base
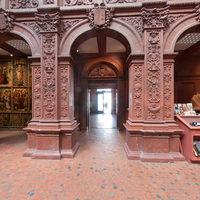 Hispanic Society of AmericaInterior View of Main Gallery
 Hispanic Society of AmericaInterior View of Main Gallery
 Hispanic Society of AmericaInterior View of Main Gallery, East
 Hispanic Society of AmericaInterior View of Main Gallery, West
 Hispanic Society of AmericaInterior View of Main Gallery, Corridor
 Hispanic Society of AmericaInterior View of Main Gallery, Corridor
 Hispanic Society of AmericaView of Sorolla Gallery
 Hispanic Society of AmericaInterior View, Main Gallery, Corridor
 Hispanic Society of AmericaView of Reading Room
 Hispanic Society of AmericaInterior View of Mezzanine, East
 Hispanic Society of AmericaInterior View of Mezzanine, North
 Hispanic Society of AmericaInterior View of Mezzanine, West
 Hispanic Society of AmericaInterior View of Upper Foyer
 Hispanic Society of AmericaInterior View of Upper Foyer, Landing
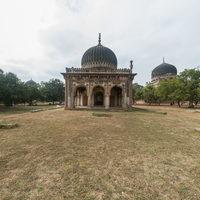 Tomb of Commander Neknam KhanExterior: Western facade of the tomb of commander Neknam Khan, view of the twin-domes of the Hakims (physicians) across
 Tomb of Commander Neknam KhanExterior: Southern facade
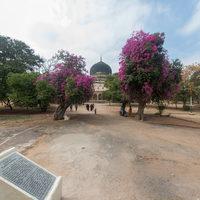 Tomb of Fatima SultanaExterior: Western facade ot the tomb of Fatima Sultana, view of the tomb of Sultan Muhammad Qutb Shah across
") Tomb of Fatima SultanaExterior: Southern facade (southern tomb entrance)
Tomb of Fatima SultanaExterior: Southern facade (southern tomb entrance) Tomb of Fatima SultanaInterior: view of the graves within
") Tomb of Fatima SultanaExterior: Eastern facade (eastern tomb entrance), view of the unfinished tomb of Abul Hasan Tana Shah outside the walls
Tomb of Fatima SultanaExterior: Eastern facade (eastern tomb entrance), view of the unfinished tomb of Abul Hasan Tana Shah outside the walls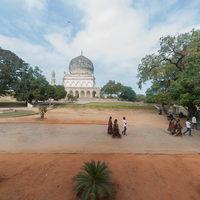 Tomb of Fatima SultanaExterior: Northern facade of the tomb of Fatima Sultana, view of the tomb of Hyath Bakshi Begum opposite
 Tomb of Fatima SultanaExterior: Western facade with qibla
 Tomb of Fatima SultanaExterior: Qibla
 Tomb of Hyath Bakshi BegumExterior: Southern facade
 Tomb of Hyath Bakshi BegumExterior: Eastern facade
 Tomb of Hyath Bakshi BegumExterior: Western facade and view of adjacent mosque
 Tomb of Hyath Bakshi BegumExterior: Western facade and view of adjacent mosque
 Tomb of Hyath Bakshi BegumInterior
 Tomb of Hyath Bakshi BegumInterior
 Tomb of Hyath Bakshi BegumExterior: Northern and western facade of tomb, interior of adjacent mosque
 Tomb of Ibrahim Qutb ShahExterior: Eastern facade of the tomb of Ibrahim Qutb Shah, view of the tomb of Muhammad Quli Qutb Shah on right
 Tomb of Ibrahim Qutb ShahInterior
 Tomb of Muhammad Quli Qutb ShahExterior: Northern facade
 Tomb of Muhammad Quli Qutb ShahExterior: Western facade entrance, view of the tomb of Ibrahim Qutb Shah on right
 Tomb of Muhammad Quli Qutb ShahExterior: Southern facade entrance, view of the tomb of Ibrahim Qutb Shah to the southwest
 Tomb of Muhammad Quli Qutb ShahInterior
 Tomb of Muhammad Quli Qutb ShahExterior: Eastern facade
 Tomb of Muhammad Qutb ShahExterior: Eastern facade of the tomb of Muhammad Qutb Shah, the tomb of Fatima Sultana across
 Tomb of Muhammad Qutb ShahExterior: Northern facade of the tomb of Muhammad Qutb Shah, view of the tombs of Taramati and Pemmati across on left
 Tomb of Muhammad Qutb ShahExterior: Western facade of the tomb of Muhammad Qutb Shah, view of the tombs of Taramati and Pemmati on left
 Tomb of Muhammad Qutb ShahExterior: Southern facade
 Tomb of Muhammad Qutb ShahInterior: View of archways
 Tomb of Muhammad Qutb ShahInterior
 Tomb of PemmatiExterior: Eastern facade (eastern tomb entrance)
 Tomb of Muhammad Qutb ShahExterior wall qibla
 Tomb of Muhammad Qutb ShahInterior of exterior wall qibla
 Royal Mortuary BathsInner courtyard
 Royal Mortuary BathsInterior
 Royal Mortuary BathsInterior: View of archways
 Tomb of TaramatiInterior
 Tomb of TaramatiExterior: Eastern facade of the tomb of Taramati, view of the western facade of the tomb of Pemmati on opposite
 - Exterior western facade") Twin-domes of the HakimsExterior western facade
Twin-domes of the HakimsExterior western facade - Interior mid-point between twin-domes") Twin-domes of the HakimsInterior mid-point between twin-domes
Twin-domes of the HakimsInterior mid-point between twin-domes - Interior") Twin-domes of the HakimsInterior
Twin-domes of the HakimsInterior - Interior") Twin-domes of the HakimsInterior
Twin-domes of the HakimsInterior Saranrom ParkView of a modern shrine
 Saranrom ParkDetail of palm tree fruit
 Saranrom ParkDetail of palm tree fruit
 Saranrom ParkDetail of palm tree fruit
 Saranrom ParkDetail of the Chao Mae Takhian Thong Shrine
 Saranrom ParkDetail of the Chao Mae Takhian Thong Shrine
 Saranrom ParkView of a model of a traditional Thai teak house
 View of a shrine
 View of a wooden panel with a painting of a bird
 View of a wooden panel with a painting of a bird
 View of a wooden panel with painting of flowers
 View of a shrine
 Wat PhoStreet view of Wat Pho
 Wat PhoStreet view of Wat Pho
 Street view of shopfronts
 Wat RatchabophitImage of watchman at the front entrance
 Wat RatchabophitView of façade
 Wat RatchabophitExterior
 Wat RatchabophitView of the chedi
 Wat RatchabophitView of the chedi
 Wat RatchabophitView of façade
 Wat RatchabophitDetail of façade, view of a monk
 Wat RatchabophitOblique view of façade
 Wat RatchabophitView of the complex and the chedi
 Wat RatchabophitDetail
 Wat RatchabophitDetail
 Wat RatchabophitDetail
 Wat RatchabophitView of the ubosot, or ordination hall, in Gothic revival style
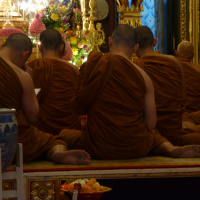 Wat RatchabophitDetail of the ubosot, or ordination hall
 Wat RatchabophitDetail of the ubosot, or ordination hall
 Wat RatchabophitDetail of the ubosot, or ordination hall
 Wat RatchabophitDetail of the ubosot, or ordination hall
 Wat RatchabophitDetail of the ubosot, or ordination hall
 Wat RatchabophitDetail of the ubosot, or ordination hall
 Wat RatchabophitDetail of entrance
 Wat RatchabophitDetail of entrance
 Wat RatchabophitDetail of entrance
 Wat RatchabophitDetail of a shrine
 Wat RatchabophitDetail of a shrine
 Wat RatchabophitView of the royal cemetery
 Wat RatchabophitView of the royal cemetery
 Wat RatchabophitView of the royal cemetery
 Wat RatchabophitView of the royal cemetery
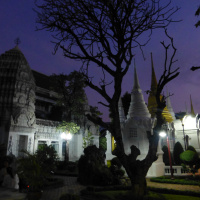 Wat RatchabophitView of the royal cemetery
 Wat ArunView of the prang, or spire
 Wat PhoDetail of the Reclining Buddha
 Wat PhoDetail of the Reclining Buddha
 Wat PhoDetail of the Reclining Buddha, seen through vihara pillars
 Wat PhoDetail of the Reclining Buddha, seen through vihara pillars
 Wat PhoDetail of the Reclining Buddha
 Wat PhoDetail of the Reclining Buddha
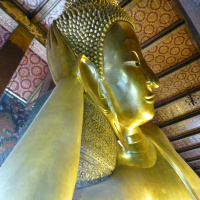 Wat PhoDetail of the Reclining Buddha
 Wat PhoDetail of the Reclining Buddha
 Wat PhoDetail of the Reclining Buddha and column
 Wat PhoDetail of the Reclining Buddha and column
 Wat PhoDetail of the Reclining Buddha and column
 Wat PhoDetail of the Reclining Buddha and column
 Wat PhoDetail of the Reclining Buddha
 Wat PhoInterior
 Wat PhoInterior
 Wat PhoDetail of the Reclining Buddha
 Wat PhoDetail of the Reclining Buddha
 Wat PhoDetail of the Reclining Buddha
 Wat PhoDetail of the Reclining Buddha with view of the mural in the backdrop
 Wat PhoDetail of the Reclining Buddha with view of the mural in the backdrop
 Wat PhoDetail of the Reclining Buddha with view of the mural in the backdrop
 Wat PhoDetail of the Reclining Buddha
 Wat PhoDetail of the Reclining Buddha
 Wat PhoDetail of the Reclining Buddha
 Wat PhoDetail of the Reclining Buddha and the sculptural base
 Wat PhoDetail of the Reclining Buddha and the sculptural base
 Wat PhoDetail of the Reclining Buddha and the sculptural base
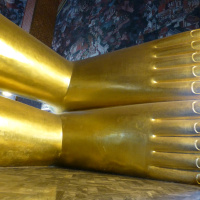 Wat PhoDetail of Buddha's feet
 Wat PhoDetail of Buddha's feet
 Wat PhoDetail of Buddha's feet
 Wat PhoDetail of Buddha's feet
 Wat PhoDetail of the Reclining Buddha's feet from the back showing the 108 Auspicious Symbols, and view of murals behind the sculpture
 Wat PhoDetail of the Reclining Buddha's feet from the back showing the 108 Auspicious Symbols
 Wat PhoDetail of the Reclining Buddha's feet from the back showing the 108 Auspicious Symbols
 Wat PhoDetail of the Reclining Buddha's feet from the back showing the 108 Auspicious Symbols
 Wat PhoDetail of the Reclining Buddha's feet from the back showing the 108 Auspicious Symbols
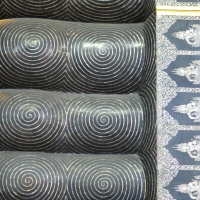 Wat PhoDetail of the Reclining Buddha's feet from the back showing the 108 Auspicious Symbols
 Wat PhoDetail of the Reclining Buddha's feet from the back showing the 108 Auspicious Symbols
 Wat PhoDetail of the Reclining Buddha's feet from the back showing the 108 Auspicious Symbols
 Wat PhoDetail of the Reclining Buddha's feet from the back showing the 108 Auspicious Symbols
 Wat PhoDetail of the Reclining Buddha's feet from the back showing the 108 Auspicious Symbols
 Wat PhoDetail of the Reclining Buddha from the back with view of cushions
 Wat PhoDetail of the Reclining Buddha from the back with view of cushions
 Wat PhoDetail of the Reclining Buddha from the back with view of cushions
 Wat PhoDetail of the Reclining Buddha's curls and cushion from the back
 Wat PhoDetail of the Reclining Buddha from the back with view of cushions
 Wat PhoDetail of the Reclining Buddha from the back with view of cushions
 Wat PhoDetail of the Reclining Buddha from the back with view of cushions
 Wat PhoDetail of the Reclining Buddha from the back with view of cushions
 Wat PhoDetail of the Reclining Buddha from the back with view of cushions
 Wat PhoDetail of the Reclining Buddha from the back with view of cushions
 Wat PhoDetail of the Reclining Buddha from the back with view of cushions
 Wat PhoDetail of the Reclining Buddha from the back with view of cushions, and the ceiling above
 Wat PhoDetail of the Reclining Buddha from the back with view of a mural
 Wat PhoView of a mural in front of the Reclining Buddha, seen from behind the sculpture
 Wat PhoView of the vihara door and the mural above it, seen from behind the Reclining Buddha
 Wat PhoDetail of the Reclining Buddha from the back
 Wat PhoDetail of the Reclining Buddha's hand and ushnisha
 Wat PhoDetail of the Reclining Buddha's hand and curls
 Wat PhoView of Phra Chedi Rai
 Wat PhoView of Phra Chedi Rai
 Wat PhoView of Phra Chedi Rai
 Wat PhoView of Phra Chedi Rai
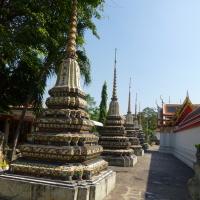 Wat PhoView of Phra Chedi Rai
 Wat PhoSite map of Wat Pho
 Wat PhoView of Phra Buddha Palili
 Wat PhoView of Phra Chedi Rai
 Wat PhoView of Phra Chedi Rai
 Wat Pho
 Wat PhoView of a yantra, or a stone slab with Thai inscriptions
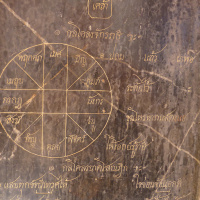 Wat PhoDetail of a yantra, or a stone slab with Thai inscriptions
 Wat PhoView of the courtyard with a guardian figure, sculptures, and a row of Buddhas in the colonnade